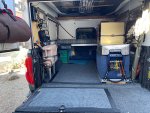
Lets see your mobile on-board house/aux battery set-up's

Chorky

Observer
I know there has been lots of discussion on the topic, but I finally have a direction - after all these years.

After looking at some options, I think I have concluded that no current ready to go system (Jackery, goal zero, or equip mobile battery box) will suit my needs. So I probably will be having to build my own - as much of a pain as that is. After reading several sources (and researching other options in the past for other vehicles I have had) I concluded that a 200ah rating is needed. Even for just a 3 day weekend.

My idea is to have a mobile battery box to house 2 batteries via Anderson connector. Those batteries would be hooked up to a PDC in the bed to power various things like fridge, camp lights, water pump (when not powered by the engine running), air compressor (when not powered by engine running), and maybe charging a phone or two. That PDC would also have wired a DC/DC charger (probably red-arc) so that I could, if desired, switch out battery types if realizing I needed something different. The DC/DC charge indicator circuit (connects to a 'key on, engine on' circuit) would also be wired through a relay of one of the factory aux switches so it would have to be manually powered on, in order to close the circuit that recognizes the 'key on, engine on' signal. This way, batteries could be removed and the DC/DC charger would remain "OFF" since no batteries are connected, and thus electrical charge power is not needed.

So, only the batteries would be 'removable' as the system would essentially be designed to be permanently in the bed. I suppose the system could also be in the cab, but my truck and TJ usually gets upwards of 130 degrees in summer sun on a daily basis..... Not good for batteries.

The need for a mobile system (or mobile batteries) is real considering cold winter temps for 6 months out of the year, so an onboard system of lithium batteries won't work without risking damage to expensive batteries. I would honestly much prefer AGM batteries and just leave them in the bed all the time. However, I think in order to have the battery capacity I need for a 4 day weekend trip once a month, AGM would not last long enough...

So I would love to see other folks current on-board set-up's. I'm really not interested in something like a Jackery or goal zero. Because of their proprietary and integrated circuits they simply won't work for my application and I have seen many people showing real world experiences of those systems simply not working even for a fridge due to the 'start-up' voltages being high and the integrated system shutting down for protection - thus, no working fridge after just a couple hours. No offense to anyone who is successfully using one of those systems.

Curious to see what folks here have success with.
 

Wallygator

Adventurer
I have a battleborn battery in the bed of the truck full time. I had the same concerns about the cold. Contacted battle born and they said no worries. The battery protects itself. An so far this has been the case. It's recharged by a 160w solar panel through a renogy mppt solar charger.

The system has been flawless and will power a fridge 24/7. Have led lighting and run a fan at night in the summer. If I need more power I can add another battery but so far it's been good. Having a solar panel makes all the difference in the world for keeping the batteries happy. Portable or permanent I would recommend including one in your build
 
Last edited:
  • Like
Reactions: WVI

Martinjmpr

Wiffleball Batter
Sounds very similar to my setup which I think I wrote about here:


I keep mine charged with a Renogy 20a DC-DC charger


I've been using this system since 2019 on over 25 camping trips and it has worked on every one.

In addition to the Anderson Connector, the power box also has an SAE harness so I can connect our solar panel (100w) to it when we don't have electric power. Does a good job of keeping the power box charged up as long as we have good sunlight.
 

dstefan

Well-known member
Here’s mine. I’m very happy with it. Works flawlessly. I’d do it again for the portability/ease of removal. That aside, I would not use the National Luna Power Pack for a one vehicle or permanent install.

The linked write up doesnt include that I also wired two Anderson plugs in a ”Y” at the two side hatches and leave that plugged into the power pack for my portable solar unless I remove the battery. Though I don't find much need for the portable solar with the DCDC alternator charging. I also added a bit of 8020 structure and a ratchet strap to hold the box when I added a bench seat over the battery.

Continuing on with electrical . . .

I ran my non-camper 2nd Gen Tacoma with dual Odesseys with my 50qt ARB as the primary draw on the aux battery. Weight management is a big issue for me so wanted LiFePo for weight to amp hour ratio. Plus figured I'd have other other draws in the camper, so a 100 AH Battleborn gives me 3x the AHs for half the weight of my old Odyessy.

Decided on the National Luna DCDC Powerpack (AKA green box). Got some good holiday deals last year, but it may not be the cheapest way to go. I seriously researched the Jackery and others. Lack of good non-solar charging option along with skepticism about Li-ion durability and handing high Phoenix heat as well as the superior amount of amp hours available put me squarely in the Battleborn LiFePo camp. I also don't want to have to install constant rooftop solar if I can avoid it.

View attachment 699692
View attachment 699693
Pro's:
-- Easy to remove (necessary in Phoenix summers where the camper outside can easily get over 120;
-- has 4 50amp Anderson Power Ports (2 for either input or output, 1 for connection to starter battery for charging, 1 for solar input through built in MPPT controller)
-- multiple other USB ports, 12v cigarette ports and 1 Hella port (sometimes called Powerlet), which is higher amp (15 I think) and snaps tight vs normal 12v cigarette ports
-- came with 25 feet of 16mm (~6AWG) cable for the battery connection with fuses and pre-done Anderson plug
-- 25 amp DCDC charger, with Li profile that fits Battleborns
-- MPPT Solar controller
-- On/Off circuit breaker
-- Ports are all pretty easy to switch out can customize, except for the Andersons
-- Year end deal last year included a hardwired monitor, which is pretty useful to watch the solar charging on my portable solar panel when I use it.
-- I could take it out easily and use it in my 4Runner as well
-- I think it's cheaper and/or more versatile than one of the solar generators for the power

Cons:
-- several $100s more expensive than building my own system
-- Stuck with the box configuration. Can't separate components (well, can't do so easily)
-- No inverter as with Jackery's , etc. I used a Victron Phoenix 500amp inverter as you can see in the picture above. Don't really have much heavy duty AC power needs.

Rest of configuration:
I ran the charging cable in a heavy duty loom out the OEM grommets in the Tundra cab bulkhead passenger side and followed the existing P-side electrical lines to the engine bay and starter battery. You can see the cable under the bedrail and then velcro'd to the Bedrug down to the exit in the right corner.
View attachment 699694
My wiring run is kinda long as I'm putting my water cans in the P-side corner to be opposite of the 38 gallon gas tank for weight distribution and didn't want the battery box around the water. Plus, Toyota puts their batteries on the D-side, so I had to add about 8' more 6AWG cable to the supplied cable, but it worked out great.

My camper electrics are in the rear D-side
View attachment 699695
I rive-nutted two bolts on the right side and used a self tapping lathe screw on the left in the corner (where it's too tight for a rivnut) to attach a 1/4" baltic birch panel. Used 8AWG from the battery cable tied under the bedrail to go up to the Bluesea switch box. I really like the Bluesea box. Water resistant with 4 15amp breaker switches. I found a great gasket sealed plastic box on Amazon that the panel fits perfectly into a cutout I made on the lid so I can just open the box for wiring or changes without pulling the panel board. My Maxxair fan goes to one switch, a set of 5 Led lights for the cabin goes to another, the built in 12v port and dual USBs are switched from the top switch (comes that way) and I have one left for future use.

And, it's mounted upside down :oops:. . . I actually did that on purpose to put the USB port up high for an out of the way plug-in for a Luminoodle I have which we attach under the awning at night.

FYI -- Bluesea makes a 6 switch version of this little panel which might be more useful -- gives you 3 more switches than this since there's no 12v or USB on that one.

We've really liked these little lights, which I found on Powerwerx. https://powerwerx.com/pwrbrite-led-light-strip
They draw only milliamps, are clip mounted, can be rotated and have an on-off switch. They come with 6ft of cord and and Anderson plug.
View attachment 699697

I mounted two inside the cabover hinge for reading lights. They work great with the ability to aim the light, which also allows managing the intensity by rotating into the wall or bounce off the ceiling ,etc.
View attachment 699699
There's another over my fridge on the D side at the tailgate Also wired in an Anderson plug to the main light switch in the panel and got a 5th light that I put velco on the mounts so I can move it around and stretch it out under the awning over my stove at night (sorry no pics yet). You can supposedly get colored tubes for them, but they're always out of stock, so I bought a sheet of photo flash gel and scotched taped my own for a bug light.
View attachment 699701
Finally the fridge . . .
I didn't want to have my fridge go through the ports on the front panel of my Powerpack. The 12v ports aren't secure enough to guarantee the connection won't come loose off-road and I didn't want to have the on/off switch turn the power off to the fridge. I could have used one of the 50amp output ports, but that's overkill, plus I use them all. So, I drilled a hole in the side of the box and wired ARB's 10awg fridge loom with it's in-line fuse directly to the battery using a15-45amp Anderson plug. I really like the loom as it has a screw-in plug on the other end for the fridge, so nothing can rattle out. Anderson plugs CAN separate, but I'm using one of their clips to secure it so there's no chance of the fridge disconnecting anywhere in the circuit.
View attachment 699717
You can also see I put in a Victron smart shunt (upper right corner) so I can monitor amps in an out, voltage and charging via Bluetooth on my phone. Very useful.

Finally, I cut a hole in the P-side and wired in a Noco external plug, so I can just plug external power through the wall. Lets me pre-cool the fridge (now that I have to park outside) all night with the camper locked. Just pull the extension cord and the fridge switches over to DC and we can head out.
View attachment 699718
I eventually bought a Victron charger for the battery. One really unexpected benefit was that it turns out that it has a setting for using it as a 12v power source. I just cut off their plug, put a 50amp Anderson plug on it and now I can either charge the battery or run on DC without the battery by connecting to the input plug for my camper wiring. I used this feature a lot when finishing the build out. I haven't used it camping, but if I know I'm going to have shore power it gives me the option, though mostly we're fully off grid.

At this point I'm really happy with the electrical system. It's real easy to work with and performs well. If I was doing it again, I'd have to think real hard about making my own battery box and using a separate DCDC charger and MPPT controller.

There's some advantages of the custom system, but it's a PITA to design and configure, especially without some background in it. I'm used to AC electric work around the house and have done some limited DC work, but wasn't really versed in cabling, crimping, etc and didn't have the tools. I thought I could do the NL Powerpack as simple plug and play and avoid buying a bunch of crimpers, etc.

I did order some premade cables from Powerwerx, but in the end it's expensive to go that route, and I kept finding things I wanted to do, so I just bit the bullet and bought the tools to DIY, and I'm glad I did. I still think, given my level of skill and knowledge at the beginning, the NL Powerpack was the right decision, but if I was doing it in the future again, I'll do my own, now that I'm past the initial learning curve.

Here’s the final configuration…unless I change it again! [edit:forgot to add the picture of the final config]
1649198492994.jpeg
 
Last edited:
  • Like
Reactions: WVI

dfinn

Adventurer
Based on your needs I bet you'd be fine with 100AH lithium and a 100 watt solar panel. I've got a 100AH lithium battery. I also just recently added a Redarc DC-DC charger. Previous to the Redarc, I've gone on quite a few trips with just the battery being topped off and I hadn't drawn it down past 20%. I was mostly just running a fridge, LED lights and charging my laptop. That includes a 7 day trip to Baja but on that one I was just running the fridge, daytime temps in the high 70s.

I'm pretty sure I'll be fine now with just the DC-DC charging but I will be adding a solar panel down the road as well.
 

jonyjoe101

Adventurer
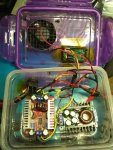
I have 2 battery banks, a 220 ah lifepo4 and a 312 ah li-ion. One thing I noticed was when the batteries got down below 20 percent my 12 volt fridge (26 liter joytutu) kept shutting off as soon as the compresser kicked on, it would just cycle back and forth. I did check the low voltage cutoff on the fridge and tried it on low/high but it would still do it. During the day while the solar panel was charging the battery, the fridge worked good but once the sun went down its when It was shutting off. This usually happened on hot days when I was running my swampcooler constantly and the fridge because of the heat was comsuming alot of power and more or less using more power than my panel could replace.
I had to use a dc to dc boost buck converter between the battery and fridge, that fixed it and I been using for the past 2 years, havent had anymore fridge shutting down problems. I found that fridge works best when the converter is set to 13.2 volts and amp output at least 6 amps. With the boost buck converter as long as the battery has usable ah available it will run the fridge, my li-ion pack will run it when its down to 10 volts. The power this converter uses is insignificant ( less then 100ma, mostly the fan), I been running it 24/7 almost 2 years.

Picture of the converter, you need to 2 converters a boost to take the input voltage to about 18 volts, and then a buck converter to take the voltage down to 13.2 volts, thats the only way you will keep max amps output. They also sell an all-in-one boost/buck converter, you just have to verify you get the right one. This is basically a regulated output and it keeps my fridge happy.
1 boost buck internals.jpeg
 
  • Like
Reactions: WVI

NMBruce

Adventurer
I just got this ECOFLOw River Pro and extra battery, https://www.costco.com/ecoflow-river-pro-portable-power-station+-river-pro-extra-battery.product.100716886.html and getting ready to order their 160 watt Solar panel https://www.costco.com/ecoflow-160w-solar-panel.product.100716854.html. So this setup has a battery protect for charging, 1440WH or 120AH, the connection for charging at home, solar, 12v and USB, USB-C, 12v plug and 115v, so no need to wire stuff up.

this way I can keep it in my trailer or move it my Tacoma or even use it at home. Just need to wire up my trailer for it.
 

Forum statistics

Threads
186,210
Messages
2,883,412
Members
226,050
Latest member
Breezy78
Top