Los Angeles -Class Attack Sub(urban), Build / Collected Werks topic - '02 k1500 Z71

rayra

Expedition Leader
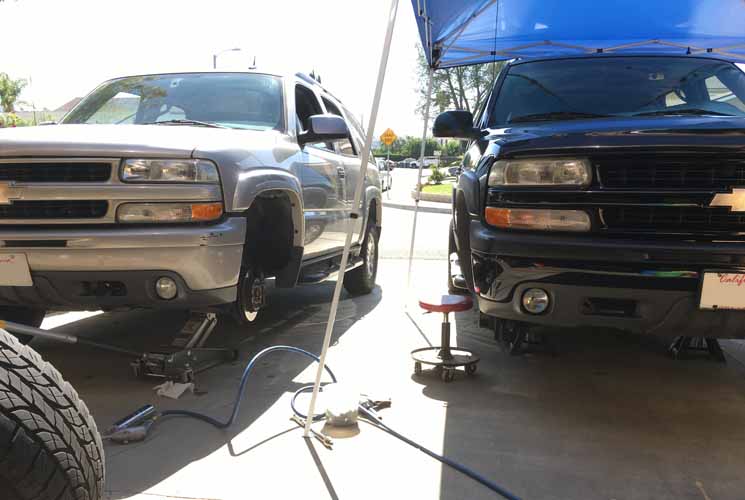
Wheel spacers. After taking the Sub to the brink of a rollover on a highway interchange, I decided (in addition to slowing down) that I wanted a wider wheelbase. The budget solution to that was wheel spacers, a common enough mod in the offroad genre. But there are some attendant drawbacks, related to the greater 'moment arm' accelerating the demise of worn wheel bearings, CV axles, ball joints. All of which are on my 'pending upgrades' list.
They come in a few different widths. After reading some notes elsewhere online about the long length of the factory lugs, I went whole hog and got the 2" spacers, for a 4" increase in vehicle track width. And with the factory fender flares the tires still remain well within the wheel well / flare and within legal constraints regarding the tire tread remaining under the fender.

They were a quick install. I added some thread anti-sieze and took care to see that they were properly centered. Essentially you take the wheel off, bolt the spacer to the vehicle lugs, then bolt the wheel to the spacer's offset lugs.

At first I didn't like the look of the rear installation and had read elsewhere of people using a lesser spacer on the rear. But from many angles it looks just fine. I can live with it, and if I can't I can probably find someone that also wants a mixed setup and trade them a pair of spacers.

Front wheel clearances remain good, with a torsion bar key lift and factory sized tires. This would most likely still work fine with a 285 series tire but might require a trim of the front air dam / skirt at the front corner of the front wheel well.

http://www.rayra.net/imageshare/Suburban/wheelspacers01.jpg


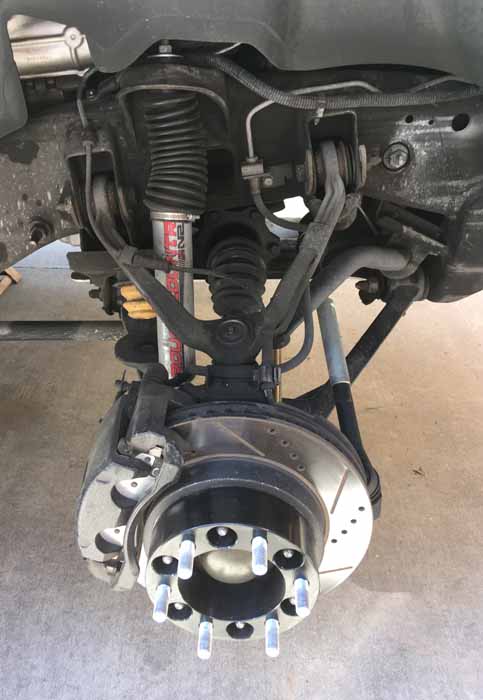
The instructions seemed to indicate using the factory lugnuts to secure the spacer to the vehicle and use the included nuts to secure the wheel. Wanting to keep the factory lug nut cvers required doing the opposite and this was a quick way to compare the conical cross section of the nuts. Close enough.

http://www.rayra.net/imageshare/Suburban/wheelspacers03lugnutconecompare.jpg


Some pics of front wheel clearances

http://www.rayra.net/imageshare/Suburban/wheelspacers04clearancefrontfront.jpg
http://www.rayra.net/imageshare/Suburban/wheelspacers05clearancefrontrear.jpg


And some comparisons Before & After the addition of the 2" spacers. The stock tire size tread is still well within the vertical plane of the fender flares. That's a requirement in most (all?) States. Note that the greater projection of the tires is going to throw more road debris and muck onto the vehicle.

http://www.rayra.net/imageshare/Suburban/wheelspacers12frontcompare.jpg
http://www.rayra.net/imageshare/Suburban/wheelspacers13rearcompare.jpg


Another note in passing. I took some wheelbase / track measurements and was surprised to find that the rear track width is about 2-1/8" wider than the front. We measured to the first inboard tread groove, side to side, the front was 72-5/16ths, the rear 74-1/2". Maybe 1-1/2 of tread pattern outboard of each measuring point. call it 75"+ in the front and 77-1/2" in the rear.
If one has OCD, you might consider 1" spacers for the rear and 2" for the front, to have a matching front/rear track. No really an issue on somethign as big as a Sub, some folks that might wheel smaller vehicles in tighter places, it might matter to them.

And one other thing to consider if you go LESS than 2" spacers that you will likely have issues with the stock lug lengths. I do not thing you could mount a 1-1/2" (or thinner) spacer without having them project thru the outer face / impact the back of the rims. Might need to replace your lugs with shorter ones to make a smaller spacer work. Or just do it all properly if you are changing rims anyway and by a proper positive(?) offset rim.


Next suspension item will be replacement upper control arms with new ball joints. Almost cheaper to buy them new, than go to the trouble of having the old ones dismantled, the old ball joints pressed out, new ones pressed in, drop-off and pick-up of parts. Can just buy new and install them in one go.

Next repair / replace is a replacement water pump and removal of the intake manifold assembly and knock sensors, so I can change the galley cover gasket and see to some high rear oil leak (might be the oil pressure sensor, too) and the replacement of the coolant crossover tube gaskets both front and rear of that gallery cover.

Next project item is properly finishing the trans cooler install with some compression unions in the plumbing lines, instead of the 'temporary' awkward rubber hoses and ladder clamps I am still using. After that I can try to wrap up my rooftop solar panel install. So I can get the roof deck shade back in place, pronto.
 

rayra

Expedition Leader
...and I went ahead with the water pump replacement today, went with a Gates-branded pump. misaligned and pinched / crushed the thermostat housing o-ring during assembly, re-used the old o-ring instead.
Once again had trouble removing that huge fan clutch nut from the water pump shaft. Forgot to procure or rent the proper spanner wrench to lock into 2 of the 4 holes in the face of the main pulley and no way to get enough bite to keep things in place while trying to break the nut free, ON the vehicle.
So I did what I did last time, dismounted with water pump with fan/clutch still mounted - careful not to drop it and shatter that plastic fan! - and I clamped the water pump to my workbench, drilled a 1/4" hole in the side face of the main pulley and jammed a sturdy screwdriver thru it to bind against the bench and stop the shaft spin so I could put a big wrench on the nut. Came off a lot easier on this 6mos-old water pump, than on the original

http://www.rayra.net/imageshare/Suburban/waterpumpfannut.jpg

Left the galley cover gasket and crossover gaskets for another day. Got too damned hot to work thru the midday.

Now back to my regularly scheduled patio excavation and tree root removals...

http://www.rayra.net/imageshare/Building/brickpatio52planterroots.jpg
 

rayra

Expedition Leader
late addendum on the wheel spacers, something I've not seen mentioned in relation to them. Handling and feel are much changed by them. With a track width of +4", it seems to steer differently. I go into curves I travel all the time and suddenly I'm under and over steering, can't yet make a smooth curve of it like I did. My subconscious steering inputs don't match anymore. I suppose I'll get re-adjusted eventually, but with <400Mi on them so far, it's like I'm driving with a clapped out steering system, instead of the newish parts I'm on. Just wandering all over the place.
 

Kingsize24

Well-known member
Spacers completely change steering axis inclination (SAI). This in turn effects scrub radius as well as suspension feel due to the fulcrum point of the tire spaced out and acting on the suspension. The pivot point of the tire is no longer centerline of the wheel and tire combination. This isn't a huge deal if the offset is +/- small amounts, but you moved it tremendously. The contact patch on the outside of the tire is fighting the small patch that may be inside of SAI. I bet you are getting crazy steering feel. Is there not enough room inside the wheel well for your tire/wheel combination without spacers?

Jason
 

rayra

Expedition Leader
There was, I'm running stock wheels / tire size. I just wanted a wider wheelbase, it's an experiment. I was totally expecting a change in suspension geometry / moment arm, but hadn't anticipating the steering change. Like it was a dirty secret or something no one wants to admit after the fact.
Just never noticed anyone talking about the steering effects.

I got the set on sale, delivered for just over $60, not a big deal if I wind up removing them. Could probably sell them for what I paid.
 

CrazyDrei

Space Monkey
There was, I'm running stock wheels / tire size. I just wanted a wider wheelbase, it's an experiment. I was totally expecting a change in suspension geometry / moment arm, but hadn't anticipating the steering change. Like it was a dirty secret or something no one wants to admit after the fact.
Just never noticed anyone talking about the steering effects.

I got the set on sale, delivered for just over $60, not a big deal if I wind up removing them. Could probably sell them for what I paid.

Rayra,

Great list and write ups on budget mods. Spacers are a weird animal. Type of tire will affect how the truck drives and steers.

I run 45-50mm offset wheels, equivalent to 2" spacer. That keeps the scrub radius acceptable and prevents the 37" tires from rubbing. I also run a 1.25" spacers in the rear in addition to the offset rims.

Before you give up on the spacers completely keep 2" spacers in the rear and try 1.25" spacers up front. It will give you a wider track and less strain on steering components.
 

rayra

Expedition Leader
I might indeed try that as when I measured after the install I realized that the front and rear stock track width was different by nearly 2.25" And not sure if that came from the torsion key lift drawing the fronts inward. No idea what the stock height track width was or if front and rear matched to begin with.

Gonna give it some time to see if I re-adjust, before I change anything again.
 

rayra

Expedition Leader
Work continued this morning, coming to the end of my fiendishly clever plan to have two near-identical GMT800 SUVs. The missus decided she wanted a newer vehicle, something with far better mpg and after a couple weeks of searching I accidentally discovered a great niche in 'used' cars - Dealer loaner vehicles. As such they are 'Used', but nearly New in every regard. And the great part is the Dealer eats the huge depreciation hit of buying a New vehicle. We found a 2018 Equinox listed with TEN miles, but priced as Used. Actual mileage when we test drove it was just over 200mi, not a thing wrong with it and we went for it. For all intents a New vehicle, at 40% under list. We also went in with a pre-approved loan from her industry credit union and the dealer finance folks had to beat our much lower rate to secure our interest money, so we got the full 'New' car warranty as part of the deal, the current rebate offer and despite their 4.99% rate our monthly payment only went up $5. We were saving so much on an essentially new vehicle that we were feeling magnanimous.


Swapped front wheels today, needed to do some lube and brake inspections, find a weird squeaky screechy noise in the Sub front brakes. And there's a little shimmy in the Tahoe front end at 80mph, dont know if it's wheel balance or idler arm. No weird wear on the tire tread. Vehicle is just a few hundred mi short of 200k now. So I'm swapping wheels to see if the shimmy moves with them

fiendishlycleverplan.jpg


Also pulled my grill to take some better layout pics of my transmission cooler install, which is still unfinished 9-10mos later. I'm moving on to the final step of actually cutting the factory metal fluid lines. Right now all I've done is slid the factory trans cooler nuts further down the lines and worked some 3/8" hose over the flared end of the metal line and onto the barbed fittings on the new cooler. And created long loops of hose to forestall any home-kinking issues due ot misalignment of the factory metal lines and the new connection locations. Solved one problem and created another - knowingly at the time - with these misalignment and long hoses being susceptible to rubbing and wear-thru. Not want you want on a transmission fluid line.
So I measured the metal lines, they appear to be 3/8" OD, so my intent is to get a couple sets of brass compression->barb couplings and I will cut the factory lines where needed to create a better flowing arrangement which is also protected from rubbing on anything.

transcooler50.jpg
transcooler51.jpg


Pic of the 2" wheel spacers. Having the wheels off for other purposes was a good opportunity to check lugnut tightness on the spacers.
I like the overall look and stance, I've pretty much adjusted to the steering changes, but I'm still rubbing the occasional curb in fast food lanes.
This pic is to illustrate that there's only about 1/4" clearance over the length of the factory lugs / studs, with the 2" spacers. If a person wants narrower spacers, know that you will have to either cut the factory studs or replace them with shorter ones. And if a person i sbuying new rims anyway, best to get them with the offset you desire at the time, rather than add spacers.

sub2inwheelspacers.jpg


My front / brake noise appears to have been my CV boots squeaking. Been degreasing and washing things lately, plus our extreme heat and suddenly they've become obnoxiously noisy. Brakes themselves seem perfectly fine. So I hosed the CV boots down with silicone lubricant on all surfaces, spun the rotors a bit and the noise is seemingly gone now. And a random pic of the front setup with all the poor man mods and replacement parts. I intend to replace ball joints this winter.

subfrontsuspensionmods180808.jpg
 

rayra

Expedition Leader
Finally getting around to properly finishing off the Transmission Cooler plumbing, some 10-11mos after I installed it. When I did the install I didn't want to alter the factor metal lines. With the size and placement of my aftermarket trans cooler, neither of the factory lines were close to lining up. So I just put the barbed fittings on the cooler and used some deliberately-long hoses, looped, to make the transitions from old lines to new barbs. The loops were to prevent kinking or rubbing of the hoses, prevent any flow restrictions.
Cooler's been working great, but it's time to rectify that hacked install. Some measuring of the metal lines shows they are ~3/8" OD. So I got some brass compression fittings and a mating set of barbs to go with them.

transcooler55.jpg
transcooler56.jpg


I expect I'll cut the driver's side end of the return (IIRC) line around the centerline of the vehicle and attached the new fittings and cut the hose down so it makes a simple 'J' shape to the cooler fitting. The passenger side line (input? can't recall right now) I think will have to be cut underneath by the frame rail end and the hose section will describe a similar 'J' curve, rising up thru the factory notch in the fiber panel that fills the gap between the bottom of the radiator and the front bumper (which helps channel more air thru the radiator path).

Pics to come later tomorrow, will be attempting the work in the late morning.
 

rayra

Expedition Leader
working on the Suburban's transmission cooler plumbing. Tentative success. The compression fittings went on a little loose, but I was able to get things fully seated and cranked down tight. And driveway tested without any leaks. IIRC the fluid pressure is something like 80psi. But I won't be sure things are solid until I've driven it around town and really flog it on the highway / up our 4000' pass.
I'm actualyl MORE worried about it leaking now, than I was before the plumbing swap. The prior 'temporary' install setup was leak free and while I was worried about the extra hose rubbing thru, 10mos & 5k mi on there's no sign of chaffing at all.
Pics to follow, after I grab lunch

The scene of the crime

transcooler57.jpg


The driver-side connection had a large 270deg turn / pigtail of hose. I double-checked the compression fitting and trans cooler pipe dimensions with my reloading calipers before cutting the factory line with a small plumber's cutter. Nice and clean cut, no sawcutting debris in the lines.

transcooler58rightpigtail.jpg
transcooler59notruningback.jpg


Couple pics of the finished assembly on that side

transcooler60rightinstall.jpg
transcooler61rightinstall.jpg


The passenger end was an even sillier loop, up over down and around to the cooler fitting

transcooler62leftmess.jpg


For that end I decided to cut the line underneath by the frame rail end, pretty much directly below where the in-radiator trans cooler (actually intended as a warmer) lines are connected. Due to the length of the compression fitting stack I needed to push the factory line forward to cut the line in an appropriate place. The line crosses thru the radiator core support framework and the frame crosstube that supports the fibrous plastic chin 'plate' (which I removed for easier access during this project). There was just enough room to turn the pipe cutter. And to then wrench the coupling on. I should have popped the line off the radiator and done the install on my workbench. It was the topmost line on the radiator, would have been very little leakage. Instead I was working from below with a loose pipe and fitting.

transcooler63leftcut.jpg
transcooler64leftfittinginstalled.jpg
transcooler65lefthoseconnected.jpg


hose cut down and installed with a small smooth curve, no binding or rubbing. I then took the hose remnant and blasted it clean with brakleen and slit it lengthwise and slid it on to the factory metal line where it crossed that frame area as a guard and to reduce rattle. I might zip-tie it down later. The multi-bend rigid line worked fine. But the rubber hose and abandonment of the factory line clip location leaves things too free to bang around. No bueno on my washboarded roads.

transcooler66leftlinewrap.jpg


And a topside pic of the hose routing.

transcooler66leftrouting.jpg


Overall there was very little mess. When I started to cut the first rubber hose I basically nicked it and let things flow back into the trans as much as possible, trying to drain the cooler. But I also ran the vehicle after the first fitting was installed to make sure things were working right before I cut the second end. And then I forgot to try the same draining before I proceeded on the 2nd line. But all in all I only lost about 3-4oz of fluid. And I poured that back into the trans.

transcooler67littlemess.jpg
transcooler68littlemess.jpg


So I'll be checking for leaks often in the coming days.
 

rayra

Expedition Leader
Spacers were 'DynoFit' and their manufacturing quality seems to be pretty good, fit and finish was very good. As was their packaging. They're aluminum and anodized (painted?) black. Got them off eBay from 'maxeoffroad'
https://www.ebay.com/usr/maxeoffroad?_trksid=p2057872.m2749.l2754
Paid $80 for a set of four. If you get thinner than 2" you'll need to replace or cut your existing wheel studs. The 2" spacers only clear them by about 1/4".

The cooler is a Tru-Cool Max Transmission Oil Cooler 40,000 GVW Low Pressure Drop (LPD47391), also off of eBay
https://www.ebay.com/usr/usa.industries?_trksid=p2057872.m2749.l2754
Paid $110 13mos ago. Came with bag with a lot of fittings options. With a bit of care some compression unions and some 3/8" brake tubing, one could probably fashion a new hard line plumbing setup without much extra work or expense. Probably under $100.
 

Forum statistics

Threads
186,582
Messages
2,887,702
Members
226,608
Latest member
DQblues
Top