You are using an out of date browser. It may not display this or other websites correctly.
You should upgrade or use an alternative browser.
You should upgrade or use an alternative browser.
Los Angeles -Class Attack Sub(urban), Build / Collected Werks topic - '02 k1500 Z71
- Thread starter rayra
- Start date

rayra
Expedition Leader
Very interesting. I wouldn't have thought there is more than 4" there and that it's interrupted in several places. I also think my spare tire winch bracket is different than yours. yours seems to hang down lower on its bracket, seems to yield more space to the tank.
That's a second tank correct, separate from the primary? And how are they plumbed together, is it simple gravity / hose connections. It's not some sort of 'transfer' arrangement, is it?
Would be real nice if this could readily be added to a 1500 series. I can't even seem to find a new part source for that tank. I'll keep my eyes open for such the next run I make to the auto wrecking yard, looking for parts.
---
I'm going forward with my winch purchase, as in this week. I'd really prefer to have it before I sew the winch cover, to ensure a good fit. Gonna call it an early graduation gift to myself and try to endure the shitstorm from the missus. We're both 'covid unemployed' right now, but $350 isn't going to make any real difference in our situation if this nonsense is dragged out thru the rest of the year, the way Gov Newsom is seeming to indicate. We'll probably be selling the house and moving out of State by the end of the summer if things don't turn around soon. We were already planning to do so in 18-24mos, regardless. Covid just moved things up. I need to get a lot of projects done before we move.
@rayra I have a 2500 and I believe it's a transfer system that's automatic. RockAuto lists two different pumps, front and rear, and I've noticed that my fuel gauge stays at 3/4 of a tank for far longer than it has any right to. I believe at that level it kicks in the aux pump and transfers to the front tank. Adding capacity is on my wish-list and because I'll be relocating the spare to a swingout, I imagine I'll have quite a bit more room. One thing I've noticed is the spare is plainly visible under the 2500s, whereas I don't recall ever seeing one under a 1500, probably because they're tucked up higher.
rayra
Expedition Leader
Sounds right, as that second tank certainly seems to be too high for any sort of gravity or crossover hose to work. Seems a weird flex. I saw the dual pumps and different tank straps browsing for parts online but never could find the tank itself.@rayra I have a 2500 and I believe it's a transfer system that's automatic. RockAuto lists two different pumps, front and rear, and I've noticed that my fuel gauge stays at 3/4 of a tank for far longer than it has any right to. I believe at that level it kicks in the aux pump and transfers to the front tank. Adding capacity is on my wish-list and because I'll be relocating the spare to a swingout, I imagine I'll have quite a bit more room. One thing I've noticed is the spare is plainly visible under the 2500s, whereas I don't recall ever seeing one under a 1500, probably because they're tucked up higher.
with the 2500 already having the plumbing and moving the spare to a swingout it ought to be possible to remove the factory secondary tank and the spare winch and bracket and put a much larger tank there, at lease as large a capacity as the factory primary. And that would necessitate some modification to the 2500 fuel management.
Or you just add a new tank as a third tank and rig a manual transfer setup.
---
well 270mi flog at 80mph yesterday and no oil leaks overnight / today. So my top end repairs worked. Yay.
--
Got the big zipper today and the fit is nice on the carrier. Reaches just right down the three sides. It's a #10 size YKK, double metal sliders, with the holes in the zipper pulls large enough to pass a padlock thru, if I wanted to weld a lock ring on the hitch carrier and padlock the cover on the vehicle.
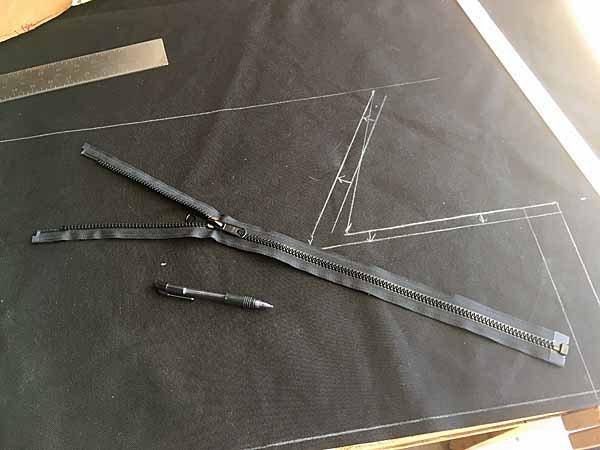
Hope to get the cover sewn up by the end of the weekend. I'm going to go ahead and get the winch this week.
I'll have to take it all apart and learn more about how it works, but if it's as simple as main tank at 75%, turn on extra pump, then it should be possible to rig up a second tank to replace the factory aux pretty easily. I think for simplicity's sake I'd go with a pre-built fuel cell, plenty of 24 gallon cells available for good prices on the market. That'd be enough range for what I do. If controlling is harder then either a microcontroller or manual transfer would work I think. I'm considering mounting a rear winch, both for recovery as well as for hauling cars up onto a trailer, so that may factor in to fuel tank placement and sizing as well. We'll see, winches are still a ways out yet.
I crawled under again tonight and theres a Tee in the fuel filler, and then I can see 3 metal lines going from ontop of the secondary tank forward (didnt trace past the axle). I can all but guarantee they are going to be fuel lines. But unsure of why there would be need for a return fuel line if it's just to top of the main tank. I'm guessing feed, return, and vent line would be 3.
rayra
Expedition Leader
Does the 2500 do the transfer automatically? or does it just switch to sucking on the second tank at the ~3/4 mark on the primary? That triple line plumbing sure makes it seem like the latter. Fuel supply, fuel return and vent or vapor.
--
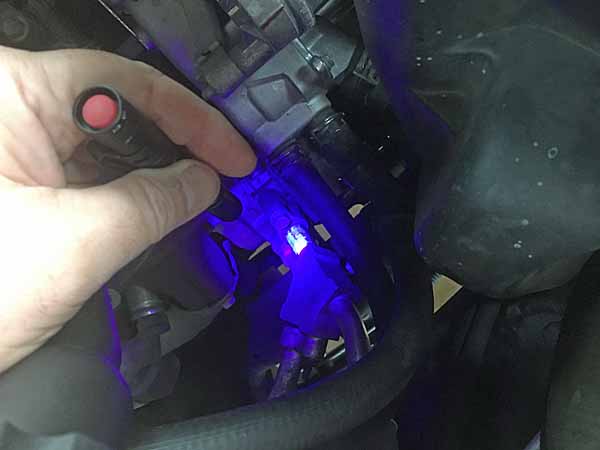
whee, the new UV flashlights are here! the new UV flashlights are here! Time to get all CSI up in this beyotch, looking for AC leaks. It still was weakly working today, ~72hrs after the drive home Sunday. So I presume what leaks I might have had were stopped during the 270mi round trip Sunday. Before I left for home Sunday evening I put another 12oz of R134 in and the can gauge said pressure was at the bottom of the desired range. I'll check that pressure reading before injecting more. Don't want to put another can in if I still have a leak. This evening / twilight I'll probe all over looking for signs of the UV dye.
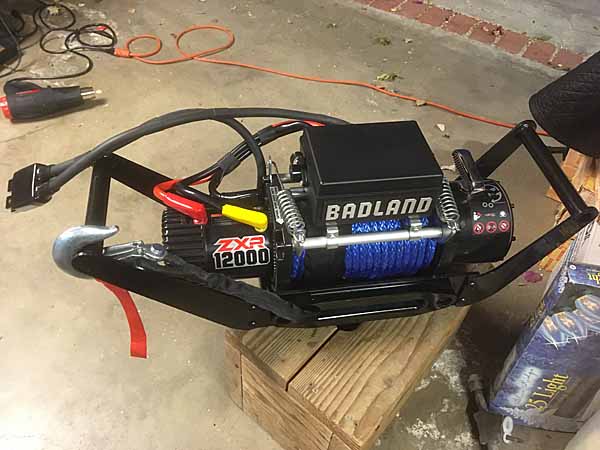
Picked up the new winch today and already farting around with it.
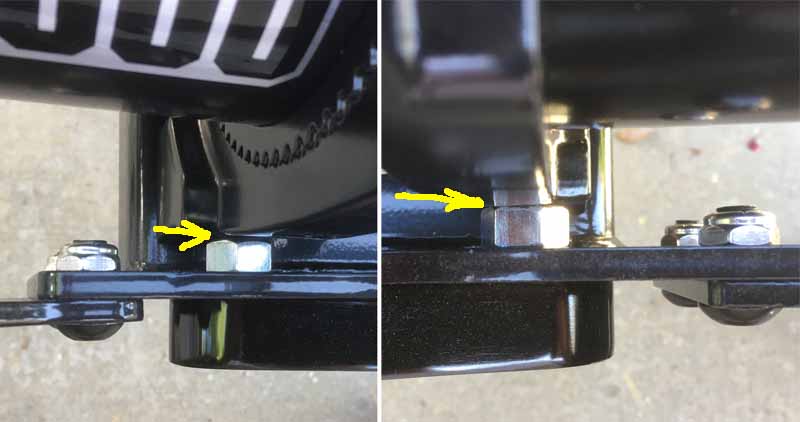
as anticipated, the mounting bolts for the winch cable hawse plate needed to be ground down for clearance of the winch body and proper alignment of the winch body with the holes in the carrier baseplate.
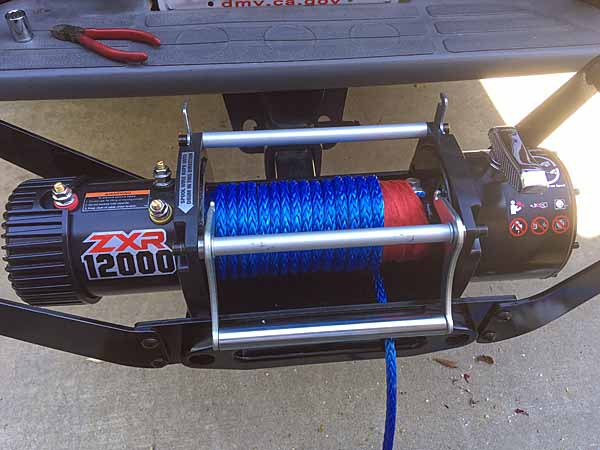
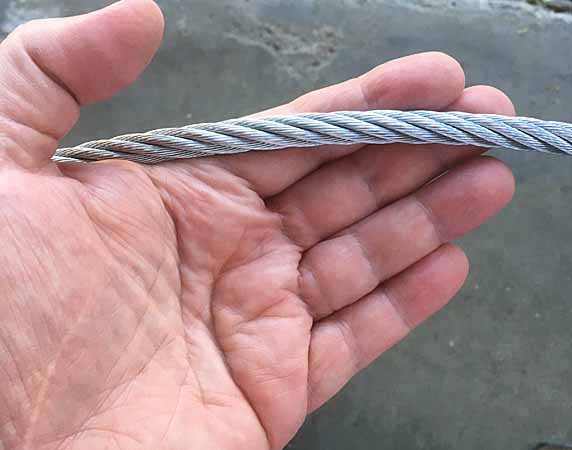
Then I managed to unspool the nice and surprisingly supple 65' steel wire / cable and hand spool 100' of synthetic winch rope. In a few days with the neighbor's help we'll go to a big parking lot somewhere and use another vehicle as a live load and re-spool the rope under a light load to get it tighter on the drum. 100' barely fits as is, loose.
Tomorrow / Friday I'll see about getting the winch wired with the SB175 plug and test front and rear for the proper length / longest stretch.
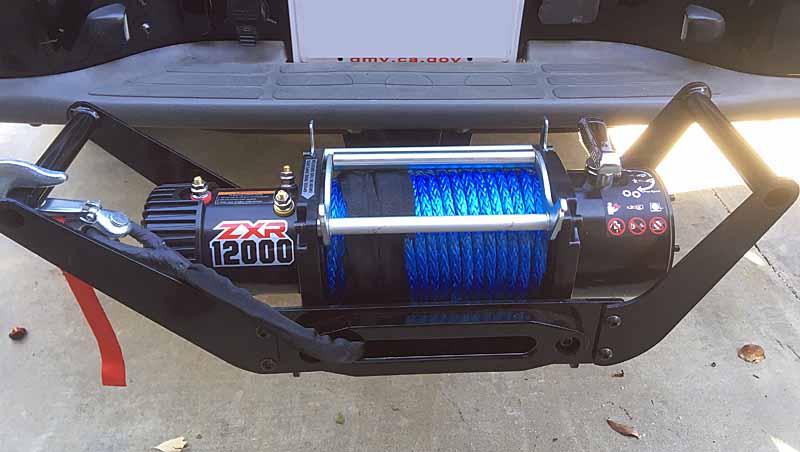
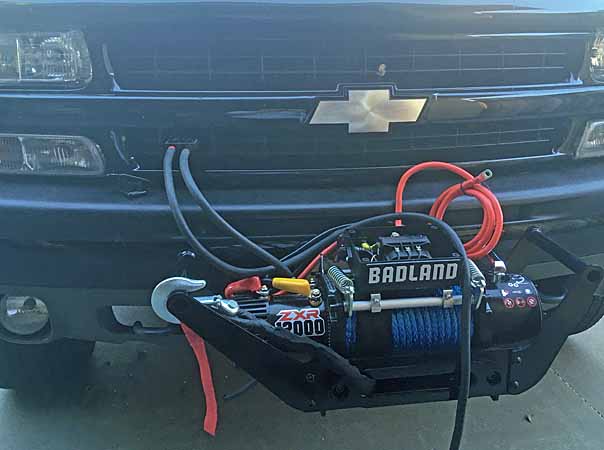
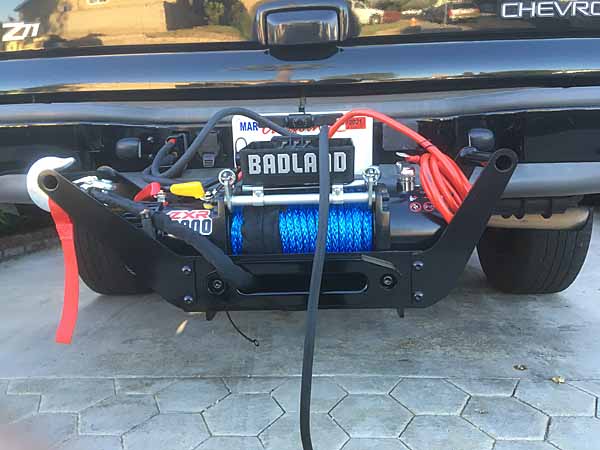
And I am indeed going to have a clearance problem in the front. The control / solenoid cabling box on front has the thick cables going straight out the back. There's no room at the bumper. I HAVE to extend the receiver tube on the winch carrier - or the front receiver hitch, which would be the more correct choice - by about 2-3" to gain the room I need. in the meantime I believe I can mount that control block in reverse, with the wires projecting messily forward, to at least have it functional until I get around to having the carrier mount reworked. TBD.
Most importantly right now, it's a good thing I went ahead and bought the winch before cutting / sewing the cover fabric. The winch and control box protrude much more than anticipated. The top panel area of the cover will have to be much bigger. It would not have fit the way I was beginning to lay out the fabric.
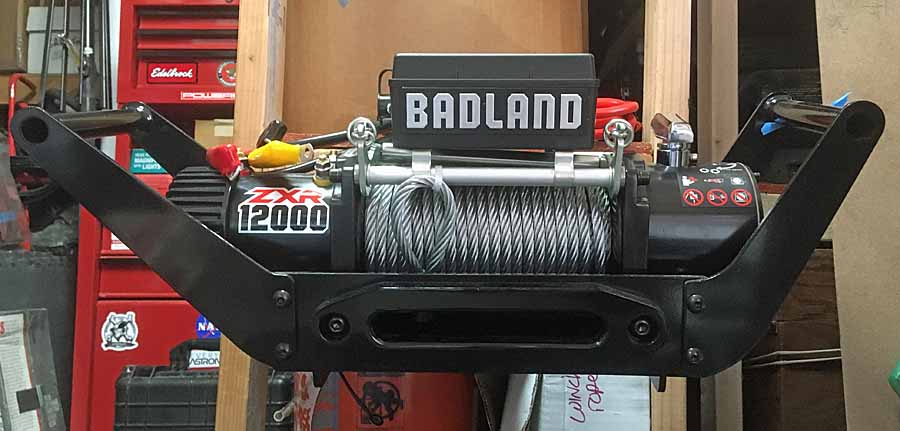
I'll be back later with some pics of the supplied winch cable, it was much nicer than I anticipated. I have a couple saddle clamps and an eye that I'm about to install on the cut end of the cable (that was held on the winch drum thru a passage in the drum, with a set screw. Putting the clamped loop on that end gives me a 'free' 65' winch cable extension, anchor cable, or snatch block rigging.
--
whee, the new UV flashlights are here! the new UV flashlights are here! Time to get all CSI up in this beyotch, looking for AC leaks. It still was weakly working today, ~72hrs after the drive home Sunday. So I presume what leaks I might have had were stopped during the 270mi round trip Sunday. Before I left for home Sunday evening I put another 12oz of R134 in and the can gauge said pressure was at the bottom of the desired range. I'll check that pressure reading before injecting more. Don't want to put another can in if I still have a leak. This evening / twilight I'll probe all over looking for signs of the UV dye.
Picked up the new winch today and already farting around with it.
as anticipated, the mounting bolts for the winch cable hawse plate needed to be ground down for clearance of the winch body and proper alignment of the winch body with the holes in the carrier baseplate.
Then I managed to unspool the nice and surprisingly supple 65' steel wire / cable and hand spool 100' of synthetic winch rope. In a few days with the neighbor's help we'll go to a big parking lot somewhere and use another vehicle as a live load and re-spool the rope under a light load to get it tighter on the drum. 100' barely fits as is, loose.
Tomorrow / Friday I'll see about getting the winch wired with the SB175 plug and test front and rear for the proper length / longest stretch.
And I am indeed going to have a clearance problem in the front. The control / solenoid cabling box on front has the thick cables going straight out the back. There's no room at the bumper. I HAVE to extend the receiver tube on the winch carrier - or the front receiver hitch, which would be the more correct choice - by about 2-3" to gain the room I need. in the meantime I believe I can mount that control block in reverse, with the wires projecting messily forward, to at least have it functional until I get around to having the carrier mount reworked. TBD.
Most importantly right now, it's a good thing I went ahead and bought the winch before cutting / sewing the cover fabric. The winch and control box protrude much more than anticipated. The top panel area of the cover will have to be much bigger. It would not have fit the way I was beginning to lay out the fabric.
I'll be back later with some pics of the supplied winch cable, it was much nicer than I anticipated. I have a couple saddle clamps and an eye that I'm about to install on the cut end of the cable (that was held on the winch drum thru a passage in the drum, with a set screw. Putting the clamped loop on that end gives me a 'free' 65' winch cable extension, anchor cable, or snatch block rigging.
rayra
Expedition Leader
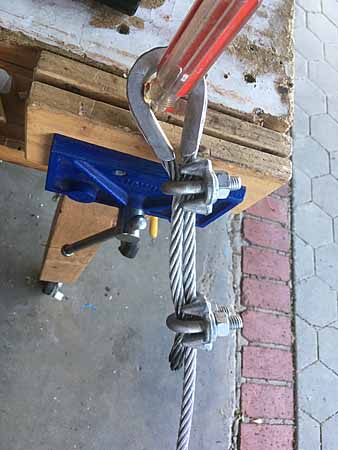
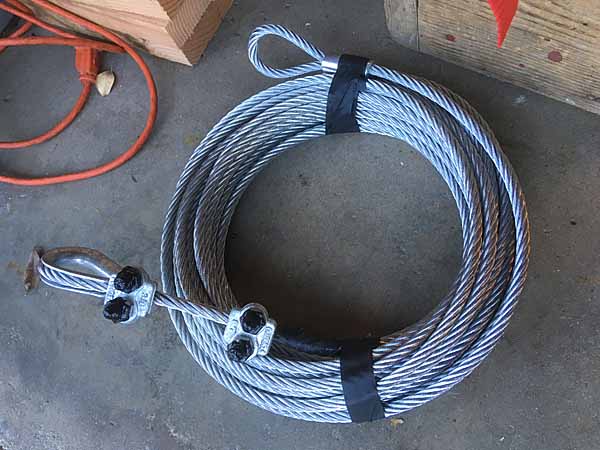
Reworked the 65' x 3/8" steel cable that came with the winch, had the thimble and saddle clamps waiting. Pretty sure I torqued the u-bolts to spec, but it looks too tight, can't undo it now. Thoroughly taped the cut end of the cable and sloshed some liquid electrical tape on the ends of the u-bolts, because those threads and the end of the cable are always what cuts you.
Take care when spooling the heavy steel cable around your arm / elbow while wearing nothing but a thin t-shirt. Unless you like having your nipple pinched severely. Twice.
Last pic I note the supplied cable loop did not come with a thimble in it.

Now it's time to go play 'CSI' with a UV flashlight looking for A/C leaks. And look for some salve.
Take care when spooling the heavy steel cable around your arm / elbow while wearing nothing but a thin t-shirt. Unless you like having your nipple pinched severely. Twice.
Last pic I note the supplied cable loop did not come with a thimble in it.
Now it's time to go play 'CSI' with a UV flashlight looking for A/C leaks. And look for some salve.
rayra
Expedition Leader
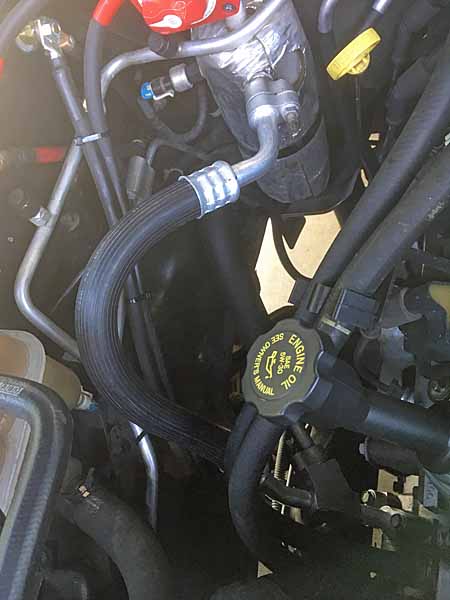
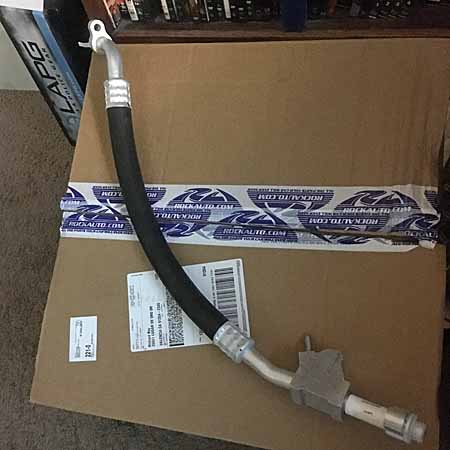
'well there's yer problem RIGHT THAYER!'
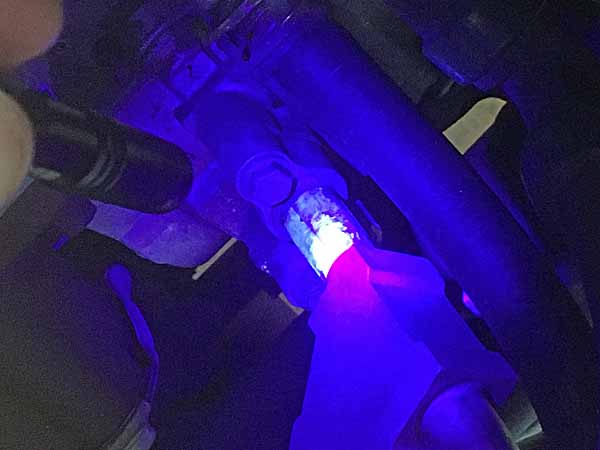
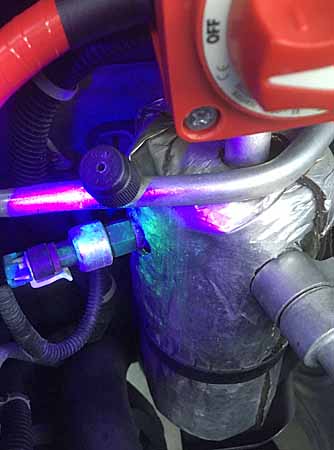
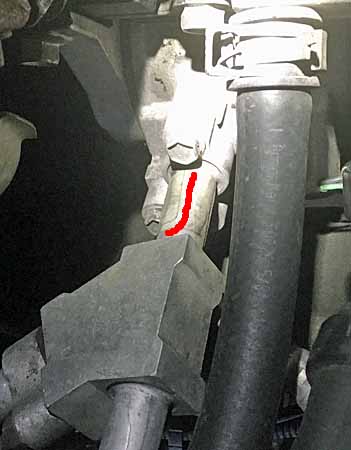
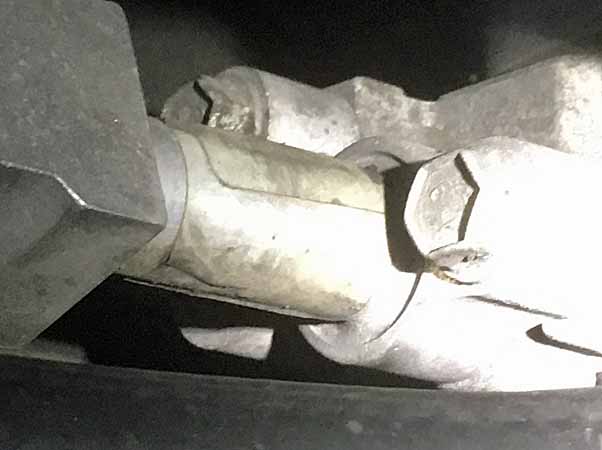
main line from compressor to accumulator, cracked right at the fitting / attachment to the compressor. $88 at Rockauto, $113 at Autozone, plan to call NAPA in the a.m. And am willing to drive down to the wrecking yard on a quest if I can pull one for ~$40 or less. I have a list of other stuff I need to look for down there anyway.
main line from compressor to accumulator, cracked right at the fitting / attachment to the compressor. $88 at Rockauto, $113 at Autozone, plan to call NAPA in the a.m. And am willing to drive down to the wrecking yard on a quest if I can pull one for ~$40 or less. I have a list of other stuff I need to look for down there anyway.
rayra
Expedition Leader
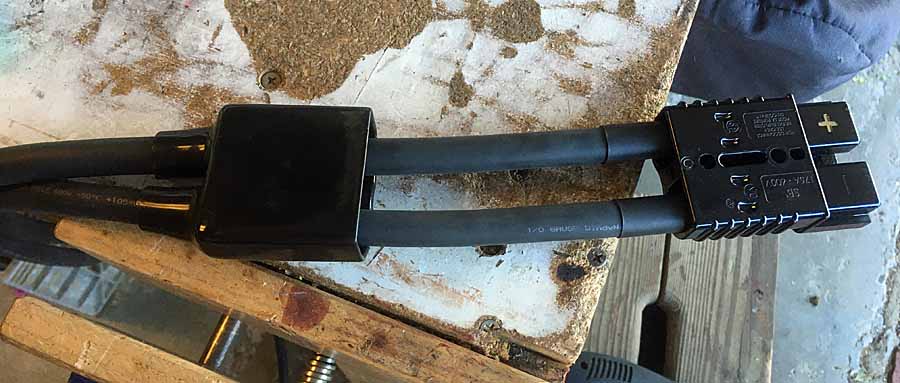
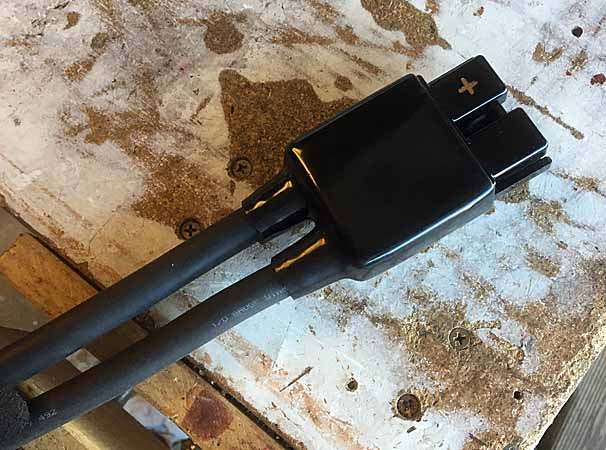
Doing a little 'brain surgery' on the winch wiring, preparatory to creating the plug pigtail. Didn't want to chop up the factory cabling, it's 4ga and it seems to be aluminum. No exposed wires, but it is very light, too light, and the terminal tabs on it are very thin and either tinned or aluminum too. I may ultimately replace the other three cables connecting to the winch motor with copper 1/0, too. But for right now just making the +/- pigtail for the power plug so I can put power to the winch this weekend for the re-spool under light load.
So I dug out the leftover 1/0 welding cable I had on hand and it's enough to form the plug pigtail, try and get that done Friday. Set the lengths by the front plug distance, as it is higher / further from the winch than the rear bumper plug. Which I also deliberately put to the same left side of the winch with the plug lead length in mind.
I definitely have to extend either the CURT front hitch receiver or the winch carrier hitch tube by ~3". There isn't enough room between the winch power box and the bumper to pin the carrier with the power box and cables installed. Nor room to put the winch cover on. Which I figured would be the case when I first mounted the front hitch and pinning the empty carrier put its handles hard against the bumper surface.
eta forgot to mention, the whole setup weighs right around 80#. The steel cable and roller fairlead that came with the winch weigh about 27# together. The aluminum hawse plate and synthetic rope I replaced them with weigh about 6#. So I 'saved' about 20# on the setup. Would have weighed 100#.
rayra
Expedition Leader
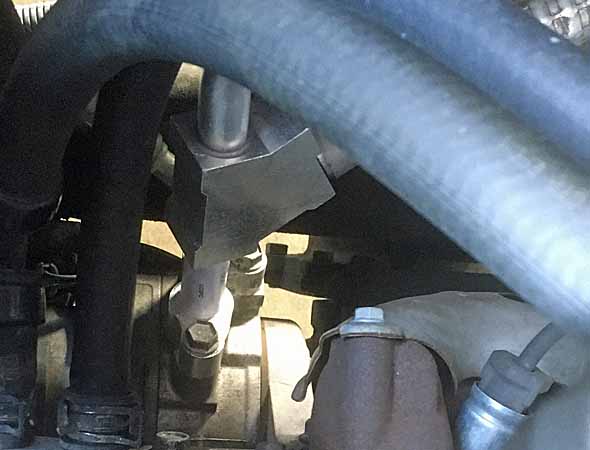
The new AC hose is here! The new AC hose is here!
Times like this I am glad I don't live in the middle of a geographical oddity. Debit card didn't even cool down yet and here it is.
eta
Got the power plug / pigtail finished and installed. Winch is ready to operate on the rear of the vehicle tomorrow or Sunday, with my neighbor and his son assisting. Going to give the boy the responsibility of operating the winch trigger. Going to run out the cable and use the neighbor's truck as the live load to re-spool it under tension.
I'm fairly certain that I'm going to get the front receiver hitch re-worked at a local trailer hitch company. I'll get the receiver tube extended ~3.5" or that tube replaced. The cross-bar that the receiver is welded to can be unbolted from the mounting plates. If I'm lucky I can just get a new longer receiver tube welded onto the cross tube.
Would rather modify the receiver than the winch carrier's tube, as the carrier works just fine on the rear hitch, I don't need more clearance there.
Got the AC hose installed but still can't find my vac pump adapter. Really need to buy a proper set of manifold gauges and do it all correctly, anyway. No point in putting more R134 in until I'm sure I've corrected the leak. And since I opened the system to replace the house, I need to draw a vacuum on the system anyway. And then I'll have my answer on the leak. I looked again this evening and found no other sign of a system leak. But I have not been into the the actual evaporator cores (front and rear) to verify there's no leaks there.
Last edited:
one other thing, on the high output alternator. I'm keeping a crisper smoother idle now, seemingly smoother acceleration, too. And the voltmeter is routinely about 14V, but the first few days I caught a whiff of battery gas and got worried. Popped caps and discovered my near 3yr old Aux was a little low. 18mos old Starter battery seems fine. No signs of bulging, offgassing or leakage. But I'm still wary of it.
I've been thinking I'll probably want to buy another new battery this summer. Bump the Start to Aux and the Aux out for something else (thinking about re-assembling a little solar battery bank)
Previously, my Voltmeter would languish somewhere in the 12-13V range and my Start battery was never over 12.5V even in an excited state. First thing in the morning usually about 12.3V. My Aux is always reading almost a half volt higher, but I mostly attribute that to my rooftop solar / PWC charge controller keeping it topped off every day. I'll check on of these mornings what the resting voltage is on my Start battery is, with this new ALT doing its thing. And stay wary about potential overcharging / offgassing.
Too, the baseline voltage of this new ALT ought to be good for AGM batteries, seeing how lots of folks talking about them not getting fully charged with 'normal' / older vehicle systems.
Is your alternator specific for AGM batteries? I was talking to the guys at Battery Outfitters when I bought a new Odessey battery and they mentioned AGM specific alternators that put out 14.7 volts.
What regulates the charge on the vehicle battery? Is that logic within the alternator or is there a logic board elsewhere that governs the charge mode for the battery?
rayra
Expedition Leader
Far as I know with GM it's the voltage regulator inside the alternator. Not sure about the most modern vehicles. There's no 'computer control' or logic at work. And yes it matters that you have an alternator that will put out and recharge to a higher voltage for AGM batteries. My aftermarket alternator was not marketed as such, it was a happy accident. My factory ALT was usually around 14.1-14.5, would not have been sufficient for AGM. But the high cost of AGM put them out of my consideration anyway. I went with duplicate flooded grp78 batts for other reasons, chiefly for ease and relatively low cost of replacement and having matching batts for heavy discharge during winching operations. And that properly requires matching batteries so as to not damage one or both. Too, with my higher output alternator, running my winch will not be a battery-taxing event. A pair of grp78s, 1/0 cabling throughout, the high output ALT, I can flow far more power than my winch can use. Especially with the short duty cycles of winches.
In my plans and power scheme I wanted the ability to move a lot of juice if necessary. Powering glamping and electric fridges and deeply discharging a 'House' battery are not in my desired plans. I do have a lot of power and recharging options, rooftop solar, various inverters. But protracted discharge of a 'house' battery is not in my plans. Neither is bashing around the desert and washboarded roads as if I was running the Baja 1000. So the whole 'AGM' thing doesn't bring me any significant advantage worth their 3-4x cost.
I need to get busy and do some power diagrams of what I have done, with some photo illustrations. I've described most of it but it's in posts all over and in more than one topic. I'd like to group it all together in once place.
Last edited:
Similar threads
- Replies
- 10
- Views
- 748
- Replies
- 25
- Views
- 2K