You are using an out of date browser. It may not display this or other websites correctly.
You should upgrade or use an alternative browser.
You should upgrade or use an alternative browser.
Making a ifting roof on a 110
- Thread starter wuntenn
- Start date
I like Williams criteria for approval.I might be blind but how do you drain the tank?
Ha! There's a waste inlet and breather on top that go inside, and on the bottom a tank fitting into which a pipe is to be fitted that has a loop to the right and can be tucked into a recess I've made between the tank and the wing, and it has a tap on the end. I can then pull that out and direct it into a gutter or bucket for emptying. There will be a small metal cover that goes over this so its protected from grot and road mank.
The orange bit on the bottom of the tank is a red lead painted angle-iron that holds the tank up (there's another at the other end) and it is part of the protection for the drain pipe - the small alloy cover will be attached to that with self tappers.
krl81
Adventurer
Aha!  Sounds like a good solution.
I haven't figured out how to do with a waste tank but since I'm only using the "kitchen" outside the car I will have to do with just a bucket or something like it. Or make sure to park/camp where no one will be annoyed with me just pouring old tea or spitting toothpaste on the ground.
I haven't figured out how to do with a waste tank but since I'm only using the "kitchen" outside the car I will have to do with just a bucket or something like it. Or make sure to park/camp where no one will be annoyed with me just pouring old tea or spitting toothpaste on the ground.
Slow progress as I've been away and tied up on other stuff. I've got the fabric for the sides being sewn up this week all going to plan, and have been making a bed for my wee lad.

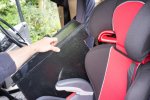
The bed is basically two 2x2 inch battens bolted to the roof in the cab area, which have slots in them for a couple of cargo tie-down straps. The straps run round the battens and support a platform made from 2 pieces of 1/8 inch ply with some 2x1 inch in between, so its a sandwich construction. I was using up leftover pieces - the ply is utter crap and warped so the bed has a slight propeller quality to it but not so much you'd slide out of bed!
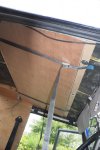
So the idea is that during the day this platform is cranked up on the tie-downs and sits securely overhead in the cab area. Come night time the seats are tipped forwards, the straps are released and the platform drops down and just rests on the seat backs, giving plenty of overhead space for the wee man to climb in and get comfy. A curtain track on the rearmost batten will allow him to be screened off from the main rear living area and have his own wee night light on a stalk to read with.
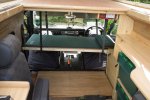
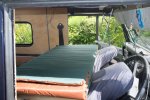
He tried it today and was well impressed. Whether he fits it next year remains to be seen!


The bed is basically two 2x2 inch battens bolted to the roof in the cab area, which have slots in them for a couple of cargo tie-down straps. The straps run round the battens and support a platform made from 2 pieces of 1/8 inch ply with some 2x1 inch in between, so its a sandwich construction. I was using up leftover pieces - the ply is utter crap and warped so the bed has a slight propeller quality to it but not so much you'd slide out of bed!

So the idea is that during the day this platform is cranked up on the tie-downs and sits securely overhead in the cab area. Come night time the seats are tipped forwards, the straps are released and the platform drops down and just rests on the seat backs, giving plenty of overhead space for the wee man to climb in and get comfy. A curtain track on the rearmost batten will allow him to be screened off from the main rear living area and have his own wee night light on a stalk to read with.


He tried it today and was well impressed. Whether he fits it next year remains to be seen!

piratexpress1369a
Explorer
can we say KID APROVED lol
tacr2man
Adventurer
I used one of these to achieve the required fit up , good VFM , as it ends up supplying the hook up cable as well JMHO
http://www.ebay.co.uk/itm/Camping-M...4057?pt=UK_Cables_Hookups&hash=item5afe740949
just need inlet port and a suitable plug for the cable end
http://www.ebay.co.uk/itm/Camping-M...4057?pt=UK_Cables_Hookups&hash=item5afe740949
just need inlet port and a suitable plug for the cable end
Well another small step or two forwards - got the solar panel on and most of the wiring in. Decided to go through the back and run the wires inside rather than down the outside of the roof and in the front or side. I've got a mess of wires at the moment - there's the inverter wiring, a mains hook-up with RCD, four led lights in the lower roof area and three in the lifting roof. The wiring on the lifting roof lights goes down to the hinge end and is then fitted into some rubber tubing to give it some protection, and all of this then comes through the remains of the old roof to where I've got the solar controller and all the rest of the gubbins tucked away behind the drivers seat.
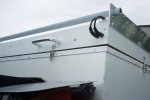
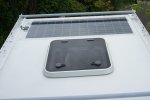

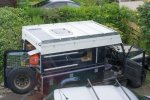
Also, had my first longish distance drive with the van this weekend since I put all the lifting roof on, which has added a fair bit of weight. I'd done a few short runs about town and got a sense of how it handled, and added a few lbs to the rear tyres and a couple to the airlift bags, and it handles really well (I have stock LR Genuine Parts springs and Armstrong dampers - nothing fancy, and SuperPro bushes all round, which are excellent). You can feel the difference as you accelerate, well 'accelerate' is a bit of an exaggeration - I went from slow to less slow, but a tad slower than I'd have done before I bolted all that stuff to the roof. But once its going it pulls well and there is no wind noise nor any rattles or creaks from the new roof additions.
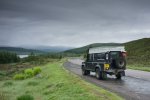
I've also got the disco gearing (1:222 instead of the standard 1:410) so it bowls along nicely at 60 in very relaxed fashion and on the twisty turny highland roads I was able to confidently go round sharp corners with minimal body acrobatics, so I'm happy with the additional weight/handling results. I'll be interested to see what its like when there's three of us, all our gear, three bikes on the back and a roof box!


Also, had my first longish distance drive with the van this weekend since I put all the lifting roof on, which has added a fair bit of weight. I'd done a few short runs about town and got a sense of how it handled, and added a few lbs to the rear tyres and a couple to the airlift bags, and it handles really well (I have stock LR Genuine Parts springs and Armstrong dampers - nothing fancy, and SuperPro bushes all round, which are excellent). You can feel the difference as you accelerate, well 'accelerate' is a bit of an exaggeration - I went from slow to less slow, but a tad slower than I'd have done before I bolted all that stuff to the roof. But once its going it pulls well and there is no wind noise nor any rattles or creaks from the new roof additions.

I've also got the disco gearing (1:222 instead of the standard 1:410) so it bowls along nicely at 60 in very relaxed fashion and on the twisty turny highland roads I was able to confidently go round sharp corners with minimal body acrobatics, so I'm happy with the additional weight/handling results. I'll be interested to see what its like when there's three of us, all our gear, three bikes on the back and a roof box!
Last edited:
piratexpress1369a
Explorer
glad you have taken it out for a spin ..do you think you may have to upgrade the springs for more weight
Pirate - well I did some research before renewing the suspension. I'd previously had HD springs in the rear and even with a decent load it wasn't very forgiving, and on one job in a very rough island environment I was being bounced about like crazy and the stock Land Rovers that were on the island with normal springs were much more controlled. Before I purchased I spoke to several spring experts and for my expected load/usage the opinion was that standard OE Land Rover springs and AirLift bags would be a good compromise. So I went with that. If it all proves to be too much once it's finished and too much even for the airbags I can either upgrade the springs, or remove the bags and add helper springs.
Mob - 150 watts panel. I've just connected it 30 minutes ago on a hot sunny day and its throwing out between 2.2 and 2.8 amps depending on the wandering cloud, and the battery is getting a steady 14V+ charge. Gearing - yes it's worth it. It doesn't unduly affect the normal pulling away ability, maybe if you were habitually pulling huge loads uphill all day you'd notice a difference. The waaaay more relaxed cruising ability makes up for any shortcomings lower down. The low range ability seems unaffected and it chugs and effortlessly pulls up most things you point it at just as you'd expect - so it's not really much different from normal apart from the cruising improvement. I've fitted a slightly bigger intercooler and a hybrid turbo so those, combined with premium diesel, makes it perform reasonably well.
Mob - 150 watts panel. I've just connected it 30 minutes ago on a hot sunny day and its throwing out between 2.2 and 2.8 amps depending on the wandering cloud, and the battery is getting a steady 14V+ charge. Gearing - yes it's worth it. It doesn't unduly affect the normal pulling away ability, maybe if you were habitually pulling huge loads uphill all day you'd notice a difference. The waaaay more relaxed cruising ability makes up for any shortcomings lower down. The low range ability seems unaffected and it chugs and effortlessly pulls up most things you point it at just as you'd expect - so it's not really much different from normal apart from the cruising improvement. I've fitted a slightly bigger intercooler and a hybrid turbo so those, combined with premium diesel, makes it perform reasonably well.
Last edited:
ersatzknarf
lost, but making time
Hi John,
Sorry for the long silence, but have been enjoying following every post
Thanks always for sharing !
Regarding the solar, here's a blog that I refer to often : http://handybobsolar.wordpress.com/
Perhaps it might be useful, if not too late ?
Sorry for the long silence, but have been enjoying following every post
Thanks always for sharing !
Regarding the solar, here's a blog that I refer to often : http://handybobsolar.wordpress.com/
Perhaps it might be useful, if not too late ?
Last edited:
Hi Frank - glad you're still keeping up with it! And thanks for the link to handybob - been there! Love his outspoken opinions backed up with real world experience.
Just so folks have a sense of the details - here's some of the electrical doings - bearing in mind I am a novice in this department, but happy to experiment (but very very carefully with anything involving amps!).
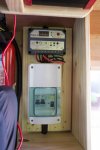
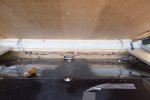
Here's the solar controller and RCD for mains hookups. The 350W inverter is situated above it - that's its base you can see at frame top. Its still not wired in yet. All this is just behind the drivers seat, separated from the main area by a wood partition so its not easily interfered with, or can easily have a cup of tea dropped onto it.
The solar panel is at roof rear (the 'top' of the lifted part) and instead of running the wires down the outside I went down the inside, hard up against the inside of the alloy. The fabric sides will be screwed up into the pine panel at top leaving a good gap between the fabric and the solar wires.
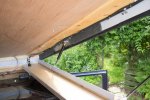
All the wiring coming down the lifting section (solar and light wiring) has to flex round the end down into the lower area and I've run the smaller stuff through clear plastic tube (garden variety from the hardware store - I had a load of this left - I used it to run my brake pipes through to protect the piping). I reckon this will give the wiring a good bit of protection. The heavier solar cable is in flexy black plastic conduit. And all this well fastened down with cable ties or wire clips.
The lighting wiring will be hidden behind a piece of thin ply which I can fasten into the timber end to keep that looking neat and tidy.
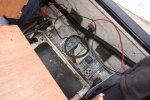
The fusebox for all the stuff running off the aux battery is currently situated just beside the battery box, in the area between the front seats. However I've pulled out the third (middle) seat and replaced it with a home-made cubby box that conceals and protects the fusebox, and hinges forwards to reveal it.

I may relocate this at some point but at the moment its fine.
PS - The loose wires visible are yet to be properly trimmed and run through the black conduit, then fixed to the bulkhead - work in progress.
Just so folks have a sense of the details - here's some of the electrical doings - bearing in mind I am a novice in this department, but happy to experiment (but very very carefully with anything involving amps!).
Here's the solar controller and RCD for mains hookups. The 350W inverter is situated above it - that's its base you can see at frame top. Its still not wired in yet. All this is just behind the drivers seat, separated from the main area by a wood partition so its not easily interfered with, or can easily have a cup of tea dropped onto it.

The solar panel is at roof rear (the 'top' of the lifted part) and instead of running the wires down the outside I went down the inside, hard up against the inside of the alloy. The fabric sides will be screwed up into the pine panel at top leaving a good gap between the fabric and the solar wires.

All the wiring coming down the lifting section (solar and light wiring) has to flex round the end down into the lower area and I've run the smaller stuff through clear plastic tube (garden variety from the hardware store - I had a load of this left - I used it to run my brake pipes through to protect the piping). I reckon this will give the wiring a good bit of protection. The heavier solar cable is in flexy black plastic conduit. And all this well fastened down with cable ties or wire clips.
The lighting wiring will be hidden behind a piece of thin ply which I can fasten into the timber end to keep that looking neat and tidy.

The fusebox for all the stuff running off the aux battery is currently situated just beside the battery box, in the area between the front seats. However I've pulled out the third (middle) seat and replaced it with a home-made cubby box that conceals and protects the fusebox, and hinges forwards to reveal it.


I may relocate this at some point but at the moment its fine.
PS - The loose wires visible are yet to be properly trimmed and run through the black conduit, then fixed to the bulkhead - work in progress.
Last edited:
ersatzknarf
lost, but making time
Hi John,
Have enjoyed every post of yours, thanks
Very, very glad to know you've been to that blog.
Agreed, really like his opinions.
Really like how you're doing the solar, too.
Also, especially like that you're putting the fuses and such in the cubby box in the middle.
That is an excellent solution.
Have enjoyed every post of yours, thanks
Very, very glad to know you've been to that blog.
Agreed, really like his opinions.
Really like how you're doing the solar, too.
Also, especially like that you're putting the fuses and such in the cubby box in the middle.
That is an excellent solution.
Similar threads
- Replies
- 0
- Views
- 421
- Replies
- 1
- Views
- 358
- Replies
- 2
- Views
- 589
