You are using an out of date browser. It may not display this or other websites correctly.
You should upgrade or use an alternative browser.
You should upgrade or use an alternative browser.
MB 1120 Coming to America! Purchase, Build and Now Travel!
- Thread starter VerMonsterRV
- Start date
northernav8tor
New member
That’s the same system we have. A with the webasto heater and a heat exchanger with a fluid pump to pre heat the engine. Works great on our 1617
VerMonsterRV
Gotta Be Nuts
That’s the same system we have. A with the webasto heater and a heat exchanger with a fluid pump to pre heat the engine. Works great on our 1617
So, one question I have is what size is your heat exchanger? How many plates? And by the way, very nice looking truck (from a private pm, made me do a double take as it looks a lot like ours, but just completed). You should update your avatar with a picture as others would love to see it.
Thanks Mark, it has been a lot of 7 day work weeks to get to this point. Although it is not prefect we are pretty happy with the results so far. Really wish we had a larger budget to be able to drop it off and have all the exterior metal work done, but in time we will work through it.Looks GREAT! You are making outstanding progress.
The exterior metal work brings up something. I am trying to work out what the rear will look like with our tire rack and rear bumper. I like what Neil did on Cloud9 and will probably clone the design (thanks again for the great site, it really helps an amateur builder figure things out). Also along with this is "clearance lights". At this point our truck is pretty dim on the road at night, I need to light it up better to warn other drivers what is coming, what have you guys done for this?
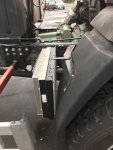
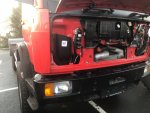
Your truck is looking great. My truck just had an A/C installed in germany. I have yet to see it but I think they were able to find a stock bracket to mount the compressor to the motor. I will try to have a picture taken. They mounted the condenser behind the rear fender and the dryer under the front hood.


VerMonsterRV
Gotta Be Nuts
Thanks, we are pretty pleased so far. Lot of work though. Any chance you would have a MB part number for the AC bracket? I contacted a couple of MB dealers in Europe and had no luck. My best info so far has been from Joe917. If I can not get the original, I think the modifications would not be too terrible.Your truck is looking great. My truck just had an A/C installed in germany. I have yet to see it but I think they were able to find a stock bracket to mount the compressor to the motor. I will try to have a picture taken. They mounted the condenser behind the rear fender and the dryer under the front hood.
Yeah, the only thing I see doing it this way is we have lived with a hydronic furnace on the boat. Although not cheap the water to air heat exchangers have caused issues with leaks. I would think by using a heat exchanger it would reduce the additional number of connections for the engine circuit to just 2. For some reason I am nervous about messing with the engine coolant circuit.There is no need for a heat exchanger, the Webasto can be plumbed right into the engine coolant . One shut off valve is all that is needed to separate the camper loop and engine loop.
Neil
Observer
Mine is connected through a very efficient heat exchanger. The engine fluid and the heating fluid never mix.
I personally think this is the correct way for the following reasons
1. A failure in one side wont effect the other.
2. Each circuit can be worked on independantly.
3. My engine expansion tank elevation isnt critical to the cabin circuit.ie tadiator heights
4. I didnt want 25 years of engine crap flooding into the natrower gauge cabin heater circuits and my lovely new eberspacher.
For these reasons i think keeping the fluids seperate is the correct way for me.
Neil
One other aspect I only recently discovered was incompatible anti-freezes.
Newer long life anti freeze is often not compatible with among other things copper. So an older vehicle that has copper components may have the older "original" type of antifreeze that seems to usually be blue. The long life stuff protects in a different way and IIRC not at all with copper.
Camper heater systems may also have copper parts and if so should also probably use the blue stuff.
Connecting such a coolant system to a newer engine that the manufacturer requires a specific sort of red/orange/pink/green etc long life version will result in corrosion somewhere, unless you can find something that definitely covers all bases (Prestone claims to for instance?).
Organic anti freeze vs inorganic.
So a heat exchanger would I think be essential in that scenario?
In googling a little in trying to find something that would be ok in my camper heater system before just asking Eberspacher (bluecol 2year was their answer) and reading about domestic thermal solar panels hooked up to a domestic hot water tank that might have to have copper friendly but non-toxic anti-freeze (so if there's a leak in the tank coil you don't give anyone kidney failure from drinking it) which you can get from thermal solar dealers but surprisingly isn't cheap. I suppose the same is a possibility with a calorifier.
I'll also reiterate that although Joe917 seems to have no issues with his engine connected system, my Mog engine pushed loads of air into the camper Eberspacher circuit every time I opened the valves. That connection was done with Eberspacher parts in the engine coolant circuit as shown in their instructions by the previous owner but caused more problems than not so I never bothered apart from occasional fiddling to get it to work which I then always regretted! Recent discussions with Eberspacher suggested that may have been connecting a big water pump to a tiny water circuit. So although putting a diesel fired water heater into a coolant circuit is shown by manufacturers because engine preheating or as a parking heater is maybe what they mostly get sold as, connecting a home made camper water system to that with all the possibilities it throws up might not always work as you expect? My new system is unconnected anyhow, but I don't have a water cooled engine.
Jason
VerMonsterRV
Gotta Be Nuts
Hey guys, been a while since there has been a build update. Took a little time off to spend the holidays with my parents but am back at it. Over the last few days we have installed a few of the interior wall panels (4 of them, 2 to go and will try and get another one up tomorrow). These are the FRP/honeycomb panels. I ended up routing out the core, boding/screwing cleats onto the walls, and then bonding the panels to the cleats. Went together well and looks neat a clean (well at least I think so). The roof panel had a slight sag in it so I propped it up a little and when the panels cure they will do the job. At the bottom of the panels I will bond/screw aluminum angle as it will not be visible. You will also see the ends of the panels are routed out. I will mill up some maple that will form the corners and slot into the ends of the panels. We will then varnish the exposed wood. I also milled up the ash bed supports today. Am planning on the bed base to look a bit like a futon slat frame to allow air to the bottom of the mattress.
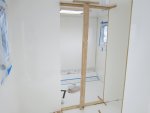
On the supplies side

On the supplies side
- I received the round stainless cabinet pulls with positive latches.
- Picked up the maple/ash/poplar wood and walnut/maple/birch plywood for the interior woodwork.
- Received the Dometic 40 liter chest freezer (we have a Indel CR130 Drink Inox for the cabinet on the right in the above picture)
- Received the 4 200watt bifacial solar panels
- Received the Thornwave Labs BMS and hi/low voltage disconects
VerMonsterRV
Gotta Be Nuts
On the way to bed but thought I would post a couple of update pics. The first one shows the bathroom and the entry door. I ended up making a plywood template and using a router with a straight cut router bit to cut the door out. Luckily this went well and I can reuse the cutout for the door, which is what I had hoped to do. This picture shows the maple corners that join the 2 composite panels. There is also a wood cleat bonded to the ceiling that the panel slotted onto. You can see in the middle of the pic the start of the bed frame, all the beams are interlocking so take a bit of time. Right below the bed will be the cabinet for the washer and a small hanging locker. You can also see the ash bed slats that Heather has varnished on the floor of the bathroom.
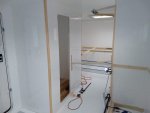
This pic shows the "pantry" with the maple cabinet face bonded in the same way the corners are. I made this frame ahead of time so it could be bonded in as a unit, the shelves were also bonded in at the same time. The largest opening is for the refrigerator. To the right is the start of the kitchen. I am awaiting the arrival of the stove so will wait to make the cabinet frame until it arrives (should be in the next few days).
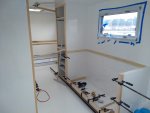
All joints are glued with dowels or interlocking mortises. Trying to make the interior add to the strength of the box and hold together. That's it for now, tomorrow Heather stays on the boat awaiting the delivery of the solid surface counter top. I'll head to the shop and continue work on the bed frame. We also picked up the Spendide WD2100XC washing machine, Coleman Mach 8 Cub rooftop AC and the Dometic CU434 oven is on the way.

This pic shows the "pantry" with the maple cabinet face bonded in the same way the corners are. I made this frame ahead of time so it could be bonded in as a unit, the shelves were also bonded in at the same time. The largest opening is for the refrigerator. To the right is the start of the kitchen. I am awaiting the arrival of the stove so will wait to make the cabinet frame until it arrives (should be in the next few days).

All joints are glued with dowels or interlocking mortises. Trying to make the interior add to the strength of the box and hold together. That's it for now, tomorrow Heather stays on the boat awaiting the delivery of the solid surface counter top. I'll head to the shop and continue work on the bed frame. We also picked up the Spendide WD2100XC washing machine, Coleman Mach 8 Cub rooftop AC and the Dometic CU434 oven is on the way.
LostInTheWorld
Builder/Traveler
It is looking so good! I like all the glossy panels. I think that was a good way to go.
As a side note, your box looks so much roomier than ours. It's amazing how a little more length changes the look of the whole interior volume.
Michael
As a side note, your box looks so much roomier than ours. It's amazing how a little more length changes the look of the whole interior volume.
Michael
VerMonsterRV
Gotta Be Nuts
Thanks Michael, I really like the interior panels. They are a bit of work shaping, corners and bonding in but they will clean easy and seem to be pretty strong. Our box is still small but we think it will be comfortable. As you well know as you keep adding walls the space seems to shrink. I continued work on the bed platform yesterday and I think it is looking good. I think ours will end up a bit higher than yours from the pictures, which means I need to think out some sort of step/ladder as the top of the mattress will be at around 44". I am considering making a version of this one here https://hideawaysolutions.com/. Pretty clever but not 100% what I want, plus at $600 I could likely make something a bit less costly.
LostInTheWorld
Builder/Traveler
Those are cool steps. I haven't seen those before. The way that they stow away is great. In some applications, it would be cool to have a bench seat that works like that.
The top of our bed platform is 26 inches from the floor. So the top of our mattress will be about 34-35 inches from the floor. I think tat will be ok, but we will have to try it out and see.
The top of our bed platform is 26 inches from the floor. So the top of our mattress will be about 34-35 inches from the floor. I think tat will be ok, but we will have to try it out and see.
VerMonsterRV
Gotta Be Nuts
You will be fine with that height, it is what we have on the boat and we do not use a step. Our mattress will end up at around 45", we were trying to maximize the under bed storage. I came up with another idea, a foldout set of steps on the perpendicular bathroom wall. I would make them out of wood to match the cabinets. When folded against the wall they would only be 3/4" out from the wall. Here is a much larger version to what I am now thinking https://9gag.com/gag/aAxv36Z . They look to be pretty clever and with only a couple of narrow ladder steps should be pretty easy to make, no handrail needed.
Sitec
Adventurer
You will be fine with that height, it is what we have on the boat and we do not use a step. Our mattress will end up at around 45", we were trying to maximize the under bed storage. I came up with another idea, a foldout set of steps on the perpendicular bathroom wall. I would make them out of wood to match the cabinets. When folded against the wall they would only be 3/4" out from the wall. Here is a much larger version to what I am now thinking https://9gag.com/gag/aAxv36Z . They look to be pretty clever and with only a couple of narrow ladder steps should be pretty easy to make, no handrail needed.
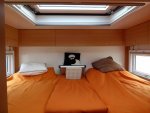
We are going with similar raised beds and under floor storage, but are doing a different take on the steps... I saw this pic somewhere on the interweb and we are doing similar as it works either as a twin bed (fore and aft sleeping) or double bed (left to right sleeping), but each partner gets to sleep on their mattress of choice, and with the divide there's s less 'partner disturbance' when getting up during the night (which happens all the more the older we get!!). I think this is from a Euro build, and I state that it's not mine, but again thank whoever it belongs to because we love the setup!


Similar threads
- Replies
- 31
- Views
- 6K
- Replies
- 64
- Views
- 10K
- Replies
- 0
- Views
- 671
- Replies
- 1
- Views
- 2K
