MB 1120 Coming to America! Purchase, Build and Now Travel!

VerMonsterRV

Gotta Be Nuts
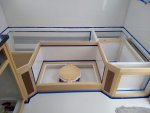
All the under seat divider walls are built. Still need to bond one in (the one on the left) and build the seat support that go over the water tank. Then of course all the plywood panels. I am also going to put in a maple surround on the top of the back cushions so all the edges of the cushions will be hidden (plus they are contained a bit). The battery shelf is built in the back right compartment. Can't believe how small of a tray is needed for the 400Ah LifePO4 battery bank (on the boat we have 6 of the old school Trojan T105's which have a pretty large footprint, the new LifePO4 bank should be of similar capacity). I have received the AC/DC Blue Seas electrical panels. The long narrow bin on the far right seems to be just perfect for beer! Figure at least being able to provision a couple of cases easy. Luckily right next to the cooler (chilly bin or esky depending on your hemisphere).

IMG_20190216_165908824.jpg
 

VerMonsterRV

Gotta Be Nuts
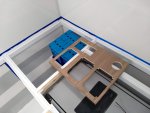
Here is a pic of the batteries set in place on their shelf (still need to work on the hold downs). Still can't believe there is supposed to be 400Ah there. The walnut ply panel will be the electrical panel. There is 1 Blue Seas AC panel and 2 DC Blue Seas panels. Then the Renogy 2000 watt inverter/charger remote and the battery switch. The panel will have a piano hinge on the bottom to allow it to tilt down for access. I will latch if from the inside of the panel using barrel bolts (just lift the seat plywood panel above to access bolts). You can also see the CFX 40 in its hole. Will need to work on drilling some large holes for ventilation for it (I have 4" round plastic vents waiting to go in.
IMG_20190222_140108524.jpg

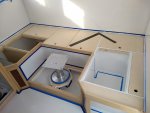
All the removable plywood panels are now finished, Heather is working on painting them now. You can also see the Springfield pedestal is installed. Also off to the far left is the Reonogy 2000 watt inverted/charger mounted on the wall (it is in a bag to keep dust out).
IMG_20190218_162204106.jpg

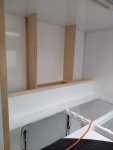
And lastly the work on the headboard cabinet has started. Goal for the next couple of days is to finish this cabinet as the seating area is on a bit of a hold until the water tank is completed.
IMG_20190222_140050138.jpg
 

Victorian

Approved Vendor : Total Composites
This looks very nice!
One thing I would recommend: install some type of ventilation openings between the compartments. I noticed stale air in ours... In cold climates you could also get some moisture build up inside those spaces.
 

nathane

Active member
I continue to be blown away by the quality of your work. You are doing a beautiful job. I'd love to know where your table support is from by the way.
 

VerMonsterRV

Gotta Be Nuts
This looks very nice!
One thing I would recommend: install some type of ventilation openings between the compartments. I noticed stale air in ours... In cold climates you could also get some moisture build up inside those spaces.
Yup, that is in the plans. For air from the main cabin into the lockers I have 4" round heater vents. From within the lockers will just be hole saw holes. For heat I was planning on a couple of Kuba VA200 heat exchangers, which I ordered from a UK company (when running they will pull air into the compartments to heat and blow back into the main cabin). As it has been about 2 weeks and shipping was supposed to be 1-2 days I am thinking I will have to try again.

If there is anything we are familiar with living is condensation. I doubt anything can be quite like a sailboat in the winter. Although our boat has 1" hull insulation it still acts as one huge dehumidifier. Especially when it is 40 degrees and raining like right now ;-), can't wait for spring to get here.
 

VerMonsterRV

Gotta Be Nuts
I continue to be blown away by the quality of your work. You are doing a beautiful job. I'd love to know where your table support is from by the way.
Thanks, although I am generally happy with what we have done it is nowhere near perfect and if I had to do it over would do a few things differently (luckily nothing major)! I come from a family of carpenters (though I ended up programming computers). My brother who stayed in the carpentry trade offered to help with the build, only problem is he is 1500 miles away. It would have turned out way better with his help (more skill and better tools) but as I told him what I need to be is "a jack of all trades, master at none", which is very true. Plus he lives nowhere near an ocean.

So the table pedestal is an air assist 3 stage Springfield. I got it from https://www.go2marine.com/product/3...ered-3-stage-table-pedestal-12-3-4-20-28.html as they seemed to have the best price. It really seems like a pretty good quality pedestal and is very sturdy. As of now it is functioning very well as a seat ;-).

So a little more news. Was going to wait until it arrived (guy is delivering it on Monday) but we bought a dinghy (boat term for a small boat to get to shore) for the truck. It is a 2009 Kawasaki 250 Super Sherpa Dual sport motorbike. It is very low mileage but needs a bit of work to set things right and fits the budget. Now just need to get the interior of the truck finished so we can move back to the exterior this summer. We like to spend a lot of time hiking so hopefully this will allow us to park the truck in a good camp spot and travel in a bit of a radius to hit the trailheads.
 

luthj

Engineer In Residence
You are going to be pleasantly surprised by the performance of that LiFe bank I think. After so many years of managing a lead bank, topping off water, keeping it alive, the lithium batteries just do their thing. Make sure its not empty every few days, thats about it!
 

VerMonsterRV

Gotta Be Nuts
Hey guys, looking for some ideas about our counter top to sitting area. Our counter top ends up against the sitting area, which will be upholstered. I am considering a 1/2" bit of clear acrylic from the counter top to the bottom of the upper cabinet (still yet to be built). This would stop any water on the counter from getting to the cushions. Any other thoughts? I was thinking something clear to allow light and sight through.
 

gregmchugh

Observer
Hey guys, looking for some ideas about our counter top to sitting area. Our counter top ends up against the sitting area, which will be upholstered. I am considering a 1/2" bit of clear acrylic from the counter top to the bottom of the upper cabinet (still yet to be built). This would stop any water on the counter from getting to the cushions. Any other thoughts? I was thinking something clear to allow light and sight through.

On our GXV build we have the same issue with the countertop ending above our bench seat. We had them attach a strip of the countertop material (about an inch wide and the thickness of the stock countertop material) along the edge of the counter from the backsplash to just before the front edge to deflect any spills to the front. Not very elegant but it works. You can see it on this page by selecting the photos of the truck with the Computer Work Station...

https://www.globalxvehicles.com/patagonia-interior-photo-gallery.html
 

VerMonsterRV

Gotta Be Nuts
On our GXV build we have the same issue with the countertop ending above our bench seat. We had them attach a strip of the countertop material (about an inch wide and the thickness of the stock countertop material) along the edge of the counter from the backsplash to just before the front edge to deflect any spills to the front. Not very elegant but it works. You can see it on this page by selecting the photos of the truck with the Computer Work Station...

https://www.globalxvehicles.com/patagonia-interior-photo-gallery.html
Thanks for that, first off that is a really nice truck! If our budget would have allowed I would have talked with these guys. So as of last night at around 10pm I decided on trying the acrylic and ordered up a piece (1/2" thick). My current plan is to make it full height between the counter top and bottom of upper cabinets. This will give the upper cabinets a bit of support. I will make a "track" out of some solid surface for the bottom to set into and a corresponding track on the top out of maple. I will then use silicone to bond it all in place.

The work on the head board has continued and I should finish in the next couple of days. I also installed the electrical panel, I think it looks pretty good. Once the dust settles on the headboard I will put up a few more pics.

On the motorcycle side the guy delivered it last evening, so it is official we are the new owners of a 2009 Super Sherpa (351 miles on the clock). It will have to wait a bit for the truck work to continue but eventually I need to get to it for a couple of days to set things right.

One other thing, the way we ended up starting to do the outside corners really did not pan out. So I have ordered up a spool gun for my mig so I can give a try at making a single piece aluminum 45 degree corners. Trickiest part will be replicating the curve of the frp extrusion in aluminum, but I think with a bit of pipe and a metal brake I can do it. Time to become a welder.
 

LostInTheWorld

Builder/Traveler
I like the 1/2" acrylic idea. I think having a transparent divider will keep things feeling open.

I bet you will like having the motorbike. If we had room for one, I think we would have done that redirection.

I hope you like the way your outside corners turn out. I think they will look good in aluminum. Are you planning to paint them white or leave them raw aluminum?

Michael
 

VerMonsterRV

Gotta Be Nuts
I like the 1/2" acrylic idea. I think having a transparent divider will keep things feeling open.

I bet you will like having the motorbike. If we had room for one, I think we would have done that redirection.

I hope you like the way your outside corners turn out. I think they will look good in aluminum. Are you planning to paint them white or leave them raw aluminum?

Michael

We are planning on painting the corners the same color as the 45 degree fiberglass edges we made, sort a light gray. Using Interlux Perfection 2 part paint. Hopefully I will figure out the bending along with welding the thin aluminum. If only I had your metal working skills (and tools). I think the acrylic will work ok, just need to be careful cutting it. If it does not pan out I plan to just silicone it in place to it could be removable if desired.

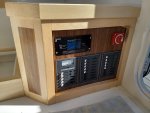
Here is a picture of the electrical panel, the little wood wedge in the top is to hold it closed as I have yet to fit the latch. Our BMS is bluetooth only, so for now we will give it a shot and see how we like it. I left room in the panel for a Victron meter if we decide down the road we want one. The 2 lower right panels are 12v, the left is AC. We got a great deal on these panels from Overton's.
IMG_20190226_101353527_HDR.jpg

And a beauty shot of the new (to us, 351 miles) 2009 Kawasaki Super Sherpa 250 (this pic was from the seller, apparently it was a bit old as the bike is not in quite as good of condition, but with a bit of elbow grease I think I can get it back).
super sherpa.jpg

Along with the 1/2" acrylic divider we have on order a 12v bluetooth amplifier for the 6x9 car speakers, led spotlights for the headboard (Heather's family are all artists and my mom does needle work so no shortage of wall hangings). We did receive the LED puck under cabinet lights and the gravity water fill. Hopefully in the next few days the cabinets (minus the doors) will be finished in the "bedroom". Then next week we are off on a roadtrip to FL for a few different things, one of them being picking up the water tank.
 

Forum statistics

Threads
188,183
Messages
2,903,508
Members
229,665
Latest member
SANelson
Top