bossman429
Adventurer
Helton hot water shower
So I just finished installing my Helton hot water shower system purchased from cruiser outfitters
I have to say I'm slightly disappointed based on my initial impressions.
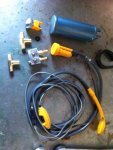
Issues - you really don't get much. A heat exchanger, a pump with a hose that goes directly to the shower head that has a weird British thread on it (not standard), some clamps and that's it
Here's a picture of what you get
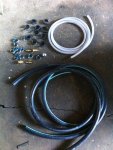
And what I needed to buy from a local hose/hydraulic shop (an additional $130 worth)
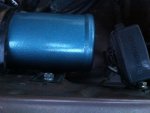
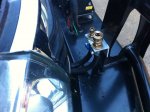
Step one is finding a suitable location for the exchanger. Since my truck doesn't have AHC I had loads of space between the airbox and the fire wall. There's some existing threaded holes I used which was nice, I do have to bend a few brackets slightly to make room and make sure nothing rubbed or rattled on each other
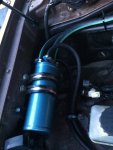
Next is splicing into the heater lines. Don't make the mistake I did and cut into the top (3/4") lines. You'll realize you need a 3/4x3/4x5/8" tee instead of the 5/8x5/8x5/8" tee I got, and also one of the lines is so incredibly short there is no room to put another tee in. Luckily I was able to replace the now cut factory hose with some spare hose I had laying around, no harm done.
Where you want to splice it into is the lower heater hoses that come off the main or upper heater lines. I'm assuming these are the lines for the rear heater core. They are a pain to get to especially on a lifted truck. I found myself literally laying across the engine. But some cussing, sweating and bloody knuckles later the tees were in place and clamped down nicely. I was sure to use heavy duty heater hose, this stuff is strong, way stronger than the factory hoses i spliced into
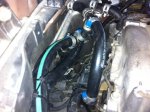
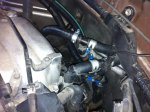
I played around with the routing a bit but decided to go up high through the ac lines rather than lower bc that would have been too close to the valve cover/head for my liking. Plus with the new heater hoses I used being so thick, I figured anything they touch would be ok. Besides the hottest they could possibly get is ~200 degrees and that won't damage anything under the hood anyways. I tried my best to use clamps to keep things tidy, but to be honest I didn't find the need for many of them
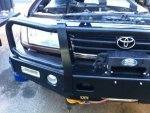
Now onto the water lines. I decided to mount the fittings on the bumper so I didn't have to open the hood. I used quick connects that don't close when disconnected. This will keep any pressure from being built up if water was to freeze in the exchanger and thus keeping things from cracking/breaking. Also I altered the female/male ends so there is no way I can put the wrong line on the wrong side, since they will only correspond with the correct fitting on either the pump or shower head lines
I did my best to keep the water lines routed neatly and clamped down to avoid rubbing
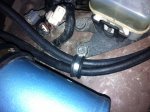
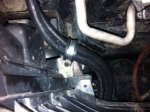
Quick connects are barely visible from the front. I do want to get some soft plastic caps to put on to keep dirt and dust out of them
So I tested it out with a 5 gallon bucket. Initial thoughts are this.
It certainly works, but turn the shower off for even a few seconds and you'll get a few seconds of scalding water when you turn it back on. Ill be looking for a small compact mixing valve in the near future to avoid this but for now my brain will be the mixing valve
Again- not totally pleased with what the system gives you. They should give you a separate line for the pump and shower head, not have the pump come connected directly to the shower head. The way they have it would work if you weren't running it through a heat exchanger, but I had to cut off this line and fit a new one on for the pick up, and re-use the old for the shower head since it was some weird thread I couldn't find anywhere. Also the shower head hose could be a little longer.
The heat exchange works. I'd say 15-20 degrees per pass. Not quite the 40 as advertised. Still....80 degree water is much better than 60 and I don't mind cycling it through once to get it another 20 degrees if need be.
The clamps and brackets are good quality. The directions are piss poor, but then again it's not rocket science to figure out.
Will get to test it out soon on the trails and we'll see how it does. I'd give the system. 6.5-7 out of 10. If I had to do it again I may just take the time to piece together my own kit
So I just finished installing my Helton hot water shower system purchased from cruiser outfitters
I have to say I'm slightly disappointed based on my initial impressions.
Issues - you really don't get much. A heat exchanger, a pump with a hose that goes directly to the shower head that has a weird British thread on it (not standard), some clamps and that's it
Here's a picture of what you get

And what I needed to buy from a local hose/hydraulic shop (an additional $130 worth)

Step one is finding a suitable location for the exchanger. Since my truck doesn't have AHC I had loads of space between the airbox and the fire wall. There's some existing threaded holes I used which was nice, I do have to bend a few brackets slightly to make room and make sure nothing rubbed or rattled on each other


Next is splicing into the heater lines. Don't make the mistake I did and cut into the top (3/4") lines. You'll realize you need a 3/4x3/4x5/8" tee instead of the 5/8x5/8x5/8" tee I got, and also one of the lines is so incredibly short there is no room to put another tee in. Luckily I was able to replace the now cut factory hose with some spare hose I had laying around, no harm done.
Where you want to splice it into is the lower heater hoses that come off the main or upper heater lines. I'm assuming these are the lines for the rear heater core. They are a pain to get to especially on a lifted truck. I found myself literally laying across the engine. But some cussing, sweating and bloody knuckles later the tees were in place and clamped down nicely. I was sure to use heavy duty heater hose, this stuff is strong, way stronger than the factory hoses i spliced into


I played around with the routing a bit but decided to go up high through the ac lines rather than lower bc that would have been too close to the valve cover/head for my liking. Plus with the new heater hoses I used being so thick, I figured anything they touch would be ok. Besides the hottest they could possibly get is ~200 degrees and that won't damage anything under the hood anyways. I tried my best to use clamps to keep things tidy, but to be honest I didn't find the need for many of them
Now onto the water lines. I decided to mount the fittings on the bumper so I didn't have to open the hood. I used quick connects that don't close when disconnected. This will keep any pressure from being built up if water was to freeze in the exchanger and thus keeping things from cracking/breaking. Also I altered the female/male ends so there is no way I can put the wrong line on the wrong side, since they will only correspond with the correct fitting on either the pump or shower head lines
I did my best to keep the water lines routed neatly and clamped down to avoid rubbing


Quick connects are barely visible from the front. I do want to get some soft plastic caps to put on to keep dirt and dust out of them

So I tested it out with a 5 gallon bucket. Initial thoughts are this.
It certainly works, but turn the shower off for even a few seconds and you'll get a few seconds of scalding water when you turn it back on. Ill be looking for a small compact mixing valve in the near future to avoid this but for now my brain will be the mixing valve
Again- not totally pleased with what the system gives you. They should give you a separate line for the pump and shower head, not have the pump come connected directly to the shower head. The way they have it would work if you weren't running it through a heat exchanger, but I had to cut off this line and fit a new one on for the pick up, and re-use the old for the shower head since it was some weird thread I couldn't find anywhere. Also the shower head hose could be a little longer.
The heat exchange works. I'd say 15-20 degrees per pass. Not quite the 40 as advertised. Still....80 degree water is much better than 60 and I don't mind cycling it through once to get it another 20 degrees if need be.
The clamps and brackets are good quality. The directions are piss poor, but then again it's not rocket science to figure out.
Will get to test it out soon on the trails and we'll see how it does. I'd give the system. 6.5-7 out of 10. If I had to do it again I may just take the time to piece together my own kit

