My Woody expo trailer.

Colby Jack

Traveler
Love the Woody!

I think that these wood builds are awesome. I, too, am a woodworker, and though fascinated with metalwork, wood just has a warmer personality to me. Couple questions-- What type of ply did you go with? Looks like standard Baltic Birch. Beautiful stuff. How do you plan to hinge the front compartment? With the arch, will you be hinging from the side, or front?

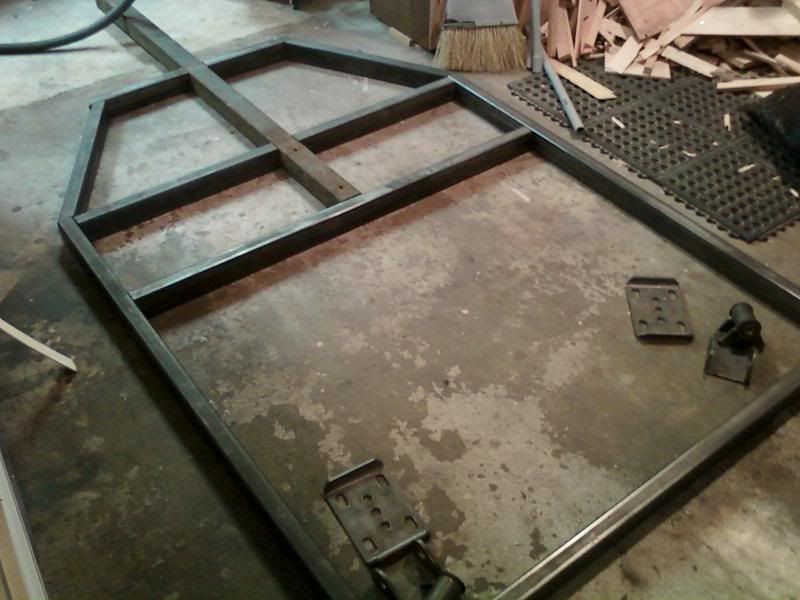
Any sketches or ideas on your frame? Overall size? Again, great work, and I look forward to more pics!

Colby Jack
 

Wavebreaker

Adventurer
I used Baltic birch shop grade 5ftx5ft not sure what that would be in the US. I was planning on hinging the lid sideways using SOSS hinges but i think ill end up hinging forward just for ease of use of the front compartment.
As for the trailer frame i am just starting to aquire pieces for it. overall length of trailer will be 104 inches from bumper to hitch. Width close to the same track width as my Jeep (i hope) will have 2 receiver tubes front and rear.sitting on YJ rear springs with shocks. Trailer box will be mounted to frame with isolation mounts. easy to remove if the need ever occurs. Lots of little things undecided as of yet. have an idea for platforms ahead and behind my fenders but not fixed in stone . Will see how it looks sitting on frame and decide from there.

Thanks for the questions.

Cheers
 

Colby Jack

Traveler
1 vote for forward hinging

Yes, the 5X5 Baltic Birch is the same I can find up here. Way cheaper than marine.

As much as I like the idea of hinging to the side, the stability, and added bonus of access from either side are a winner to me.

I am super curious regarding fiberglass, and its ease of use. Do you do glassing as part of your regular job? Is this something you've done before?

Keep up the good work and pics!

Colby Jack
 

Wavebreaker

Adventurer
Yea having it go forward does make it way more accessible.

Glassing unfortunately is something i have done way to much of. Boat Builder by trade. Glass work is straight forward no real science to it. few simple rules. main is time,always make sure you can do the piece you have laid out in the time allowed. Tho now with epoxy resins it is not as critical as it used to be but you can still run out of time end up with dry patches not completely wet out.When this happens that area has no strength. One of the most common mistakes with glass work is to much resin.

Again Thanks for the interest

Cheers
 

Wavebreaker

Adventurer
Well got the bottom glassed looks not to bad. ill let it cure a day or so and paint the bottom and move on to glassing the rest. Really need to start building the trailer frame to set this on :)

If any of you thinking of doing glass work picture 3 shows what your glass should look like after a coat of resin kinda dull and still showing weave. Biggest mistake most people make is to much resin. The first coat went on then 2 more coats 3 hours apart to fill the weave. if you apply to much resin in first coat your glass will end up floating in resin which weakens the substrate. by waiting 3 to 5 hours for another coat the cloth will not absorb any more resin yet the layers of resin will still bond mechanically. The 2 coats of straight resin fill the weave so you don't cut thru the glass when sanding. also by doing it this way it cuts down on excess weight.
Now This apply's only to EPOXY not Polyester. any way enough yakkin here's some pics.

Photo0142.jpg

Photo0143.jpg

Photo0146.jpg

Photo0147.jpg
 

Heifer Boy

Adventurer
Love it a lot!!! :wings:

Your photos have a very, very familiar look about them. LOL!!! I just wish you had started your build before mine so I would have had something to copy. I trawled (pardon the pun) a lot of boat building sites to get the information you have shown here and then had to adapt it to a suit a camper.

I like your door frame idea to get the seal gap. How are you building your doors? I used 12mm + 9mm ply for the frames and then 4mm + 12mm laminated for the door to get a 6mm gap for my seal. They are OK but warped a little. Once I get the seal on (hopefully tomorrow) then the commpression locks might pull them flatter when closed but it's not bad. My doors seem a bit bigger than your though so that didn't help the problem.

Nice job and looking forward to the finished product.

HB
 
Last edited:

AFSOC

Explorer
WOW! I can't believe I missed this one. I guess I should drop by ExPo a little more often. Beautiful!! Nice work, I will be following this. I admire anything that employs fine craftsmanship
 

VanIsle_Greg

I think I need a bigger truck!
Glass looks good Mike.

I haven't worked with glass/epoxy in many years, but I know when I did it was challenging but not hard to get it right. We owned a boat for years when I was a kid, so good ole cold cure was a VERY common thing around my place.

Will try to pop by later today if I can...will call first. I figured hauling my trailer over for you to measure might be easier than me doing it on paper. You know what you need...and saves me making crappy drawings. lol

Will call after my MTN bike ride this AM.
 

Wavebreaker

Adventurer
Heifer Boy: my doors will be doubled 12mm they are a lot smaller over all then what you have on yours. I read your build it turned out nice. I also have a clamp table for doing doors/hatches it is laser sited flat. Used to build alot of hatches for boats. you put all your pieces into a large heavy gauge plastic bag on table and apply vacuum pressure overnite never had one warp. (vacuum bagging)

AFSOC: Thanks

I'm around all day Greg.
 

Heifer Boy

Adventurer
Vacuum bagging is one thing I haven't learned/tried yet but is on the list for next time. Just weighing things down on the floor only gets you so far. I've been reading boat building sites heavily again recently and found out all sorts of new techiques to try out. I might build a Quick or EZ Canoe next for fun to try some new stuff out.

If your inner and outer skins are different sizes to create an overlap, how you get rid of excess, squeezed out epoxy around the joint when it's inside a vacuum bag? Just machine it off once dry?
 

Wavebreaker

Adventurer
Vacuum bagging is alot of fun in a way. can make complex shapes as well as flats . I use different tables depending on what i want to accomplish.
When doing a vacuum bag there is a polyester material that go's in with the object to be made, this material absorbs excess resin and holds it after product is dry this material is pulled off the product. Might leave some fuzz behind but for the most part comes off clean. West system i believe has a write up on bagging basics.

Canoes are fun Kayaks as well try a stitch and glue of even a stripper you will learn tons.
 

Wavebreaker

Adventurer
Minor update: sanded bottom glass and masked and rubber coated.
While waiting for stuff to dry to continue on with glassing i figured i should probably get the frame together so i have some where to put it :Wow1: so after a little head scratching/banging i got alot of it cut.

Photo0153.jpg

Photo0154.jpg

Photo0155.jpg

Photo0151.jpg


Cheers
 

bobDog

Expedition Leader
most definitely going in the right direction ....... I for one am 'way' impressed!!!!!:coffeedrink:
 

VanIsle_Greg

I think I need a bigger truck!
Like!

Frame looks like a great start... will look slick with matching tires/wheels to your Jeep. I really like the tub shape, purposeful and elegant. So hard to judge the overall size from the pics.
 

Forum statistics

Threads
189,832
Messages
2,921,450
Members
232,931
Latest member
Northandfree
Top