New Guy, '97 12 valve, Many, Many Adventures To Go!

GJStringert

Observer
Howdy Expo fellas!

Been a long time viewer/ part time poster on the Expedition Portal, and I have just about concluded a build (and remembered to take a few pictures along the way!) that I hope you guys and gals will enjoy as much as I have!

This was my first expedition set up: a dandy 2004 Nissan Titan I called Clifford.


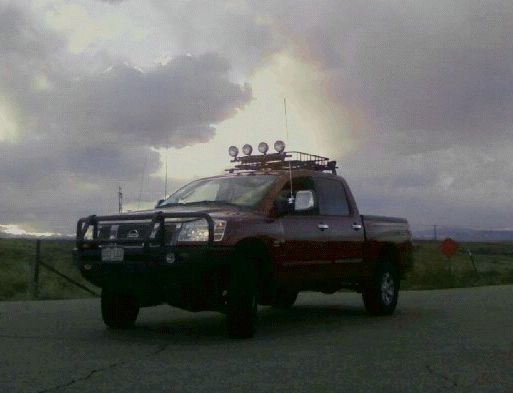
(Apologies for the nasty quality, this was honestly the best picture I could find on my computer!). Modifications were kept relatively minimal, it had a 4" Rancho lift, Detroit Tru-Trac out back, a 9.5 multimount Superwinch, the roofrack and lights you see, and an ARB bullbar. Fantastic rig, but I found myself continually wanting something more mechanically simple, with less sensors and goofball electronics.

Logged about 140K on the Titan, and bought this just this last June:


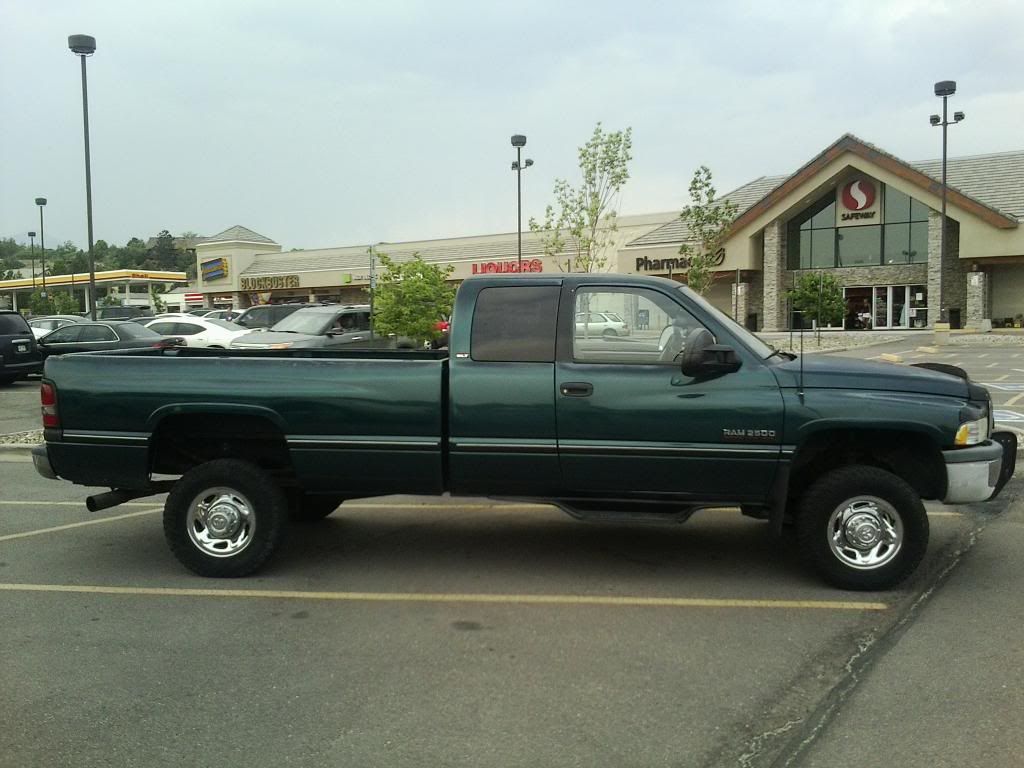
Quick specs: 1997 Dodge 2500, 12 valve, NV4500, NP241, Dana 60/80, 4.10s. The previous owner was a rancher out of northern Colorado, he took impeccable care of this thing, kept the modifications modest and useful: I picked it up with an AFE intake, Isspro Turbo/Pyro on the pillar, a 4" Turbo-back straight pipe, and the nice Cipa extendable mirrors. Other than that, the engine was clean and untouched, and I liked that (after all, it had 256 K on the clock when I got it!).

And here's a fairly recent picture of how it sits, on its inaugural off road adventure to Breakneck Pass near Fairplay, CO (More pictures of this trip to come!)


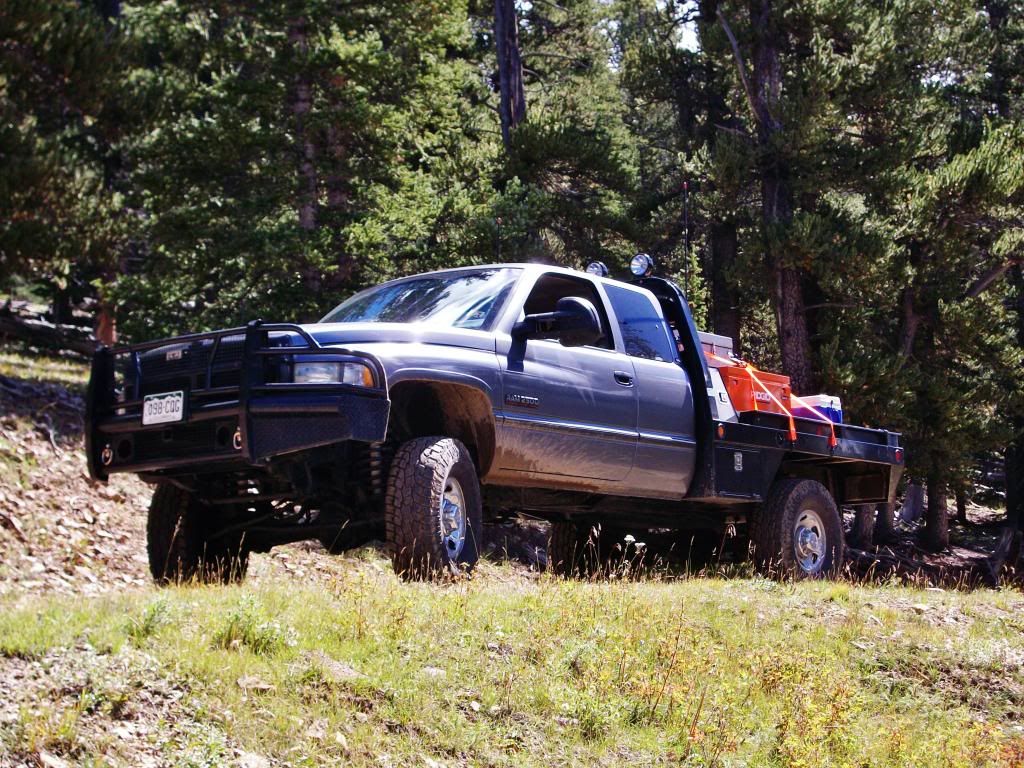
New Specs: Fabtech 6" Long arm, 315/75/16 Toyo Open Country's, CM SS Sport bed, DTR Ranch Bumper, and re-painted the factory (at the time) Chrysler metallic grey. All of this was done at TOPAR Racing in Trinidad, CO. The owner, Tony Paradisa, is a dear family friend, and for those of you in the south Colorado area, I could not recommend his shop more. He has some amazing attention to detail, and his welds are as pretty as can be! There are more goodies as well but I'm going to post those in a bit more detail later.

So for now I'll leave you all with this, I want to make sure I'm posting the pictures correctly, to tell you the truth!

Stay tuned,

Regards,
Graham
 

GJStringert

Observer
... So Tony did some pretty heavy duty over-hauling on the big bad Ram. While it was in paint, he sandblasted and undercoated the ENTIRE truck, axles, even re-sprayed a nice ceramic paint on the exhaust. Honest to God it looked like new when I picked it up.


The boxes on the bed were all built by him, and they swallow more junk than a hardware store keeps on hand!


When I got it back from TOPAR around the middle of August, I started doing the off-road oriented modifications:

First came lights. I admit I'm a bit of a sucker for lights, I've always loved the "KC's on the rollbar" look from 90s era monster trucks. On the headache rack, I have 6 120W Daylighters:


Those rear ones are SWEET for loading up game on late night hunting retrieves!

I also have 2 4" cheepo autozone LED lights in the bumper. Honestly, for what they are, they work great. I needed a little light to "fill the gap" below my hi-beams (and low beams for that matter), and these work perfectly!


GJStringert

Observer
I like to keep my aftermarket separate from factory, when I can. This way, when my brother or girlfriend need borrow the truck, if something were to go wrong, they might have an easier time "isolating" it.

I got this nifty 6-fuse block from Checker, and just bolted it to the top of the factory relay box under the hood, behind the driver's battery. It's powered by a big 4 GA wire (in the red conduit), and sends power to all the lights, the CB, and my compressor (don't have pictures of this yet, still working on getting a set of second-hand air bags mounted up)


At the moment, it remains uncovered. I think I will either make something out of some acrylic to cover it, or, and I like this idea better, do a little CAD and ask my school if I can use their 3D printer and make a nifty little one-off fuse box cover.

So that huge jumble of multi-colored conduit feeds through several holes in the firewall to a little trick filler plate that takes the place of the cup-holders above the radio.


The switches, from left to right, are: roof lights (inner pair), roof lights (outer pair), bumper LEDs, and roof reverse lights.

I also Dremel'd out the ashtray location and shoved my little Cobra CB in its place. It fit surprisingly well! I screwed the microphone clip to the side of my brake controller, it hurt less than going into the dash plastic...

I had been reading about the CAD issues with the front axle, so I installed a posi-loc as soon as I had time:


That's a nifty gadget. I never knew 2-low would be THAT useful for backing up trailers!

And finally, I just finished welding up a set of rock sliders yesterday. Main bar is 2x2 3/16, 1.5x1.5 1/4" frame legs, with gussets and frame plates all 1/4".


Well folks, my apologies for most of these having been in my driveway. I wanted to throw a little thread together real quickly, as I've enjoyed reading about all the other fantastic rigs (and many fine Cummins!) on here!

Here's a little transition into that trip to Breakneck Pass I mentioned earlier...


Anyway, I'm Graham, the girlfriend is Kaity, and, for now at least, I'm calling the truck Kurt ("Kurt the Cummins" has a nice ring... although I've thought about Mater... you see my Mater dashboard buddy earlier?)

Thoughts/comments are always welcome, catch you all later!

Graham
 

ExpoMike

Well-known member
As a fellow '97 12 valver, welcome and nice build.

If it hasn't been done, do the KDP fix.

Keep up the nice work and pics.
 

redthies

Renaissance Redneck
Welcome Graham. Nice truck. I like the charcoal grey. Which part of Colo are you from?
 

GJStringert

Observer
Thanks guys!

The previous owner had the KDP tabbed, so I'm good there.

@redthies, I'm all over CO, it kind of depends on the season and where work or school has me... I'm from Colorado Springs originally.
 

GJStringert

Observer
The Aforementioned Adventure...

Before we begin, here's another picture of those rocksliders I had on my phone.


Ok so grab a beer/hot chocolate/ whatever tickles your fancy, time for a little story: My girlfriend and I have been dating for around two and a half years. Every year, besides the usual summer trips, we try to do a little anniversary trip, which for us, falls in September. I prefer the later summer trips anyway because things cool off and nature is a might more inviting! Last year, the red Titan took us on the "Mud Loop", a system of 3 trails near Estes Park, CO. This year, we found ourselves at Breakneck Pass, just a bit south of Fairplay, CO.

...And here's how it started:


Did you guys know you could be pulled over on dirt roads?? That was a new one on me. Speeding just a smidge, got a warning, no biggee.

So we got to the staging area and I pulled over to flop the sway bars off and see what that Fabtech stuff would do...


I admit, nothing is even scratching the surface of "hardcore", but I was taking it easy, just wanted to see what this thing could do.


Breakneck is a REALLY cool trail. It climbs through a little rocky section and at the top, you come to a fork. If you head right, it dead ends at a VERY cool old mining cabin...


... And if you proceed straight, you drop through about a half a mile of aspens into a massive valley...


...Where you're presented with a bunch of little spur roads, and my favorite, the stream crossing.


So we trucked around for a bit and explored some spurs, and claimed ours for the night. It was tucked WAY off the trail, perfect!


We parked at around 2, and I was glad to. It was first season for muzzleloaders and I didn't want to be rattling around too much in a big lope-rich diesel messing up folks' hunts. We threw some lunch together, and headed off to hike Mt Sherman, number 47 on Colorado's list of 14ers!


... and the girlfriend makes fun of me for carrying around a mini tri-pod for my camera...

Hiked back and set up camp. She cooked the trout, I set up the tent and drank Corona. Not bad!


Don't mind that pitiful excuse for a fire! All the wood was soaked from the epic rain Colorado had been getting so I didn't even bother.
 

GJStringert

Observer
And Act II

Unfortunately, I didn't end up with many pictures from the next morning. We were in a bit of a hurry to get off the mountain and meet my father for some fishing down near Lake George. Here goes:


And this is that valley that the rock trail drops out into!


And who could forget the victory photo? I try to take one of these with every little trip I do, making memories!


We hopped over to Fairplay for a little breakfast at the Inn, and then proceeded south to meet my pops. To say he is a guru of the stream would put it softly. This man really knows his lines.


Well my friends thanks for viewing!

See you out there!

Regards,
Graham
 

redthies

Renaissance Redneck
Unfortunately, I didn't end up with many pictures from the next morning. We were in a bit of a hurry to get off the mountain and meet my father for some fishing down near Lake George. Here goes:


This is what I love about Colorado!
 

Wh1t3nukle

I gotz dis
Nicely done. Love what you've done to the rig. Was the flatbed an idea forever that just finally found a place?

I use the same suction phone holder over the dash. hahaha Curious, how long is the posi-lok cable from the firewall to the CAD? No rush at all.

Oh, and you might be interested in a Blue Sea fuse block. Not very expensive: http://www.bluesea.com/products/category/Fuse_Blocks/ST_Blade

Everything work out like you wanted? Anything tell you how you want it better?

Awesome pictures and thanks for sharing.
 

1leglance

2007 Expedition Trophy Champion, Overland Certifie
Great little shakedown run and looks like that girl is a keeper....she likes the outdoors, fishes and hangs out with you, tough combo to beat.

Keep the trip reports coming, that is what we build these things for anyway.
 

GJStringert

Observer
Nicely done. Love what you've done to the rig. Was the flatbed an idea forever that just finally found a place?

I use the same suction phone holder over the dash. hahaha Curious, how long is the posi-lok cable from the firewall to the CAD? No rush at all.

Oh, and you might be interested in a Blue Sea fuse block. Not very expensive: http://www.bluesea.com/products/category/Fuse_Blocks/ST_Blade

Everything work out like you wanted? Anything tell you how you want it better?

Awesome pictures and thanks for sharing.

Thanks for the thoughts!

The flatbed was always a fantasy more than anything. I always thought having one would be the bees knees because I've always loved putting fullsizes where they never should be. With a flatbed, basically, if the cab will fit, I'll drag the bed through without any worry of mangling sheet metal! And trust me, with an 8' bed, I have a continent of sheet back there with a factory bed... On this truck, I did it because it was actually cheaper than having the factory bed fixed. The first picture of the Dodge in this thread, when it was still green, doesn't do it justice. This bed was DESTROYED. I actually had to have my brother push the driver's bed side inward so I could close the gate haha! I mentioned the previous owner was a rancher too, and I think he may have dropped a trailer on it at some point, because both bedsides were banana shaped. Cheaper to have a flatbed fitted than have that beer can straightened!

The posi lok is 9' overall, so without measuring, I'd guess it's right around 8' from the firewall to the axle. I really had to fish it through and around some things (and at one point, take it all out and re-mount it because it wouldn't let me go full throttle, wrapped around the linkage on accident haha!), but it's in place now, and there's plenty of slack for axle droop! Ill get you some pictures later today.

And thanks a lot for the Blue Sea link! Those were exactly what I was looking for when I put all the electronics in there, but I couldn't, for the life of me, remember the company that made those. A little fuse update shall follow...

Only other thing I need is some sort of traction aid. I'm working on getting my multi mount winch all ready for this rig, then, if I can swing it right, an ARB locker for the rear. We shall see!

Thanks for checking in!
 

GJStringert

Observer
Merry Christmas, Happy New Year, Updates!

Hello all! Hope everyone is doing well. Like the title says, Merry Christmas, Happy New Year (belated, I know), I have updates for you!

Haven't been on in a little while, been slammed with college and odd-jobs, but the old 12er got some loving over the past few months. Let's begin...

First, the day before I left for Grand Junction to do a little work with my girlfriend's father (Christmas break), this happened:


That's my passenger floor vent. That's a coolant leak.

...looking down on the heater core...


...dash all torn apart...


That took me about 9 hours to do. I'm all about DIY, but in all honesty, I might consider paying somebody to do that if it ever happens again, that job was a SERIOUS pain in the butt. Still, it was a learning experience, and it's always good to get a little experience.

Ok let's move on to something less depressing! I mentioned I worked a bit with my girlfriend's father over break. We did a little fabrication for his farm, basically, he cut pieces, I welded them. I did that for probably 4 days, then, as payment, we built this:


I had been sitting on plans for this "chase rack" for a while. I had a few things I was trying to achieve, here: 1) I wanted to move my lights forward, I was getting WICKED glare in my mirrors and on the dash when those were turned on, 2) I wanted the lights to have their own protection from branches. This truck is already very tall, and I didn't want the lights themselves to be pushing branches and trail stuff out of the way. 3) I wanted a little extra storage. I had a roof rack on my last truck and even though, at times, it seemed a bit overkill, I ended up really loving it for little, soft things like folding chairs, sleeping bags and tents. To just throw those in a basket and bungee them down worked really well for me. 4) Finally, I wanted it to be mounted to the headache rack, not the roof (that's why I'm calling it a "chase rack", it's a little more styled like those). My last roof rack WAS mounted to the roof, with those little captured neoprene nuts (like Thule or Yakima). Really, there was nothing wrong with that, honestly I never had leaks or anything, but the thought of that kind of weight pulling on just sheet metal really made me cringe sometimes. This way, I know it's sturdy, and I don't even have to think of it up there.

Quick specs: bottom is 1x2 1/8" wall tube, "risers" are pieces of 2" wide 1/4" strap (cut into 2x2 squares), top "hoop" is schedule 40. All plates for mounting and gusseting are 1/4" thick, weight is about 65lbs. My girlfriend's dad helped me BIG TIME with this. He's got some nifty MIG tricks to really make some quality gizmos. Thanks Charlie!

Now I DO have a bunch of pictures from building it, but they're on my phone and it's kind of acting up, doesn't want to sync to my computer... As soon as it starts to behave I'll pull the pictures and post them up.

This next part was a bit of an after thought. At first, I was sure the headache rack would be ok with that rack up there and no gusset down low where the headache rack meets the bed, but I drove around for 500 miles or so and began to worry about it. Everything was still in shape, no welds had cracked or anything, but I figured over time something would fatigue a bit. I started building some "kicker legs" for the rack to help stabilize it:


(pardon the little black welding blowouts, I'm really trying and my little 140A welder sometimes doesn't like it)


Now, I can sleep knowing my headache rack/roof rack combo won't part company with the rest of my truck...

Moving on. I did a little tuning under the hood, the generic P-Pump tricks, and tightened down the wastegate a bit (I know that's not always advised, I'm still being pretty cautious with it). I also re-did my exhaust. I basically cut the whole thing out, then just cut and re-welded joints and elbows until I came up with this:


Tire Burner!!! My aim here was just to free up a bit of clearance behind the tire, now my lowest point is my receiver, and that's still darn high.

I mentioned a while ago that I had plans for an air compressor:


This was a Christmas gift from my parents and brother, Viair 450P Portable Compressor. It's made to be portable, but I kind of made it "fixed". I cut the alligator clips off the power leads (since it's supposed to be hooked up directly to the battery) and spliced in a little 2-prong harness (so it's still detachable/portable). This is, then, powered by a switch in the cab. I welded up a little tray for it out of some 1" L-angle, and bent a little 1/8th round rod to make rings for the lashing strap to run through. This way it still sits on it's portable "sand tray", and there are hardly any vibrations from it. The black hose hooked up here runs to the tank:


The tank is hung up right underneath the flatbed, next to the fuel tank. It is well above the exhaust and driveshaft, high enough in fact that I didn't even worry about making a skidplate or anything for it. Now, here's the really nifty part: the compressor is called an automatic portable compressor, which means it has a built in pressure switch that cuts it off at 140psi. The tank is rated for 150psi (harbor freight special haha!), perfect! Because it's 100% duty cycle, I can let it run and forget about it until the tank fills and it cuts itself off, pretty darn cool. So then, from the tank, I ran a female to each side box:


Now, all I have to do for a quick air up is carry my coily hose and tire gun around, and I'm set!

Finally, I decided it's time for some rear suspension work, and here's why:


I confess, this is easily one of the most hick things I've ever done. My friend and I wanted to get out and do a little wheeling this last weekend (3 day weekend, yay MLK day!) and I wanted to get my bump pads for my overloads off to try to milk a little more flex out of the big rig. Well I got the other 3 off, but this last bolt was seized tighter than anything I've ever known, I ended up completely destroying the head of the bolt trying to get it off. So as a quick fix (it was 9:45 at night...), out came the good old angle grinder!

Jokes aside though, this was only temporary. I figured it was time to do it right, so I ordered a shackle flip from DIY 4x4, should be here tomorrow! I also got some radiused U-bolts from a local place, and ordered some top plates from Ballistic Fab to do a U-bolt flip as well


If it's worth doing, it's worth doing right.

A final little note for those of you that like a little custom touch, Office Depot sells some stuff called Inkjet Window Decal paper. It's 8.5x11 and is made to stick to glass and plastic, and feeds through a printer just like any paper. Go into Word, do a little Word Art, and you've got home-brewed service stickers!


Thanks to my girlfriend for that idea...

Well my friends that's about all I have for now. Thanks for looking!

Regards, Graham


Forum statistics

Threads
189,600
Messages
2,918,736
Members
232,571
Latest member
Psyph
Top