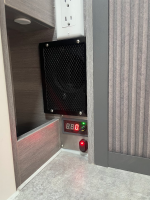
Here is a quick write up on the pressurization system I designed and installed in my Dweller. It is going to be several months before I will be able to comment on the overall effectiveness, but I am cautiously optimistic that this system, combined with my efforts to seal up the Dweller, will significantly reduce the amount of dust that gets inside.
The key design parameters were:
- No interference with existing systems/components
- Minimal impact on storage
- Quality, long life components that can be easily sourced
- Short duct runs that are as efficient as possible
- A reasonable professional looking appearance
The key components of the system are:
- Air cleaner
- Wall penetration fitting where the duct passes through the front wall of the Dweller
- 12 volt blower
- Ductwork components
- Electrical
Air cleaner
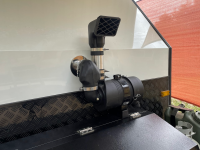
The top of the front gear box is where I chose to locate the air cleaner. There is limited space to work with, so that limited my selection of an air cleaner. The unit I choose is a Donaldson FPG series air cleaner, p/n G070020. It is an industrial engine air cleaner. Key attributes are:
- Fits in the available space
- 3 inch inlet and outlet
- 2-stage filtration - pre-filter design removes large particles and water prior to final filtration
- Heavy duty construction
- Readily available replacement filter elements
Wall penetration
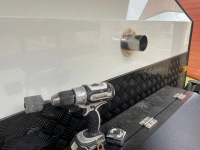
This is a simple but critical component. I started working on a clean-sheet design to have fabricated locally, I then stumbled across the perfect solution: a 3-inch marine exhaust tip. It is polished stainless steel with a TIG welded flange. It is the perfect solution for my application.
12 Volt blower
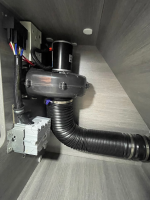
After looking at lots of options, I settled on a squirrel cage marine bilge blower. There are 3 and 4 inch options available. I went with the 4-inch version. The 3-inch blower specs did not blow enough CFM under pressure. The 4-inch version I selected is a Jabso continuous-duty rated flange-mounted blower. The p/n is 35760-0092.
Duct components
Key exterior duct components
- Generic 3-inch intake snorkel off EBay. It is surprisingly high quality. It also provides initial water removal.
- 3-inch stainless tube. Polished exhaust pipe purchased from Amazon
- 3-inch “Cobra elbow” - this is the funky elbow connecting the outlet of the air cleaner to the wall penetration, Not ideal from a restriction perspective, but it is what was needed to be able to locate the wall penetration where I wanted it.
Key interior duct components
- 3-inch x 4-inch coupler
- 4-inch flex pipe. This is another component that really exceeded expectations. This is a semi-rigid accordian duct. it holds in place very well once it is formed to shape. The primary usage for this is woodshop vacuum systems.
Outlet Grill
- Homemade. 5-inch x 7-inch oversize to hide blower mounting bolts.
Electrical
The electrical is maybe more complicated than needed, but I am happy with the result.
- The electrical is wired through the current gauge on the Dweller control panel so I can measure the amp draw.
- I installed an on/off switch in the Dweller. I also added a PWM motor speed controller. My thinking was that I may want to use the blower as a variable speed vent fan when the Dweller is parked.
- I wired it so that I can also control the fan from a yet-to-be-installed switch in the cab of my tow vehicle where I can remotely turn the fan on when hitting dirt roads. Adding this complexity, combined with the PWM speed controller, required relays for both the 12v+ and 12v-..
Still to be done
- I need to do the wiring for the cab mounted control switch in my tow vehicle. This will happen at the same time as I wire an Anderson connector for a DC/DC charger
- I may extend the intake snorkel to the top of the Dweller. The fact that the front wall of the Dweller is not angled at 45 degrees complicates things, but I think I have it figured out.
As mentioned, it will be some time before I get to give this a thorough test on some dusty roads. With the Dweller parked and the fan running, I can feel air blowing out of the exterior louvers of the refrigerator compartment. I take that as a good sign that I have things reasonably well sealed up and that there is a chance this will work as expected.
The photos below show most of the details. I am very satisfied with the result. Let me know if there are any questions. I am out-of-pocket for most of the next month, but I will respond when I can.
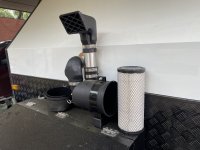
Wall Penetration / Exhaust Flange
Below is the interior ductwork and fan which are located tight against the left wall of the front interior storage cubby.
This shows the interior grill, the on/off switch and the PWM speed controller.
