Ok I get it maybe I'm being too picky. How long would you guys say that fridge will go before it drains the batteries? Go forever if you're in the sun? How long before dead batteries in cloudy conditions? I dont own or plan to buy a generator.Quality and customer service?!? Don't we all.
I wish you good luck, and let us know where you end up.
You are using an out of date browser. It may not display this or other websites correctly.
You should upgrade or use an alternative browser.
You should upgrade or use an alternative browser.
OBI Dweller Review and Discussion
- Thread starter gendlert
- Start date
Flettrich3
Member
DWELLER 13 Does the Parking brake work? Mine does not. Do I just tighten it up?
Last edited:
Yeah, i had to tighten mine a bit and it was good.DWELLER 13 Does the emergency break work? Mine does not. Do I just tighten it up?
Most likely. I had to adjust the brake pads out on mine.DWELLER 13 Does the emergency break work? Mine does not. Do I just tighten it up?
Singler3360
Active member
A word of caution on the Tacoma in case it helps someone else. We have the Conqueror UEV-14 which is in the same ballpark weight-wise as it's cousin the Dweller 13. I was sure our '06 Tacoma had the factory tow package and therefore thought it was rated for 6,000+ towing capacity. Going over small rock ledges down in the Moab area to get to dispersed camping sites, the chassis became bent a few millimeters on each side at a spot just behind the rear axle. It turns out the tow package was added later, leaving the tow capacity still around 3500 lbs. The local body shop says it was repairable for about $2000. We sold it as-is with full disclosure and bought a 2014 Ford F150 FX4. My local repair guy whom I trust said that for towing off-road one-third more weight should be added to the towing capacity needed. We loved our Taco and it was sad to see her drive off.Awesome camp site. How does the Tacoma do pulling the Dweller?
That's fantastic. I have the Dweller 13 and a TundraV8 but my son has a Tacoma. I've been curious if he could tow it. Thanks for the reply. Enjoy the Dweller!!
Singler3360
Active member
Awesome campsite in the Redwoods! You've got to love the free HF bucket for the sink drain. HF should have teamed up with OBI/Conqueror at time of sale! "Here are your keys and your free HF bucket."
Yes, but Roa, says Dweller warranty would not be affected. I agree with you. The manufacturer will look for any possible way to not cover something.That's with any modification to any vehicle. Just like your vehicle, any modifications that result in a direct failure voids warranty.
Have any of you guys swapped out the agm batteries for the lithium ? The stock agm's don't seem to work that well for me. Or maybe they are just junk. After watching Will Prowse ( diy solar) There are some cheap china lithium ion with bms, 12 volts that are actually pretty good.
Or I was thinking about the EG4-LifePower4 Lithium Battery | 12V 400AH | Server Rack Battery. Looks like there would be enough room to install in front storage area. Or which batteries do you have ? Constructive critisim would be appreciated.
Thx !
Or I was thinking about the EG4-LifePower4 Lithium Battery | 12V 400AH | Server Rack Battery. Looks like there would be enough room to install in front storage area. Or which batteries do you have ? Constructive critisim would be appreciated.
Thx !
rehammer81
Active member
Will has great advice. I built my own power box with individual 3V lithium cells based on Will's YouTube channel. I built my own 200Ah 12V battery with BMS to power a portable box with a solar controller and 12V USB and cigarette lighter style sockets. For replacing your AGM batteries in the trailer, I would recommend just buying prebuilt 12V batteries he recommends. Lithium is the way to go if you have the money to make the swap. Your solar controller already has the settings for lithium programmed in. Lithium gives you close to full battery capacity while AGM is more like 50%.Have any of you guys swapped out the agm batteries for the lithium ? The stock agm's don't seem to work that well for me. Or maybe they are just junk. After watching Will Prowse ( diy solar) There are some cheap china lithium ion with bms, 12 volts that are actually pretty good.
Or I was thinking about the EG4-LifePower4 Lithium Battery | 12V 400AH | Server Rack Battery. Looks like there would be enough room to install in front storage area. Or which batteries do you have ? Constructive critisim would be appreciated.
Thx !
Sent from my SM-G991U using Tapatalk
Flettrich3
Member
Has anyone tried to move the TV from the inside and mounted it to the outside bar area? I know you are supposed to be able to, but have yet tried. Do you have to buy another set of cords to plug it up?
gendlert
Well-known member
Got out of the heat here in AZ and found a nice little shady spot with no one in sight. Only a couple hours max of partial sunlight on the panels, and the Li battery never dropped below 13.1V, so we're very happy with the performance of the upgrade. Money well spent. @S J check out this post and I've detailed what I did for the upgrade; there are others who have done different solutions. I like that this one uses my existing bank's storage area with no modifications, as opposed to installing a server rack battery elsewhere, but I know I saw on Facebook someone doing the EG-4 install; check that out there if you're interested.

My wife finally picked up some mini hummingbird feeders on Amazon and they were a lot of fun. The hummingbirds were literally hovering and waiting for her to hang them up so they could feast all weekend. They got real territorial real quick; aggressive little buggers.

On our previous trip, I bent the step and it won't open for now, so we used a nature hack which worked just fine. I'm going to remove the electric step and take a portable stool from here on out, but it wasn't delivered yet before this trip. "Stumpy" was a good substitute; we'll miss Stumpy.

Then I got to thinking, what other "nature hacks" can I come up with. Well, you know those pesky locking D-clips on the pop-top? Forget those! Nature hacks! I call this the "quick release twig." (patent pending) Now I need to find a stick to fit as a hitch pin and I'm gonna have the complete set.")

My wife finally picked up some mini hummingbird feeders on Amazon and they were a lot of fun. The hummingbirds were literally hovering and waiting for her to hang them up so they could feast all weekend. They got real territorial real quick; aggressive little buggers.
On our previous trip, I bent the step and it won't open for now, so we used a nature hack which worked just fine. I'm going to remove the electric step and take a portable stool from here on out, but it wasn't delivered yet before this trip. "Stumpy" was a good substitute; we'll miss Stumpy.
Then I got to thinking, what other "nature hacks" can I come up with. Well, you know those pesky locking D-clips on the pop-top? Forget those! Nature hacks! I call this the "quick release twig." (patent pending) Now I need to find a stick to fit as a hitch pin and I'm gonna have the complete set.
bjammin101
New member
Here was our Labor Day trip to Concan, TX at Riverview Campsite by the Frio River.
We have a "yard" now I am going to call the dog mod. Previously we had all three leashed up, getting tangled and stuck under chairs constantly. I also had a fear of them wrapping around the support for the awning and tearing that thing down.
What we did was put a large tarp on the ground and then used bungee cords to secure it under the trailer so the dogs couldnt go underneath the camper to escape. Then these fence pieces have a stake that goes through and you can tamp it into the ground. Link below
Amazon product ASIN B0BK6H4FPZ
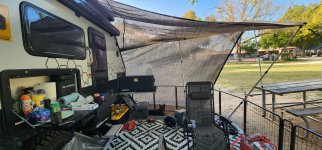
Now I complained a lot about heat in my previous posts but I can say if you stay in the shade, it makes things a lot more tolerable. We were fortunately in the shade until about 3 pm when it was affecting us a little more but in the second to last picture, you can see I bought some of the 90% fabricate sunshade material and bungeed it on the driver side of the trailer and then used some telescoping tarp poles to create a shaded area that would still allow windflow. Unfortunately I only took this one picture but it covered the entire front side of the camper. Temperatures were reaching 100 degrees so I know the shade and drier weather helped tremendously.
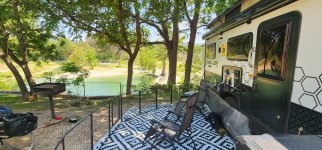
Last picture is the view from the bed in the morning. Overall it was a very successful trip and I would recommend this location to anyone.
Update also on pulling the trailer with my Ram 1500. I did not fill the tanks with water, we had the spare tires on the back and everything loaded up in the trailer. I also had misc stuff in the bed of the truck but nothing too heavy. I drove from Houston through SA further out west at about 65-70 mph the entire time minus some traffic. I was not having any sway issues until I started to venture past 70 a few times. Trailer is 100% stock and I would love to go faster than this but I was also only getting 10-11 mpg so I think I have settled on this being the speed I need to stay around.
Only problem left to fix is the water heater still not working...
We have a "yard" now I am going to call the dog mod. Previously we had all three leashed up, getting tangled and stuck under chairs constantly. I also had a fear of them wrapping around the support for the awning and tearing that thing down.
What we did was put a large tarp on the ground and then used bungee cords to secure it under the trailer so the dogs couldnt go underneath the camper to escape. Then these fence pieces have a stake that goes through and you can tamp it into the ground. Link below
Amazon product ASIN B0BK6H4FPZ
Now I complained a lot about heat in my previous posts but I can say if you stay in the shade, it makes things a lot more tolerable. We were fortunately in the shade until about 3 pm when it was affecting us a little more but in the second to last picture, you can see I bought some of the 90% fabricate sunshade material and bungeed it on the driver side of the trailer and then used some telescoping tarp poles to create a shaded area that would still allow windflow. Unfortunately I only took this one picture but it covered the entire front side of the camper. Temperatures were reaching 100 degrees so I know the shade and drier weather helped tremendously.
Last picture is the view from the bed in the morning. Overall it was a very successful trip and I would recommend this location to anyone.
Update also on pulling the trailer with my Ram 1500. I did not fill the tanks with water, we had the spare tires on the back and everything loaded up in the trailer. I also had misc stuff in the bed of the truck but nothing too heavy. I drove from Houston through SA further out west at about 65-70 mph the entire time minus some traffic. I was not having any sway issues until I started to venture past 70 a few times. Trailer is 100% stock and I would love to go faster than this but I was also only getting 10-11 mpg so I think I have settled on this being the speed I need to stay around.
Only problem left to fix is the water heater still not working...
Attachments


gendlert
Well-known member
All other propane elements are working? Heater works? Stove works?Only problem left to fix is the water heater still not working...
I haven't tried, but I think it's supposed to be plug-and-play. Drop the TV on the outside mount and plug it in on the outlets by the USB outlet to the left. They're supposed to be wired the same way. Anything you could watch inside should be watchable outside.Has anyone tried to move the TV from the inside and mounted it to the outside bar area? I know you are supposed to be able to, but have yet tried. Do you have to buy another set of cords to plug it up?
Thank you ! The 15 is a little different. I will check out and see what I can do.OK, it's done. I made the conversion to lithium this weekend. I now have a 400 Ah battery bank which fits in the existing battery location, and I rigged it for all-season charging, which may not have been necessary, but it's done now.
Products I used:
- LiTime 12V 400Ah Lithium Battery 3200W Max. Load Power LiFePO4 Battery, Built-in 250A BMS, 5120Wh Usable Energy, 4000-15000 Cycles & 10-Year Lifetime
- This used to be (until the new year) AmpereTime. Now it's LiTime, I guess, but it's the same stuff. Will Prowse did a video on this battery that convinced me to get it over some similar sized Sokergy models that he said were garbage.
- I picked this one specifically because it fit in the space of the three 100Ah batteries, within 0.5" in any direction. I didn't have to move anything around in the trailer besides the batteries, and it's the most battery I could find to fit in there.
- I got it for $1500 on Black Friday. Not a huge savings, but not nothing. Worth it so far.
- It does have a battery management system (BMS), but it does NOT have a low-temp cutoff. Again, Will Prowse did a video on how to work around that, and I installed my own cut-off.
- Victron Energy SmartSolar MPPT 100V 30 amp 12/24-Volt Solar Charge Controller (Bluetooth)
- This is what Will recommended in this video (same link) in order to add the low-temp cutoff.
- Yes, it comes in a 50A version, but I'm lying if I think I'm ever going to expand my solar array on the roof, so this is plenty. You do you.
- This replaced my Renogy Adventurer 30A solar controller. See pics below.
- Renogy's controller does have a temperature sensor adapter, but it's only for optimization and not for a cutoff; their BMS on their batteries has a low-temp cutoff, so if you use Renogy batteries you don't need this, but you can't fit 400 Ah of Renogy in the same space. You see the problem...
- Victron Energy Smart Battery Sense Long Range (up to 10m)
- Again, recommended from the same video.
- This just links to the Victron controller and tells it when to cut the charging (default setting is 5 degrees Celsius). I kept that, but it's adjustable. Again, you do you.
Tools needed:
Basic steps involved:
- The only weird tool that you might not have readily available is a T20 torx screwdriver; you'll need that to disconnect the heating duct from the Truma because it's installed over the battery in the D13 (I'm not sure about the D15 or D19).
- Socket set
- Various screwdrivers, including a very short Phillips to get in hard to reach spaces
- Electrical tape
This took me about an hour and around $2000 all in with tax.
- Ensure you've disconnected the battery disconnect.
- Open up the belly of the beast under the bed.
- Remove the duct from the Truma. You'll need a socket for the outer sleeve and a Torx T20 for the inner duct. Set aside.
- Remove the battery holder crossbar. Two nylock nuts on either end is all.
- Disconnect all 3 batteries. Take them out of the trailer. Sell them on craigslist.
- Drop in the new Lithium battery in the same location and admire how smart you are for buying something that fits in the exact same space and gets you 2.66x as much power. Be sure to both ooooooh and ahhhhhh.
- Remove the wiring from the OEM Renogy solar controller. Remove the solar controller. Sell it on craigslist with your batteries. Bundle discount.
- Reinstall wiring for PV and battery into the new Victron controller.
- Attach (positive first) battery with the temp sensor installed on the terminals using the [EDIT] two shortest preexisting battery wires on both positive and negative (to allow for greater current from battery, per Willy's idea). More ooooooohs and ahhhhhhs because lights turn on and stuff.
- Use electrical tape to cover the other terminals from the wiring no longer needed for a multiple battery bank. You can totally just remove these wires, but I didn't because there was a thing nagging at the back of my mind saying "what if I want to do another multiple battery bank someday?" and I just left them. They aren't hurting anything and it was easier to just cover them.
- Adjust settings in the Renogy 2000W inverter to be lithium according to manual. For my model it was program 06 set to LI, but be sure to check that and not trust this post in case it's different.
- Connect the Victron controller and temp sensors using the Victron app following Will's instructions from that video. Super easy. Takes about 10 minutes if everything goes well, including firmware updates.
- Once you're convinced it's working, install the Victron controller on the inside of where the Renogy solar controller was. That's the only logical place I could figure to put it. If you find something better, let me know.
- Reinstall the battery holder crossbar.
- Reinstall the duct to the Truma.
- Close it up and admire your work with a final set of oooooohs and ahhhhhhs. Check your new bluetooth app 30 times the rest of the day to assure yourself it's doing fine. It is.
I have NOT done a trip with it. I'll keep you posted on performance once I have some data. I also haven't closed up the hole from the Renogy controller; I'm going to cover it with something classy like a license plate that says "My Other Ride is Your Mom" or something, but that's not that important for now.
Pics to help:
Battery in its place:
View attachment 760204
The temp sensor installed:
View attachment 760210
Here's a look at the controller where the hole from the Renogy is. I still need to cover it with something.
View attachment 760209
A couple pics of the controller installed. I used the Renogy screws to mount it on the inside. I only used 3 screws instead of 4. I'll let you know if it ever fails.
View attachment 760206
View attachment 760205
Reinstalled ductwork and crossbar:
View attachment 760207
"Dude, where have you been? We're ready for dinner and no one cares about your stupid trailer." They didn't help. Not even a little bit.
View attachment 760208
Feel free to add details if you've done something similar.
At very quick glance, I'm seeing Dweller 13's from 29k to 50k. Why so much variance?
I was just checking out the same battery. Let me know what you come up with as a fix to hide the hole from the Renogy controller.OK, it's done. I made the conversion to lithium this weekend. I now have a 400 Ah battery bank which fits in the existing battery location, and I rigged it for all-season charging, which may not have been necessary, but it's done now.
Products I used:
- LiTime 12V 400Ah Lithium Battery 3200W Max. Load Power LiFePO4 Battery, Built-in 250A BMS, 5120Wh Usable Energy, 4000-15000 Cycles & 10-Year Lifetime
- This used to be (until the new year) AmpereTime. Now it's LiTime, I guess, but it's the same stuff. Will Prowse did a video on this battery that convinced me to get it over some similar sized Sokergy models that he said were garbage.
- I picked this one specifically because it fit in the space of the three 100Ah batteries, within 0.5" in any direction. I didn't have to move anything around in the trailer besides the batteries, and it's the most battery I could find to fit in there.
- I got it for $1500 on Black Friday. Not a huge savings, but not nothing. Worth it so far.
- It does have a battery management system (BMS), but it does NOT have a low-temp cutoff. Again, Will Prowse did a video on how to work around that, and I installed my own cut-off.
- Victron Energy SmartSolar MPPT 100V 30 amp 12/24-Volt Solar Charge Controller (Bluetooth)
- This is what Will recommended in this video (same link) in order to add the low-temp cutoff.
- Yes, it comes in a 50A version, but I'm lying if I think I'm ever going to expand my solar array on the roof, so this is plenty. You do you.
- This replaced my Renogy Adventurer 30A solar controller. See pics below.
- Renogy's controller does have a temperature sensor adapter, but it's only for optimization and not for a cutoff; their BMS on their batteries has a low-temp cutoff, so if you use Renogy batteries you don't need this, but you can't fit 400 Ah of Renogy in the same space. You see the problem...
- Victron Energy Smart Battery Sense Long Range (up to 10m)
- Again, recommended from the same video.
- This just links to the Victron controller and tells it when to cut the charging (default setting is 5 degrees Celsius). I kept that, but it's adjustable. Again, you do you.
Tools needed:
Basic steps involved:
- The only weird tool that you might not have readily available is a T20 torx screwdriver; you'll need that to disconnect the heating duct from the Truma because it's installed over the battery in the D13 (I'm not sure about the D15 or D19).
- Socket set
- Various screwdrivers, including a very short Phillips to get in hard to reach spaces
- Electrical tape
This took me about an hour and around $2000 all in with tax.
- Ensure you've disconnected the battery disconnect.
- Open up the belly of the beast under the bed.
- Remove the duct from the Truma. You'll need a socket for the outer sleeve and a Torx T20 for the inner duct. Set aside.
- Remove the battery holder crossbar. Two nylock nuts on either end is all.
- Disconnect all 3 batteries. Take them out of the trailer. Sell them on craigslist.
- Drop in the new Lithium battery in the same location and admire how smart you are for buying something that fits in the exact same space and gets you 2.66x as much power. Be sure to both ooooooh and ahhhhhh.
- Remove the wiring from the OEM Renogy solar controller. Remove the solar controller. Sell it on craigslist with your batteries. Bundle discount.
- Reinstall wiring for PV and battery into the new Victron controller.
- Attach (positive first) battery with the temp sensor installed on the terminals using the [EDIT] two shortest preexisting battery wires on both positive and negative (to allow for greater current from battery, per Willy's idea). More ooooooohs and ahhhhhhs because lights turn on and stuff.
- Use electrical tape to cover the other terminals from the wiring no longer needed for a multiple battery bank. You can totally just remove these wires, but I didn't because there was a thing nagging at the back of my mind saying "what if I want to do another multiple battery bank someday?" and I just left them. They aren't hurting anything and it was easier to just cover them.
- Adjust settings in the Renogy 2000W inverter to be lithium according to manual. For my model it was program 06 set to LI, but be sure to check that and not trust this post in case it's different.
- Connect the Victron controller and temp sensors using the Victron app following Will's instructions from that video. Super easy. Takes about 10 minutes if everything goes well, including firmware updates.
- Once you're convinced it's working, install the Victron controller on the inside of where the Renogy solar controller was. That's the only logical place I could figure to put it. If you find something better, let me know.
- Reinstall the battery holder crossbar.
- Reinstall the duct to the Truma.
- Close it up and admire your work with a final set of oooooohs and ahhhhhhs. Check your new bluetooth app 30 times the rest of the day to assure yourself it's doing fine. It is.
I have NOT done a trip with it. I'll keep you posted on performance once I have some data. I also haven't closed up the hole from the Renogy controller; I'm going to cover it with something classy like a license plate that says "My Other Ride is Your Mom" or something, but that's not that important for now.
Pics to help:
Battery in its place:
View attachment 760204
The temp sensor installed:
View attachment 760210
Here's a look at the controller where the hole from the Renogy is. I still need to cover it with something.
View attachment 760209
A couple pics of the controller installed. I used the Renogy screws to mount it on the inside. I only used 3 screws instead of 4. I'll let you know if it ever fails.
View attachment 760206
View attachment 760205
Reinstalled ductwork and crossbar:
View attachment 760207
"Dude, where have you been? We're ready for dinner and no one cares about your stupid trailer." They didn't help. Not even a little bit.
View attachment 760208
Feel free to add details if you've done something similar.
Glad to hear you like the extra power. What appliances are your running ? and for how long ? The existing agm batteries do not do as well as I was hoping. Maybe because they sat on the rv lot for 1 year. How much where you asking for agm and controller on craigslist ?
Thank you !
Similar threads
- Replies
- 2
- Views
- 632
- Replies
- 12
- Views
- 721
- Replies
- 3
- Views
- 511
- Replies
- 32
- Views
- 6K
- Replies
- 20
- Views
- 4K