Offroad Teardrop - SawTooth XL

JIMBO

Expedition Leader
:sombrero: Rats, here I said I would never build one, but

Are you satisfied with the way your HEAVY, battery box is attached to the trailer floor ???

I would think of the vulnerability and weight/bounce strain, in only the verticle screws, attached into the box side boards (linear plywood filler)

I know, it's behind the axle, but-strength/venting/harness access ???

just a thought !!perhaps some straps??

:coffee::):safari-rig::safari-rig: JIMBO
 

stomperxj

Explorer
:sombrero: Rats, here I said I would never build one, but

Are you satisfied with the way your HEAVY, battery box is attached to the trailer floor ??? I would think of the vulnerability and weight/bounce strain, in only the verticle screws, attached into the box side boards (linear plywood filler)

Total weight with the batteries will be approx 76 lbs. I am mounting it with (38) #6x1-5/8" drywall screws and Titebond III glue. An engineer I used to work with said that those screws with about 1" of engagement will conservatively have about 65lbs of pullout strength. I should be able to stand in it no problem... :) I'll keep an eye on it and see if there is any fatigue after the first few trips with it.

I know, it's behind the axle, but-strength/venting/harness access ??? just a thought !!perhaps some straps??

:coffee::):safari-rig::safari-rig: JIMBO

I am going to run some PVC or the like from the box to the back storage area for venting and to run the harness/cables. I'm going to mount a battery tender in there somewhere too. Not sure if it will go in the battery box or in the storage area.


Thanks for the comments Jimbo. Its always good to have more eyes looking from a different perspective at what I'm doing. It helps...

:)
 

Tumbleweed

Adventurer
Jess, really like your build. I could never have that much patience to plan and talent to execute it well.
Jimbo beat me to it; and I tend to overbuild my projects. I would try some sort or retaining strap on the bottom of the box. I think some light strapping steel would sure give some piece of mind. Maybe the type they use for strapping stuff to pallets?
Would putting the batteries inside the plastic battery boxes be a good idea?
And then inside your compartment. I don't know if they are corrosion proof or not. The boxes might even make it easier to lift the batteries out if needed, they have little handles on the ends of them. Walmart carries them pretty cheap I believe.
 

stomperxj

Explorer
Jess, really like your build. I could never have that much patience to plan and talent to execute it well.
Jimbo beat me to it; and I tend to overbuild my projects. I would try some sort or retaining strap on the bottom of the box. I think some light strapping steel would sure give some piece of mind. Maybe the type they use for strapping stuff to pallets?
Would putting the batteries inside the plastic battery boxes be a good idea?
And then inside your compartment. I don't know if they are corrosion proof or not. The boxes might even make it easier to lift the batteries out if needed, they have little handles on the ends of them. Walmart carries them pretty cheap I believe.

Thanks Don. I am taking my time and being meticulous about this one. The batteries will be strapped down inside the box. They are way smaller than a normal size battery so those plastic boxes wont fit in there. They are a sealed type of battery too. There's a link further up this page to the batts i'm getting.
 

sseaman

Adventurer
For extra strength you could use some angle on the underside and attach the box and floor to this.


just a thought
 

Box Rocket

Well-known member
I somehow missed this thread and now that I've found it, I must say this is OUTSTANDING!. I love it. Very nice craftsmanship and well thought out design. Can't wait to see more progress. I feel like a complete hack with my trailer after looking at this. Seriously great work, and I like it even more since its different from what everyone else is doing.
 

stomperxj

Explorer
I somehow missed this thread and now that I've found it, I must say this is OUTSTANDING!. I love it. Very nice craftsmanship and well thought out design. Can't wait to see more progress. I feel like a complete hack with my trailer after looking at this. Seriously great work, and I like it even more since its different from what everyone else is doing.

Thanks for the compliments BR. I appreciate it... :) Your trailer is looking good to me. Nice work...

Another semi warm day today. I got some work done on the hatch area.

Drilled for the t-nuts and used 1/4-20 stainless button heads. I also got the seal surface temporarily screwed down too.

jvvK9kM.jpg

ajwlf8O.jpg

ixm4wb3.jpg


More soon hopefully...
 
Last edited:

Stouttrout

Adventurer
Very Impressive!!!! This is one of the nicest builds I have seen on a Teardrop. Looks like you are having a blast. The work is very quality.
 

stomperxj

Explorer
Thanks for the good feedback everyone...

A few small updates. I added the angled part of the seal surface above the main header. I got the hinge drilled on the body side. 30 #10 screws should hold it. I also got my side table mounting brackets done. I used footman loops on the body side and i made the table brackets. Also got the hatch latch side plates done.

6R68MFU.jpg

oyKDl8s.jpg

0CRCf6v.jpg


More later

Jess
 
Last edited:

stomperxj

Explorer
Got some more done the last week or so. Finished the hatch latch mechanism, hinges on the rear cargo door and the side table leg. I machined some aluminum cable blocks from some 1" round stock. They are threaded for 3/8-16 on one end and have an 8-32 set screw on either side for the cable. I used McMaster Carr weld in pull pins for the latches located HERE I welded on some flanges and used some #10 screws to hold them on.

Here's a short video of the latch in action:
VIDEO


QExArJz.jpg

VkBGAXw.jpg

gt17Uz2.jpg


More soon hopefully. The weather is starting to look up and I have been getting a little more work lately. I'm hoping to be done by the end of May if everything goes well...

Thanks for looking and thanks for all the great feedback and comments...
 
Last edited:
Very cool trailer build I am going to attempt a similar build soon, with the addition of a bunk for my 38" tall (and growing) 3 year old. Probably make it the same dimensions as her toddler bed. But I am also going to build a place to put atleast one motorcycle on the front of the trailer.

I stayed up until about 2:00AM drawing some ideas out.:)
 

stomperxj

Explorer
Thanks LaOutback-

I got a little done today. Got a wild hair a few days ago to start gluing stuff down and as soon as the glue was set, I realized something I forgot. Hatch strut mounts... oops. Here's a pictorial of how i solved the problem. I made some plugs from 3/4" poplar dowel, bored them to take a tee nut and used a 3/4" spade bit to drill the holes. Then made my brackets, welded a nut on the back side of the plates and made a pocket for that with a spade bit too. They sit nice and flush and cover my plugs...

MDsQUga.jpg

toAEJXU.jpg

2xgBnXa.jpg

WFWrWu5.jpg


I did some other stuff too... Made my other fender flare and a couple other small things...

More later-
 
Last edited:
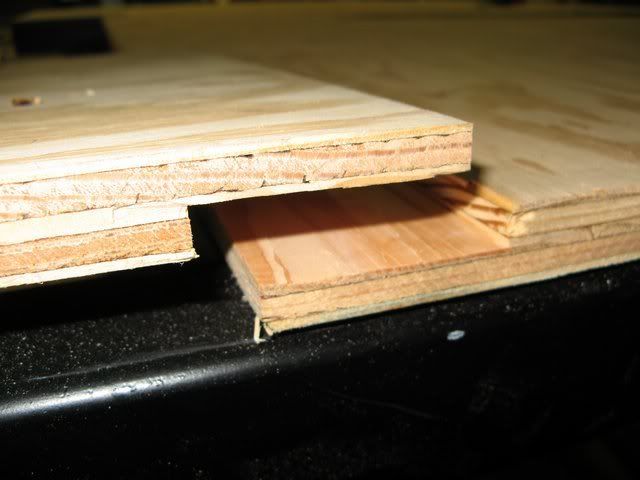
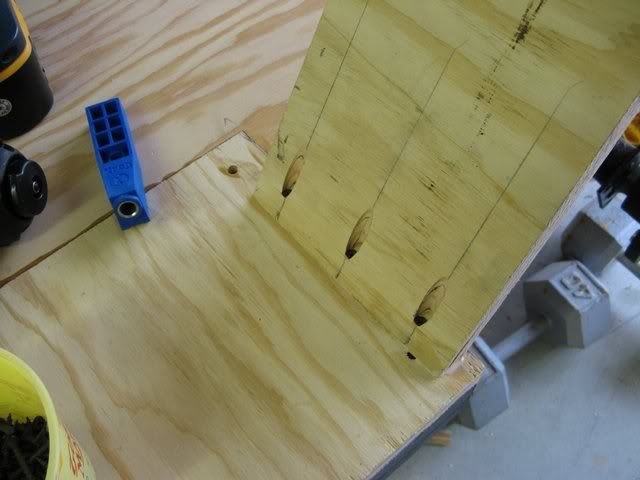
I have a couple tool questions for you.
sm-00214.jpg

How do you do that.... and what is the name of the tool that does this....
sm-00208.jpg

???

Thanks
 
Last edited:

sseaman

Adventurer
La, the first is a lap joint, you can do it with a dado blade on a table saw, or a router.

The second is a kreg pocket hole jig, about $20 and very handy, make sure you use the special screws.
 

Forum statistics

Threads
187,593
Messages
2,895,726
Members
228,596
Latest member
donaldsonmp3
Top