Overland Sprinter Build

luthj

Engineer In Residence
Over the years we have spent traveling there are many moments where we were just too slow to capture photos of amazing stuff (especially when driving). To make things a bit easier, I am mounting a GoPro onto the front of our van. We also would like to do some time lapse videos of certain drives, so we needed external power for the GoPro as well as all weather resistance.

I found a weatherpoof back for the Go Pro case which had a integral 30 pin power harness.


The online description indicated 5-20V compatibility. I pulled checked the regulator chip on the PCB and it will in fact work with 5-22VDC. I cut off the USB plug it came with, and I will wire it directly to the 12V auxilliary system for constant power. With the WIFI remote or APP I can control the GoPro from the cab, and start/stop video and photos in seconds.

Placement was a bit tricky as I needed to avoid several pieces of structure in the roof where the pass through for the wiring will be located.


I will use a waterproof connector so that the case can be removed when needed.

A friend came through with a set of shipping wheels for the van. Can you say low rider? These lower it about 6 inches overall. This allows the van to fit into a high cube container. The door opening on these is 258.5cm. The highest point on the van is the roof vent at 257.1cm with the shipping wheels installed. The lower ball joints only have 3” of clearance, and the mudflaps are only about an inch of the ground!


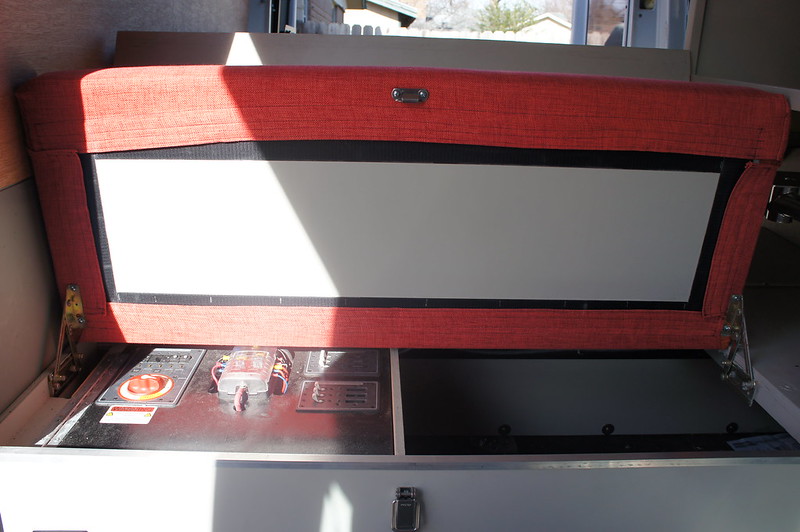
With the sliding door stop, we usually only open the door about half way. We wanted to use the aft half of the step well for storage. I made up a storage box with a hinged lid from some scrap wood.


We are considering our options, but we will likely deliver the van to the shipper sometime around thanksgiving. It takes up to 10 days to get the van packed and on a ship (we are sharing a container), and departures are every 14 days. Transit time is no less than 22 days. So it will be 30-40 days from delivery to unpacking in Australia.
 

luthj

Engineer In Residence
Still managing to sneak little upgrades in between filling out paperwork and organizing gear.

I previously added a Qi (pronounced Chi?) charging coil to my phone. This allows for wireless charging via a pad. There are cases and internal coils available for many phones.


I bought a 5V USB DC-DC power supply for the charging pad. This unit has a 10mA standby power consumption.


I used the storage nook beside the bed to make a charging “slot”. No more plugging and unplugging for overnight charging.


We are doing a final deep cleaning inside and outside of the van. To finish it up the interior was sprayed with permethrin (insecticide). Few things are worse than seeing a cockroach run under a cabinet.


luthj

Engineer In Residence
Washing the van off before delivering it to the port! Soon!
 

Attachments

  • IMG_20161202_083309.jpg
    IMG_20161202_083309.jpg
    513.9 KB · Views: 63

luthj

Engineer In Residence
Looking good! Can't wait to see this bad boy out in the wild. Looking forward to some travel pics!

No worries, I will post up some cool photos once we get down under.

We have an estimated arrival date in Australia. January 14 2017. :victory:

The arrival can't come soon enough. We are spending some time in Kansas, and it is currently -11F... In Melbourne its 46F with a high of 82F! Summer here we come.
 

J B

New member
No worries, I will post up some cool photos once we get down under.

We have an estimated arrival date in Australia. January 14 2017. :victory:

The arrival can't come soon enough. We are spending some time in Kansas, and it is currently -11F... In Melbourne its 46F with a high of 82F! Summer here we come.

You're not wrong. A bit of a warm one here today!!

354eb9f18cda0ad948b98d06dc7e5c00.png


Nice and cool tomorrow though!


Cheers

JB (From Melb)


Sent from my iPad using Tapatalk
 

KeyserSoSay

Adventurer
We are considering our options, but we will likely deliver the van to the shipper sometime around thanksgiving. It takes up to 10 days to get the van packed and on a ship (we are sharing a container), and departures are every 14 days. Transit time is no less than 22 days. So it will be 30-40 days from delivery to unpacking in Australia.

Great build! Out of pure curiousity, and the fact that I'd never even concidered the prospect of doing such a tour on a different continent, would it be too rude to ask what it is costing you to ship this rig to Australia?
 

luthj

Engineer In Residence
Great build! Out of pure curiousity, and the fact that I'd never even concidered the prospect of doing such a tour on a different continent, would it be too rude to ask what it is costing you to ship this rig to Australia?

I can't give you an exact number, as I won't know the receiving agents charges until Monday or Tuesday. There is also quite a large variance between different methods and shippers. Here is a rough estimate.

40ft high shared container, loading, insurance, freight from Long Beach to Melbourne: ~$3,800 USD

Receiving charges (rough estimate) $1,500 AUD. Includes customs clearance, AQIS inspection, container unloading etc.

Shipping RORO would have been cheaper, but it is less secure. I have seen folks who have shipped RORO from the East Coast to Europe for less than $2,000 USD. I have also seen 20ft containers shipped from Argentina to the USA for less than $1,200 USD. However they loaded their vehicle themselves, and handled most of the paperwork on their own.

There are obviously other costs, such as a CPD Carnet if the destination requires it, Road Liability insurance (if required) etc.
 

On Belay

Observer
Source for hinges?

The bench seat provides seating for 2 additional passengers, and a place to lounge in the van. It butts up against the galley. The galley contains a Vitrifrigo 115i fridge, induction cooktop, and SMEV sink.


What type of hinges did you use for the back of the fold down sofa? Looking to do something similar on my build.
 

luthj

Engineer In Residence
those look pretty great, do they lock in the up position? meaning can you just open it and lean against it? or do you have to anchor the seat back to a wall etc to stop it from laying back flat.
They have a spring which holds it open and assists with heavy lids.
 

On Belay

Observer
They have a spring which holds it open and assists with heavy lids.

I actually had the same quesion as villageidot327. From reading the description on the product page it sounds as though the spring has enough tension to keep the unweighted lid open, but I assume you need some sort of suplementary bracing, in addition to the spring, when using it as the back of the couch? I can't imagine the spring alone is enough to support the weight of two adults leaning back on it?

I would be curious to see you accomplished this as I'm planning somthing very similar in mine but still looking for the right hinge setup. I had been looking at something like these, but upon closer examination I think they would have to stick up from the sleeping platform when closed wich won't really work for my set up. May just end up going with an ordinary piano hinge and put anchor points in the ceiling.
 

luthj

Engineer In Residence
I actually had the same quesion as villageidot327. From reading the description on the product page it sounds as though the spring has enough tension to keep the unweighted lid open, but I assume you need some sort of suplementary bracing, in addition to the spring, when using it as the back of the couch? I can't imagine the spring alone is enough to support the weight of two adults leaning back on it?

I would be curious to see you accomplished this as I'm planning somthing very similar in mine but still looking for the right hinge setup. I had been looking at something like these, but upon closer examination I think they would have to stick up from the sleeping platform when closed wich won't really work for my set up. May just end up going with an ordinary piano hinge and put anchor points in the ceiling.

The hinges are pretty strong, but long benches will bow when you sit on them. I used a piece of T aluminum extrusion to support the back edge of the bench bottom. The extrusion is glued and screwed to the bench. The extrusion sits below the lid and supports it.

For a bench back application some sort of backstop support is needed. The hinge I used is not ideal for this. Instead a rock and roll bed hinge would be better
 

Forum statistics

Threads
189,829
Messages
2,921,383
Members
232,931
Latest member
Northandfree
Top