OVRLND CAMPERS ONLY : Post your OVRLND Camper build here or a link to your build thread to inspire others!

KellyM

Adventurer
Hello - I am finalizing my build and need to choose the vertical distance between the exterior 80/20 rails that will go from the rear of the camper to the front hatches - about 36" long (6.5' bed). For those of you who have exterior 80/20 rails, how far apart did you space them and has it worked well for you? I am leaning toward a molle panel one at least one side to hold a hot tap. Thanks
 

aaaslayer

Active member
Hello - I am finalizing my build and need to choose the vertical distance between the exterior 80/20 rails that will go from the rear of the camper to the front hatches - about 36" long (6.5' bed). For those of you who have exterior 80/20 rails, how far apart did you space them and has it worked well for you? I am leaning toward a molle panel one at least one side to hold a hot tap. Thanks


Off topic, but can you share a link to the 80/20 channel you'll be using for your exterior? I'm in the market for some 80/20 for the rear as well. Are you bolting all the way through into the studs and just mounting via washers and nuts? Or are you bolting all the way through and then attaching another 80/20 in the interior for interior storage (are you going to sandwich the studs between 2 x 80/20 channels) ?
 

KellyM

Adventurer
Off topic, but can you share a link to the 80/20 channel you'll be using for your exterior? I'm in the market for some 80/20 for the rear as well. Are you bolting all the way through into the studs and just mounting via washers and nuts? Or are you bolting all the way through and then attaching another 80/20 in the interior for interior storage (are you going to sandwich the studs between 2 x 80/20 channels) ?
Jay is going to install the the 80/20 as part of the build. I'll let you know how they mount them once I find out.
 

Fergie

Expedition Leader
I suppose mine can be added to the build-out list as I work to copy some of these good ideas already posted.
 

aaaslayer

Active member
I'm looking to add some 8020 extruded channel on the outside of my camper. To anyone who got it done directly at Ovrlndcampers, or if you did your own work, care to share what you did or had done? Was it bolted all the way through the skin and also the frame? Attached via bolt and washer/nut? or a riv nut on the outer skin/partial frame? Some pics and details would be helpful please.

My plan was to use this (see link) tnutz series 10 1#050 on the outside to mount some rotopax cans, and bolt through the skin and frame all the way with some bolts that are LONG enough to pass through the frame and have enough bolt left over to also attach the same 8020 channel on the inside OR ltrack, for more mounting solutions on the inside.

My only concern with bolting through the frame is that it is aluminum, and I'm not sure if it would compromise the integrity of the structure and weaken the frame. Or would I be good to go? Mounting 2 rotopax cans on the outside, 3.5 gallon cans or 2.5.


Any pics, input, guidance would be greatly appreciated!
 

ns7i

Active member
I'm looking to add some 8020 extruded channel on the outside of my camper. To anyone who got it done directly at Ovrlndcampers, or if you did your own work, care to share what you did or had done? Was it bolted all the way through the skin and also the frame? Attached via bolt and washer/nut? or a riv nut on the outer skin/partial frame? Some pics and details would be helpful please.

My plan was to use this (see link) tnutz series 10 1#050 on the outside to mount some rotopax cans, and bolt through the skin and frame all the way with some bolts that are LONG enough to pass through the frame and have enough bolt left over to also attach the same 8020 channel on the inside OR ltrack, for more mounting solutions on the inside.

My only concern with bolting through the frame is that it is aluminum, and I'm not sure if it would compromise the integrity of the structure and weaken the frame. Or would I be good to go? Mounting 2 rotopax cans on the outside, 3.5 gallon cans or 2.5.


Any pics, input, guidance would be greatly appreciated!
I'm planning on doing something similar also using 1050 extrusion. I figured I'd drill through the studs and put a bolt that'd get me into a TNUT in the channel. I wasn't planning on putting 8020 on the inside but that could work too. Looking forward to seeing how it goes for you if you beat me to it.
 

dstefan

Well-known member
I'm looking to add some 8020 extruded channel on the outside of my camper. To anyone who got it done directly at Ovrlndcampers, or if you did your own work, care to share what you did or had done? Was it bolted all the way through the skin and also the frame? Attached via bolt and washer/nut? or a riv nut on the outer skin/partial frame? Some pics and details would be helpful please.

My plan was to use this (see link) tnutz series 10 1#050 on the outside to mount some rotopax cans, and bolt through the skin and frame all the way with some bolts that are LONG enough to pass through the frame and have enough bolt left over to also attach the same 8020 channel on the inside OR ltrack, for more mounting solutions on the inside.

My only concern with bolting through the frame is that it is aluminum, and I'm not sure if it would compromise the integrity of the structure and weaken the frame. Or would I be good to go? Mounting 2 rotopax cans on the outside, 3.5 gallon cans or 2.5.


Any pics, input, guidance would be greatly appreciated!
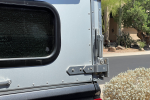
I've had some conversation with Jay on this in the past. Keep in mind he's bolting all sorts of things into the frame. Rivets galore and if I'm not mistaken, those massive hinges on the barn doors are Rivuts with bolts and are really strong -- I watched him hang on a barn door the first time I visited his shop, and that's a leveraged weight. I think he's also using the same grey 3M caulk/adhesive under those as elsewhere in his builds (he said it was 3M 540).

I put up my Wave3 heater on a light angle alu frame attached to the camper frame with 4 alu Rivuts. The assembly weighs ~10 lbs and has bounced all over creation with no loosening or pull.

On post #2 here, I you can see how I set up the 8020 frame on my barn door to hold a Rotopax. Thats made with two pieces of 8020 with just the skin sandwiched between. Both pieces of 8020 are VHB'd to the skin and there's two through bolts on each upright. I hung up a full 3 gal Rotopax and additional support I made for the Rotopax (26lbs total) and took that on some really rough trails with no drama. I also had a 10 lb kitchen roll up hanging on the inside and a full Trasharoo on the same mount for around 50lbs total.

I put up the awning channel you can see here with VHB on the skin with self tapping screws(caulked) into the frame and a bead of that 3M 540 when I first got the camper. I'll never get it off.
1665612866656.png

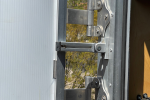
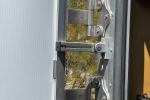
The one thing that HAS failed for me was this:
1665612944682.png

I used VHB on the base half piece of 8020 to the skin and two self tapping screws through the skin and into the frame. Held for a while, but started to loosen when it got a got knock on the extended swing out arm. Started to loosen the self tapping screws out due to the overly small surface area for the VHB not giving enough lateral support. My fault, bad design cause I was using an available pre-drilled scrap piece. This one on the other side, which used a longer piece of 8020 as the mounting base took some equally hard knocks and was fine.
1665613513805.png

I made a new double length base for the damaged one, drilled out the existing holes and added a third for Rivnuts and it's like a rock now with VHB and 3 Rivnuts. I also coated the Rivnuts with epoxy putty before installing them for good measure.

My takeaways are that you can hang some pretty heavy weight on the camper skin/frame combination without through drilling the frame. I think the key is both a mechanical faster into the frame (Rivnuts and bolts for anything heavy) along with either VHB or a permanent sealer/adhesive (eg, 3M 5200, 3M 540, or Sikiflex). It's pretty similar to woodworking where glued and screwed will always hold better than either alone if the joint is made right.

My guess is we'd do more damage through bolting clear through the frame. I would think the clamping force might cause slight crushing and more metal fatigue. Also, the loads are almost always going to be shear forces, not tensile or straight pull. And, the more square inches you have for mounting the better, especially with VHB or adhesive. Be sure to liberally coat the screws or bolt heads with a sealer too, of course.

Keep in mind, that when Jay was using 8020 for the pull out bed rails, these were mounted onto the frame surface with bolts and, I assume, Rivnuts. I don't think he even used VHB on these, but they're bolted every 8 to 10 inches. They are like a rock and are holding over 300lbs in the case of me and my wife.

Edit: one other example I just thought of is the awning mount Jay fabbed for my 23 Zero. That weighs about 45lbs and is held with four bolts into the frame and the 3M 540 and definitely not through bolted. Again, no problems and it bounces around back there on rough trails more than anything.

Hope this helps!
 

Attachments

  • 1665613153762.png
    1665613153762.png
    271.4 KB · Views: 38
Last edited:

aaaslayer

Active member
I've had some conversation with Jay on this in the past. Keep in mind he's bolting all sorts of things into the frame. Rivets galore and if I'm not mistaken, those massive hinges on the barn doors are Rivuts with bolts and are really strong -- I watched him hang on a barn door the first time I visited his shop, and that's a leveraged weight. I think he's also using the same grey 3M caulk/adhesive under those as elsewhere in his builds (he said it was 3M 540).

I put up my Wave3 heater on a light angle alu frame attached to the camper frame with 4 alu Rivuts. The assembly weighs ~10 lbs and has bounced all over creation with no loosening or pull.

On post #2 here, I you can see how I set up the 8020 frame on my barn door to hold a Rotopax. Thats made with two pieces of 8020 with just the skin sandwiched between. Both pieces of 8020 are VHB'd to the skin and there's two through bolts on each upright. I hung up a full 3 gal Rotopax and additional support I made for the Rotopax (26lbs total) and took that on some really rough trails with no drama. I also had a 10 lb kitchen roll up hanging on the inside and a full Trasharoo on the same mount for around 50lbs total.

I put up the awning channel you can see here with VHB on the skin with self tapping screws(caulked) into the frame and a bead of that 3M 540 when I first got the camper. I'll never get it off.
View attachment 747078

The one thing that HAS failed for me was this:
View attachment 747079

I used VHB on the base half piece of 8020 to the skin and two self tapping screws through the skin and into the frame. Held for a while, but started to loosen when it got a got knock on the extended swing out arm. Started to loosen the self tapping screws out due to the overly small surface area for the VHB not giving enough lateral support. My fault, bad design cause I was using an available pre-drilled scrap piece. This one on the other side, which used a longer piece of 8020 as the mounting base took some equally hard knocks and was fine.
View attachment 747084

I made a new double length base for the damaged one, drilled out the existing holes and added a third for Rivnuts and it's like a rock now with VHB and 3 Rivnuts. I also coated the Rivnuts with epoxy putty before installing them for good measure.

My takeaways are that you can hang some pretty heavy weight on the camper skin/frame combination without through drilling the frame. I think the key is both a mechanical faster into the frame (Rivnuts and bolts for anything heavy) along with either VHB or a permanent sealer/adhesive (eg, 3M 5200, 3M 540, or Sikiflex). It's pretty similar to woodworking where glued and screwed will always hold better than either alone if the joint is made right. My guess is we'd do more damage through bolting clear through the frame. I would think the clamping force might cause more metal fatigue. Also, the loads are almost always going to be shear forces, not tensile or straight pull. Also, the more square inches you have for mounting the better, especially with VHB or adhesive. Be sure to liberally coat the screws or bolt heads with a sealer too, of course.

Keep in mind, that when Jay was using 8020 for the pull out bed rails, these were mounted onto the frame surface with bolts and, I assume, Rivnuts. I don't think he even used VHB on these, but they're bolted every 8 to 10 inches. They are like a rock and are holding over 300lbs in the case of me and my wife.

Edit: one other example I just thought of is the awning mount Jay fabbed for my 23 Zero. That weighs about 45lbs and is held with four bolts into the frame and the 3M 540 and definitely not through bolted. Again, no problems and it bounces around back there on rough trails more than anything.

Hope this helps!
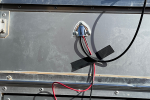
Appreciate your insight! Lots of great info. Thanks for sharing.


On another note, in an effort to keep this thread alive and active, here's a little update of what I've been up to. Finally got around to finishing my ceiling now that the temps have cooled down significantly here in the Inland Empire Socal. This is me laying down between my benches to take the picture and capture it all in one shot. I have an entire 4'x8' coroplast panel up there, and two other sections to finish it off. Unfortunately I can't get coroplast in anything bigger than a 4x8' so I had to do it in sections. Not the prettiest, but it looks better than just the framing and insulation boards.


I picked up some white gorilla tape at Lowe's today and will use that to cover the seams and tie it all together.Screenshot_20221012-202446_WhatsApp.jpg
 

flydream

New member
This thread has been very helpful, thank you

I'm currently finalizing our build, F150 6.5 bed.

Question:
I was going to have Jay mount some exterior rails on one or both sides of the camper towards the back, I will have hatches near the front and 1/2 barn doors at the back.

What is the preference for L track vs 80/20? 1575 series is what they use. Mostly this will be used in camp, hang wetsuits/drysuits, stage outdoor gear, maybe in-camp hang propane instant water heater, cooking stuff, etc, doubt need for mounting water/fuel

I'm not as familiar with 80/20 and can't seem to find any equivalent quick connect mounts that are readily abundant for L track. Do people just bolt in hardware/rings/tiedowns and leave them hanging when not in use? I get the adjustability advantage of 80/20, but L track seems easier to quickly mount and dismount stuff. I see 4WC Project M uses 80/20 while Vagabond users often mount L track. Thoughts? Weight difference seems negligible. Thoughts on vertical spacing? Rather have OVRLND tackle mounting than DIY

Welcome input on rest of build
2 inch cabover, ano skins, lift struts, roof rails, Maxxair fan, hatch x2, tern window in hatch, slider cabover window, 1/2 barn doors, vinyl windows, headliner,

On the fence:
Positive pressure vent
awning install - never really used one, also in PNW and would be more for rain than sun. Likely have them prep/frame out in case of future Ez awn and instead do keder rail awning track (seems that they will only do this on both sides rather than just one)

enjoying browsing all the builds
 

flydream

New member
Hello - I am finalizing my build and need to choose the vertical distance between the exterior 80/20 rails that will go from the rear of the camper to the front hatches - about 36" long (6.5' bed). For those of you who have exterior 80/20 rails, how far apart did you space them and has it worked well for you? I am leaning toward a molle panel one at least one side to hold a hot tap. Thanks

Same question. Did you make a decision?

I'm thinking the bottom rail 1-2inch from the bottom (the lowest they can go) and the top rail about even with the top of the front hatch, (not sure what that would measure out to). I'd like to optimize good spacing, but not so high that difficult to reach.
 

dstefan

Well-known member
I'm not as familiar with 80/20 and can't seem to find any equivalent quick connect mounts that are readily abundant for L track. Do people just bolt in hardware/rings/tiedowns and leave them hanging when not in use? I get the adjustability advantage of 80/20, but L track seems easier to quickly mount and dismount stuff. I see 4WC Project M uses 80/20 while Vagabond users often mount L track. Thoughts? Weight difference seems negligible.

8020 is for building things typically. You’re right, there really arent good quick connects. L-track is better suited for what you say you plan, I think.

Since I have the 8020 bed rails, I do use them for hanging things, but it takes screwing in bolts and hangers.

As to your ”on the fence” items, I’d strongly suggest you get the positive pressure vent. It really works IMO. I hear F150s have leaky tailgates (?) and the shape of our campers really creates a rear suction. You’ll need to do some serious sealing as well, but unless you never go off pavement, dust will be an issue almost certainly.
 

Fergie

Expedition Leader
Regarding the pressure vent, I picked up one from WM that was mentioned in another one of your posts; going to be installing it this weekend along with the bed-rug and hopefully the D-side platform to start building off of.
 

flydream

New member
8020 is for building things typically. You’re right, there really arent good quick connects. L-track is better suited for what you say you plan, I think.

Since I have the 8020 bed rails, I do use them for hanging things, but it takes screwing in bolts and hangers.

As to your ”on the fence” items, I’d strongly suggest you get the positive pressure vent. It really works IMO. I hear F150s have leaky tailgates (?) and the shape of our campers really creates a rear suction. You’ll need to do some serious sealing as well, but unless you never go off pavement, dust will be an issue almost certainly.

Thanks, that is helpful. I will probably go the L track route on the outside.

80/20 buildout on the inside, bedrails will be unistrut per recent changes, I'm ambivalent, figure I can always change in future as needed.

Thanks for the rec on the PP vent. I've eyed your build and tried to steal your ideas! I assume Jay was referring to you when he mentioned a tundra getting after it bombing around the SW and have good success with the vent!
 

dstefan

Well-known member
No problem!

He probably was. Plenty of people have done PPVs before me, but Jay hadn’t done one before mine. That Lewmar vent really works. Keeps the camper cooler on the road when in the sun also. Never leaks, even when directly sprayed at the car wash. Just need a high flow dust filter on the inside to keep stray stuff out. Also provides good night time ventilation with the Max fan on very low.
 

Forum statistics

Threads
188,041
Messages
2,901,536
Members
229,411
Latest member
IvaBru
Top