OVRLND CAMPERS ONLY : Post your OVRLND Camper build here or a link to your build thread to inspire others!

montechie

Active member
I'm curious to see how yours evolved. Did you add any semi-permanent furniture or kitchen stuff?
I've only built an extruded aluminum shelf that my wife and I use as a step and organizer on trips, I think there's some pictures in this forum of it. It's worked pretty well and takes about 5 minutes to remove, 10 to put back in. I'm using Volle straps to cinch it to my bed rail system and keep it snug. The metal is a mixed bag, more to warm up in the winter instead of wood, but the extrusions are so easy to adopt/change later and it's easy to remove or attach random stuff to. The bench part of the shelf works well as a seat, and we can fit a camp chair in the open bed for the other person. Right now I can still fit 2 mountain bikes in my small bed with the shelf in there...

Haven't added any kitchen fixtures yet, I'm still wanting to add an attachment for my collapsible sink onto my shelf so I can fit a gray water catch under it. I keep things basic when cooking inside, but would really like to do dishes and other cleaning inside no matter where I cook. I just get into a lot of bugs and inclement weather and like to be inside at the end of the day.
 

dirtnsmores

Active member
How are you liking that awning off the rear? I have the Kammock Crosswing 5ft awning and plan to have team mount it above the rear hatch for quick shade (freestanding) and when there for more than a few minutes I can add the support poles pretty easily.
Here’s my build out. i just recently put the Trail Kitchen wheel well cabinets in. I may be selling this in the near future.
 

dirtnsmores

Active member
How's the visibility when you drive out the rear window? Was thinking I want windows on both barn doors, now I'm thinking just one will be fine.
My camper has held up incredibly well over the nearly 2.5 years and lots of use that I've had it, but the Arizona sun (and elsewhere) is brutal over time. The only thing I've noticed so far is a bit of cracking of the gaskets around the window/door latches, no leakage though. Partly my fault, as I missed those in my initial treatment with 303 for UV protection. The Maxxair fan, the PV cable gland in the roof and the roof seams seem like a longer term concern for sun damage.

So, last year I got a custom cover from Adco/Covercraft to go with the Covercraft pick-up truck cover I already had. Adco seems to be the RV side of Covercraft. Just put it on today for the first time as we were using the camper enough last summer that it didn't seem worth the effort to put it on and off a bunch. I'll be taking it right back off for a trip soon, but had to try it for fit. Maybe 10 to 15 mins to put on, and guessing a little longer to take off and stow.

It took a long time to make, but they nailed it. It's Sunbrella fabric and the quality of the whole thing seems exceptional and a lot better than the off the shelf pick-up cover from Covercraft I'm using on the truck cab.

I can provide more details/contact info if anyone is interested -- the custom guy at Adco was great to work with. FWIW, they keep a library of their custom work and now that they have the dimensions for mine, should make it easier/quicker. I'd bet a cover made to these same dimensions would fit any Ovrlnd camper on a 6.5' full size bed, but the dimensions can be adjusted. IIRC, the cost was around $380 but that was the fall of '21 when I ordered it. Took 'em 6 months at the height of the pandemic and supply/labor shortages.

View attachment 773953
The straps across the back are the only two showing, but there's 7 total -- two under the cabover (which also has a HD elastic edge in the front underneath), two in front of the rear wheels and behind the rear wheels plus the two in the back. All the attachment points for the straps are reinforced with heavy canvas/vinyl and have grommet holes as well, and the straps are quick connect buckles.
View attachment 773954
There's two zippers up the sides in the back with straps and velcro to roll it up on the roof to allow easy rear door access with the cover on.
View attachment 773955
 

dstefan

Well-known member
How are you liking that awning off the rear?
Like it a lot. Don’t have to worry about which side the sun is on. It really expands the partially indoor partially outdoor living space on the tailgate. With the addition of a gutter between it and the camper body we can sit there in the rain and be dry and protected. We tend to cook insider or occaisionally off the tailgate, so that’s good too. Some people want to have a whole kitchen set up out of a side hatch, so there I can see the side or 270º option, but generally think those are less useful, and they put a lot of bulk up high for offcamber offroad situations and seems like they'd catch a lot of wind and brush.
How's the visibility when you drive out the rear window? Was thinking I want windows on both barn doors, now I'm thinking just one will be fine.
Terrible — even before we had much in the camper. With any built-ins and loaded, including having a back seat attic it was just useless. We like the single window to let us look out while inside the camper, but for driving not useful. Not sure two windows would be much better. The rear camera an side mirrors work fine.

Also, knew I wanted to use one barn door as a swing out for gear/Trasharoo, so left the window off the D side for that and had Jay add a 3rd hinge for strength. The lack of a window made the further reinforcing much simpler and also easier to insulate.
 

montechie

Active member
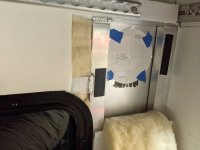
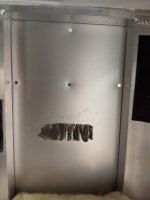
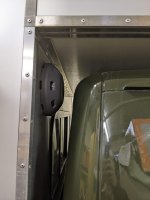
Added a PPV last night, it was pretty easy except trying to not get my black RTV sealant everywhere, ignore the black patch, that's just VHB tape I scraped off, all of this will get covered up again.

It was pretty easy, I already had the hole saw and RTV from my snorkel install, I think based on @dstefan I just ordered some fish tank filter off of Amazon. I added washers as well, and triple checked everything. We're getting heavy rain right now, so after the sealant dries I'm running out for a test before covering that wall back up.

ppv-1.jpgppv-2.jpg
ppv-3.jpg
ppv-4.jpg

ppv-5.jpg
 

dirtnsmores

Active member
Like it a lot. Don’t have to worry about which side the sun is on. It really expands the partially indoor partially outdoor living space on the tailgate. With the addition of a gutter between it and the camper body we can sit there in the rain and be dry and protected. We tend to cook insider or occaisionally off the tailgate, so that’s good too. Some people want to have a whole kitchen set up out of a side hatch, so there I can see the side or 270º option, but generally think those are less useful, and they put a lot of bulk up high for offcamber offroad situations and seems like they'd catch a lot of wind and brush.

Terrible — even before we had much in the camper. With any built-ins and loaded, including having a back seat attic it was just useless. We like the single window to let us look out while inside the camper, but for driving not useful. Not sure two windows would be much better. The rear camera an side mirrors work fine.

Also, knew I wanted to use one barn door as a swing out for gear/Trasharoo, so left the window off the D side for that and had Jay add a 3rd hinge for strength. The lack of a window made the further reinforcing much simpler and also easier to insulate.
thanks for the answer! you made my decision easier. Will leave one barn door w/o window to allow for mounting stuff, and the other (driver) will have a window.
 

DoubleDD

New member
OK, now the camper built-ins.

After dust sealing the truck bed, the two things I did before getting the camper and putting in the Bedrug that I was really glad to have done first were:
1-- Take pictures of the naked truck bed with measurements for where the ridges, flat spots, bed bolts and other features were. This has been super helpful as I've added things and needed to know where to anchor them and where flat spots, etc were. Don't forget interior bedsides too. Of course, if you're not doing a Bedrug or are laying a baseplate over, never mind . . .

2-- Fitted the fridge slide and drilled holes in my truck bed to through bolt it, as well as rivnut and VHB'd short pieces of L-track to spots on the bedside where I planned to have some cam straps terminate (Rollercams -- really great product. Holds way better than others I've used). I also VHB'd a couple of 12" long, 1/2" single lot 8020 pieces to the floor in front of the wheel wells. All this was covered with the Bedrug, but then easily accessible through slots and very useful later. Bedrugs, BTW are tough to cut through, though no problem, and you end up making some big flaps. You can add rivnuts or VHB that way, but if you can plan out anchor points, etc its just a LOT easier.

I knew I wanted a shelf/bench across full the bed width that allowed the full 78 inches of bed length to be used. Most builds I had researched built a free-standing structure with legs, put it in place and stabilized it against the bedwall or bedrail. I decided to make a hanging bench from the Toyota bedrail system (which I added). It's rated for 800lbs, kept the build light, and could be made pretty stout with 8020. I purposely avoiding tying any structure to the camper. It's quite rigid, but the Tundra beds flex, as do most truck beds, though the Tundras flex more. Having structures anchored to both is a bad combo off road. Even with bed stiffeners.

We purposely keep the P-side corner of the bench and cabinet open for storing tall vertical things -- full sized Maxxtrax, shovel, camp chairs, etc.

View attachment 700295

I bought the all the extrusions and hardware from Tnutz, not 8020. 8020's website and catalog are great for research, but their prices and wait times (this was Aug/Sept '21) are ridiculous. Tnutz has a more limited, but still great selection, they are a 1/3 to half the price, the extrusions are the same and they were shipping within 2 weeks or less vs 80 to 90 days from 8020.

I went with 10 series extrusion and standardized all hardware to 1/4-20. Many people will say use 15 series, but I've worked with it and it's unnecessarily heavy and expensive.
For the attachment ledger strips to the Toyota bedrail system, I used 1"x 2" 10 series and on the D-side 1"x3". For two reasons:
1-- I trialed a scrap piece of 1" and it was just barely too narrow to securely bridge the Toyota bed rail width and would slip under pressure.
2 -- My 1"north/south crossbars could be held with a gusset on each side AND one underneath in the second or 3rd slot. They easily hold the combined 300lbs of me and my wife on the bench

The front rail of the bench that stretches completely across the bed is 1x2" as it has a long unsupported span. 8020 has a great deflection calculator that you can model stuff like that with.

I decided to keep the plywood "step" over the P-side wheel well as it's very stout and I could avoid legs.
View attachment 700306

Got these bed rail nuts on Amazon. Bomber! 3/8" tapped stainless. Had to shim them up for my ledger rails with 1/8" aluminum bar. I used Grade 8 bolts in holes drilled through the extrusion. It's all very stout, no deflection and still pretty lightweight. ALL of the extrusion and hardware from Tnutz was 40lbs (I weighed the package) and that included 18' of additional extrusion for another project Plus, I cut a lot down (using a table saw). I estimate the weight of 8020 in the project was about 30lbs, plus the plywood, which weighs 43lbs for a 5x5 12mm sheet. I used a sheet and a half. So all told about 90-ish lbs.

I've worked with 8020 before (rack system), but never something complicated. This wasn't hard, but took a lot of planning and multiple revisions on paper. The time spent ahead is worth it, as well as living with a minimal build for a few trips to figure out what we really wanted.

Also, either a chop saw or table saw is critical if you're going to custom fit pieces as you go (I did for several reason). A drill press or drill stand is also super helpful if you're drilling though the extrusion. It tends to catch a hand drill for larger holes.

Made the bench top liftable to access the battery.
View attachment 700313

Here's the final finished product
View attachment 700314
View attachment 700316
View attachment 700317
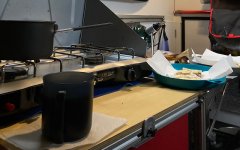
Made the counter extension a flip up so the heater is still usable where it is. We also found it's very handy to have a surface reachable from the pulled out bed, sort of like a night table. Also put a very low shelf for the propane to allow my slide out tailgate cooking counter to fit under. Used a large quick fist with a 1" ratchet strap laced through the quick fist.

The middle compartment has 1/4" baltic birch cutouts slid into the 8020 slots with a liner from my wife's unused yoga mat. I made another coroplast drawer, using an even easier technique. The stove is sitting on top of the counter since that's where we store it strapped down while traveling.

Here's the pack bag I mention we put under the rear seat platform. We love this thing. Holds a ton, very organized. It's like a lightweight chest of drawers. Hangs from the camper bedrail. Also, you can see where I move a water jug for gravity feed water. The spigot hose isn't attached. Works great. If it's freezing no pump or plumbing to worry about. I also use a Rollercam strap vertically to hold the jug to the platform. I can leave the hose/spigot attached and it's solid enough to bounce around offroad and off camber.

I should also say the bench cushions were custom cut 3" medium firm foam from https://www.foamorder.com/ with a Dacron wrap. We got the sunbrella fabric from https://www.sailrite.com/ (great DIY resource). It's super durable. Very easy to cover your own cushions IF you use a solid base so you wrap the fabric around and staple the bottoms. No sewing!

If we need to stealth camp or close down the top, my wife can sleep on the bench and I can sleep north/south under with my Thermarest. Our goal with this was NOT to have it built out inside like a FWC, but to be able to retreat inside as needed for a day or two. Mostly it's tailgating for us, sitting outside, and retreating in for bed. That said, the bench is comfortable seating with a pillow behind us, and there's enough room with the top down to clear my head, so I'm sure we'll hang out inside more than we think.
View attachment 700322

One last organizational issue is the kitchen.
View attachment 700329
This lives on the inside D-side barn door that's reinforced. You can see it stowed in my electricals post. This is ALL of our kitchen stuff. Saw it on iKamper's website, and hoped it would work. The pockets surprised us with the roominess. Holds our pot set, dishes two Yeti mugs, a GSI skillet plus everything else. Eliminates need for more storage construction and super handy.

I'll post a little more I'm sure on odds n' ends, but that's the bulk of it. I left out some details, sources, links, etc so as not to hog this thread (at least too much!:rolleyes:). Happy to answer questions or provide more info. Just ask.

We're going somewhere in about 3 weeks (still figuring where). I'm going to try to force myself to get it weighed again fully loaded, and I'll post that if I do.

Good luck on your builds!
Very nice interior build. Do you have drawer stops to prevent shifts while driving and over pull outs while camping? Maybe I missed that detail, you have a lot of details! :)
 

dstefan

Well-known member
Thanks @DoubleDD. Yeah maybe a few too many details!

I do have a drawer stop for the drawer in the camper. It’s just a piece of 1/8 aluminum with a thumb bolt into a t-nut in the 8020. flip it up in camp, flip it down to drive. I added it after taking the pictures and forgot to mention it.

1697774387681.jpeg

The drawer in the back seat platform doesn’t have any stops. It moves a bit, but can’t go far in the platform and it’s really long and actually a bit hard to pull out, so can’t be accidentally dumped.
 

Peter_n_Margaret

Adventurer
Small trick that is sometimes worthwhile.....especially for heavy drawers.....
Instead of setting drawers exactly horizontal, slope them to the rear (closed position) a tad then the vibrations from corrugations will tend to close them instead of open them. And it takes the loads off the catches.
Cheers,
Peter
OKA196 motorhome
 

Pra4sno

Member
Doing some prep on the truck for the camper. Got ride-rite bags in (we use them for towing our boat too) and set to 5psi to help them keep their shape.

Ordered a TRD rear sway bar; I figure with the amount of canyon driving we do, and the wind that we run into, anything keeping the tail end more grounded will be useful. Waiting for that to come through.

Researching bed stiffeners for the Tundras. @dstefan @Fergie (and anyone else with a 2nd Gen Tundra and Ovrlnd camper) have you found that these were needed? Total Chaos' stiffeners look to be doable with a bedrug with modifications; but I may weld up some of my own to get something more low profile.
 

Fergie

Expedition Leader
I haven't needed any on mine, but I also haven't done any research in to them either....so my "not needing them" is based on lack of knowledge.
 

DoubleDD

New member
On a recent trip I noticed my 22 Silverado 1500 being a bit bouncy on paved roads. I didn't think that I was to heavy but I did have a lot of extra camping gear. So now I am thinking of helper springs, airbags or some type of suspension upgrade. A friend suggested just upgrading to load range E AT tires.
Suggestions?
On my 1500 I recently added Sumo Spring blue bump stops and Hellwig helper springs. I may need to grind down the bump stops some because they nearly touch with just the weight of the topper. Upgrading to pop top soon and assume they will have constant contact which may not be preferred.
 

dstefan

Well-known member
Doing some prep on the truck for the camper. Got ride-rite bags in (we use them for towing our boat too) and set to 5psi to help them keep their shape.

Ordered a TRD rear sway bar; I figure with the amount of canyon driving we do, and the wind that we run into, anything keeping the tail end more grounded will be useful. Waiting for that to come through.

Researching bed stiffeners for the Tundras. @dstefan @Fergie (and anyone else with a 2nd Gen Tundra and Ovrlnd camper) have you found that these were needed? Total Chaos' stiffeners look to be doable with a bedrug with modifications; but I may weld up some of my own to get something more low profile.
I have the total chaos version.

From my Tacoma days i knew that heavy weights on the bed sides could spread the besides at the tailgate with heavy offroad use. I have heard of Tundras potentially having the same issue, but not sure how prevalent it is. Problem is once you know you need it the damage is done. I figured better to reinforce. Probably not necessary if you’re not doing rough offroad.

The TC stiffeners have worked well with their anchor points for cam straps in my set up. They tie into the bed structure inside the tail lights and seem to really reinforce the bed at the tail gate. My fridge slide cleared them as well. The main problem I have with the Bedrug interference is the horizontal antenna/flag mounting point they put second from the top. Wish I’d hacked that one off first. Its no t integral to the structure like the rest of the attachment points on them.
 

Pra4sno

Member
Heard from Maggie that I'll be able to pick up mid November! Has anyone had any success in insuring their camper? I'm going to call my insurance company and ask about accessories coverage as one idea.

Snow and a low of 19* here on Friday/Saturday.

Bought a Lavaner Pro Alpine 5kw diesel heater and spent some time over the weekend building it into a hard case. May install it into the camper at some point but for now want to test it out as a portable version.
 

Forum statistics

Threads
188,032
Messages
2,901,443
Members
229,352
Latest member
Baartmanusa
Top