OVRLND CAMPERS ONLY : Post your OVRLND Camper build here or a link to your build thread to inspire others!

dstefan

Well-known member
Thanks. I saw that Crollison had his on the side of his two campers. I would like to have it plumbed through the camper, but probably wouldn't keep it connected while in route. It looks like you have a Truma Vario. Is that correct and do you like it? Did you install it yourself?

Thanks

Kelly
Yes, it’s a Vario. No, Truma will only sell through dealers who install as far as I could find out. Apparently they’re wary of US litigiousness. All of which makes it hard. A lot of RV dealers handle Truma, though.

I do like it a lot. Very quiet on night mode, pretty simple interface, heats up the camper quick once it’s all initialized. Can be set as low as 40º and as high as in the 80ºs IIRC. It’s very effecient on both propane and electricity, but most of all, it could fit out of the way on the camper since I couldn’t fit a Propex on the floor to handle the intake and exhaust and didn’t want to have a big structure on the wall like Crollison/YetiOverland. I really like the combined intake and exhaust in one hose assembly. The external exhaust hose heats the intake hose inside it which adds to the efficiency and means only one hole in the camper or truck bed is necessary.

The only downside is that the first startup can be fussy, but that’s because it’s pulling propane from the tank on the ground through 6’ of supply hose from the outside which is full of air the first time and the error overrides shut it down too quickly requiring several tries. Once that happens, it’s no drama, including turning it off (ie, temp down to 40º) overnight and just bumping the thermostat to mid 60s in the morning to get the chill off in cool, but not really cold weather (ie, 20ºs).


I'm looking at changing my propane set up to an exterior door mount with this hatch on the side. Looking to maximize interior space since I'm starting with a new truck.
I really like that enclosure.
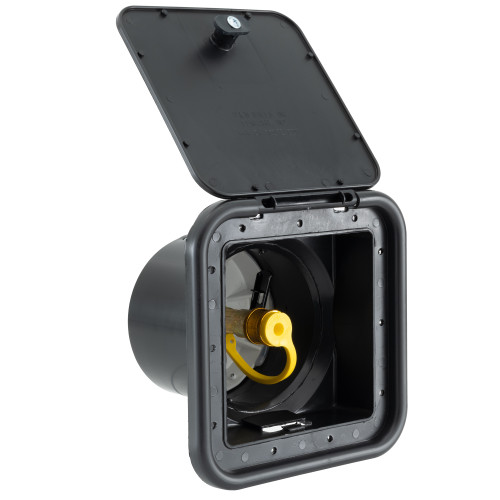
FWIW, here’s how I did a door mount. I’ve still got to get a short hose with a better regulator set up to avoid the air lock situation I mentioned above.

I reinforced the frame inside the door like I did for the non-window door that holds the Trasharoo and extra gas. It’s VHB’d 10 series 8020 with through bolts sealed with 3M 5200. The 2’ L brackets at top and bottom are just VHB’d to Jay’s internal frame around the widow

1700424368046.jpeg
Outside is two vertical rails of 1/2” single channel 10 series that’s VHB'd bolted through the door to the internal bracing. The horizontal rails are the 4 side channel 1” 10 series. I might get away without the middle one, but the Powertank mount for the propane I’m using had 6 bolt holes, so . . . I expoxied Tnuts in the back channel for the Powertank bolts to through bolt into.
1700424625522.jpeg

Powertank mount. It mounts on and off easily with a drill driver and 6 bolts into the epoxy captured Tnuts. It has to be removed not to tear up the cover over time.

1700424933398.jpeg
Propane tank mounted:
1700425079376.jpeg


I found a screaming deal at Uhaul on a Manchester aluminum 10lb tank. Full it weighs 18lbs and IIRC the Powertank mount weighs 8lb, plus about 1.5 lbs of 8020 mounting.

I still need to source a much shorter hose and better regulator for this setup. Amazingly it clears the external connections when folded back.

Full disclosure — I haven’t bounced down a rough trail with it all yet, but I’m pretty confident it’s robust enough. It gets the tank out of the way and I won’t have to pull the tank in and out to use, but it will collect dust (I found a small pack cover in my closet for that though), and I’m not sure if opening and closing it night and morning won’t be more of a pain the butt than just storing the tank inside, but at least its an option.
 

dirtnsmores

Member
Someone asked me recently... Is it really worth $14,000 (options add up) for essentially a big shell, a pop-up roof, bed, some windows. I'm sitting here about to order one, asking myself the same thing 😂. I'd say it depends on your needs and wants.
 

Dan250

New member
Someone asked me recently... Is it really worth $14,000 (options add up) for essentially a big shell, a pop-up roof, bed, some windows. I'm sitting here about to order one, asking myself the same thing 😂. I'd say it depends on your needs and wants.

All depends on your point of view. I mine came in around 16.5ish with tax and I didn't go too crazy on options. More than I would have liked to pay for sure but worth it to me considering a 20 year old 4wheel camper goes for about 14k around here and personally something new with no furniture or windows was more attractive. If you want something you can stand in that's light weight I couldn't find much comparable for less especially for an 8ft bed. Also the drive to pick it up was a great excuse for a good trip. So far super happy with the camper but still has a long way to go getting it dialed in.

I looked into the Oru Bruin camper with the hard side pop up as well. About the same price but they build it all with bent aluminum and there's no frame like the OVRLND, their walls also go in at an angle so that was a trade off. The OVRLND camper seemed like a more flexible platform to build off of. The hard side top looks awesome on the Oru but I also don't know how well it would hold up since its a kind of complex design. Great to see so many solutions on the marked these days though I hope I made the right choice.
 

Attachments

  • IMG_0474 (1).jpeg
    IMG_0474 (1).jpeg
    715.4 KB · Views: 53
  • IMG_0827.jpeg
    IMG_0827.jpeg
    405.6 KB · Views: 52

Pra4sno

Member
Someone asked me recently... Is it really worth $14,000 (options add up) for essentially a big shell, a pop-up roof, bed, some windows. I'm sitting here about to order one, asking myself the same thing 😂. I'd say it depends on your needs and wants.
We started with making a list of things learned from our past camping setups; and what we wanted our next one to accomplish. We weighted the importance of the things we wanted what we wanted to build in our camper vs what we wanted to buy. We've built a few setups before, so we know how much time and energy goes into getting the waterproof/weatherproof part right. OVRLND does this extremely well.

One of the mistakes I made along the way in this process was seeking feedback from people that don't do the activities that we do, with different lifestyles to ours, and that have different skills/abilities/interests.

You can look back a page or two on my decision making process as I was also asking the same question. We just picked ours up last month. It is very well made.
 
Last edited:

bikelanta

Adventurer
One of the mistakes I made along the way in this process was seeking feedback from people that don't do the activities that we do, with different lifestyles to ours, and that have different skills/abilities/interests.
100%. So many comments in threads across this forum that make plenty of sense, but not if they don’t fit with your lifestyle.
 

dstefan

Well-known member
Someone asked me recently... Is it really worth $14,000 (options add up) for essentially a big shell, a pop-up roof, bed, some windows. I'm sitting here about to order one, asking myself the same thing 😂. I'd say it depends on your needs and wants.
My observations from being on this forum since 2010 and close to 3 years with the Ovrlnd/Tundra combo, coming from a Tacoma and tent camping:

There’s clearly a continuum of truck campers in size, weight, cost and comfort. Anchored on one end by, say the Go Fast on small/midsize truck and hardly any build out to the other extreme of a big, heavy slide in, hard side camper with all the comforts of home.

Seems like a lot of people are somewhere in the middle — which might include FWCs with varying degrees of amenities, and maybe closer to the GFC end, Ovrlnds in varying degrees of build out. Closer to the F350/BigHorn camper end, but more comfortable and more off-roadable are things like CampX, SuperTramp, or FWC flatbeds, but on more built trucks — not giving up too much on getting to more difficult places with better comfort.

Personally, I thought the Ovrlnd well worth the ~$14K with options to have the light weight that would work with the truck of my choice (with less payload) to “almost” equal the off-roadability of my previous Tacoma, but give a lot more options and comfort than a tent.

Think @Pra4sno nailed it in his comments above in terms of needs. Just gotta figure that out first. The Ovrlnd is never gonna have the level of amenities/comfort of the F350/Hardside with a wet bath, but can potentially get farther out in the back country, depending on truck, build, skill, etc.

I used to work with an IT director who when asked about the possibility of some system farkle or another would always tell us operational folks: “The heights of your salvation are only limited by the depths of your pocket” . . . 😁
 

Pra4sno

Member
I've gone through the thread, but haven't found what folks have found works well for covering the ceiling? It looks like OVRLND uses a stretchy headliner fabric that is pulled taut, and then put a track channel nearly the length of the roof?

This looks like it is being put on either before the roof side hook and loop is applied (for thermal pack), or they are actually sewing a strip of hook and loop onto both sides of the headliner and sticking it to the hook and loop? What did you find @montechie

I fully insulated the roof, using 1/2" + 1" RMAX, so it is flush with the aluminum roof 'beams' now as others have done.

@PirateMcGee how have the carpet squares held up on the walls since you switched to 3M 77 and removed the plastic backing?
 
Last edited:

K9LTW

Active member
This looks like it is being put on either before the roof side hook and loop is applied (for thermal pack), or they are actually sewing a strip of hook and loop onto both sides of the headliner and sticking it to the hook and loop? What did you find @montechie

@PirateMcGee how have the carpet squares held up on the walls since you switched to 3M 77 and removed the plastic backing?

Yes…there is hook and loop on both sides of the headliner to allow for the thermal pack to be used with it. I leave mine installed all the time.

I used carpet squares with spray adhesive added on both the aluminum sheeting I used on the back doors as well as the plywood on the walls. I didn’t bother with the spray adhesive on the walls, though. Just stapled it down. Zero issues.

Sent from my iPhone using Tapatalk
 
I've gone through the thread, but haven't found what folks have found works well for covering the ceiling? It looks like OVRLND uses a stretchy headliner fabric that is pulled taut, and then put a track channel nearly the length of the roof?

This looks like it is being put on either before the roof side hook and loop is applied (for thermal pack), or they are actually sewing a strip of hook and loop onto both sides of the headliner and sticking it to the hook and loop? What did you find @montechie

I fully insulated the roof, using 1/2" + 1" RMAX, so it is flush with the aluminum roof 'beams' now as others have done.

@PirateMcGee how have the carpet squares held up on the walls since you switched to 3M 77 and removed the plastic backing?
I have the OVRLND headliner on our camper, am really happy with it. They use stretchy fabric with reinforced plastic strip at both ends with grommet holes and screws to attach to the ceiling, and the sides are double sided strong Velcro for the sides. We just had them install the headliner, I then took half down at a time (front to back) I then put block insulation secured with VHB tape reinstalled that section then did the same to the other half. I didn't want to risk taking the whole liner down and trying to put it back by myself. When ordering our camper I could not come up with anything else for a headliner and just ordered it with the build. I am extremely happy with the headliner and would do it again. You can order the headliner after the build and install it yourself. Hope this helps. Jeff
 

PirateMcGee

Expedition Leader
I've gone through the thread, but haven't found what folks have found works well for covering the ceiling? It looks like OVRLND uses a stretchy headliner fabric that is pulled taut, and then put a track channel nearly the length of the roof?

This looks like it is being put on either before the roof side hook and loop is applied (for thermal pack), or they are actually sewing a strip of hook and loop onto both sides of the headliner and sticking it to the hook and loop? What did you find @montechie

I fully insulated the roof, using 1/2" + 1" RMAX, so it is flush with the aluminum roof 'beams' now as others have done.

@PirateMcGee how have the carpet squares held up on the walls since you switched to 3M 77 and removed the plastic backing?
Holding up great. No issues.
 

Pra4sno

Member
Thanks! Finished up my insulation for the most part today. Got a bedrug installed, and thru bolted the camper to the truck bed rails so I could ditch the clamps.

Now to figure out side covering and to order a headliner!
 

Attachments

  • PXL_20231211_001656843.jpg
    PXL_20231211_001656843.jpg
    3.4 MB · Views: 86
  • PXL_20231211_001646129.jpg
    PXL_20231211_001646129.jpg
    3.5 MB · Views: 85
  • PXL_20231211_001707237.jpg
    PXL_20231211_001707237.jpg
    3.2 MB · Views: 86

dstefan

Well-known member
…there is hook and loop on both sides of the headliner to allow for the thermal pack to be used with it. I leave mine installed all the time.
Hey @K9LTW (and anybody else that does this) — how much does the thermal liner get in the way when left up? Do you have the newer style lift plate with the black panels or the older open hinges? Also, does your thermal pack velcro at the bottom too? Mine is the older style and goes behind the front/back hinge lift assembly with no bottom attachment. It’s a PITA, and not sure how to leave it up effectively.

Would love to see a couple pictures of how yours works if possible and hear from anybody that’s figured how to leave the pack up with the old style hinges.
 

Dave in AZ

Well-known member
Hey @K9LTW (and anybody else that does this) — how much does the thermal liner get in the way when left up? Do you have the newer style lift plate with the black panels or the older open hinges? Also, does your thermal pack velcro at the bottom too? Mine is the older style and goes behind the front/back hinge lift assembly with no bottom attachment. It’s a PITA, and not sure how to leave it up effectively.

Would love to see a couple pictures of how yours works if possible and hear from anybody that’s figured how to leave the pack up with the old style hinges.
I would love to see this too!

It is amazing how few posts there are with pictures showing popup truck camper insulation. I've delved hundreds of pages deep here and at OverlandBound and TacomaWorld, and the in depth posts with pics and follow up actual use, are few and sparse. Your build and posts here are some of the most helpful.
 

K9LTW

Active member
I would love to see this too!

It is amazing how few posts there are with pictures showing popup truck camper insulation. I've delved hundreds of pages deep here and at OverlandBound and TacomaWorld, and the in depth posts with pics and follow up actual use, are few and sparse. Your build and posts here are some of the most helpful.

Thanks, Dave! I don’t post as much as I’d intended to, but try to provide SOMETHING!

@dstefan I have the newer style (bought it September ‘22) with the solid panels. My insulation has velcro both top and bottom. You still run it behind the panels to get total coverage, but it secures in place. It does add a little bulk, obviously, when collapsing the top, but I’ve never had to readjust it once since installing it.

I’m not home tonight, but will get some photos of it tomorrow.


Sent from my iPhone using Tapatalk
 

K9LTW

Active member
Here’s some pics of my permanently installed thermal liner. For reference, I have two 2” mattresses with a little filler inside the covers, two 1/2” thick pieces of anti-condensation mat and an 1/8” piece of Reflectix on the cabover. Normally also have fitted sheets and a fluffy waterproof blanket to protect it from the dogs as well. When traveling I wedge a foldable baby barrier between the mattresses (so our Malinois doesn’t take an unscheduled flight to the floor at night). Even with all that, I can still close the top with barely a hint of pushing down the front, left corner.

As you can see, the material is nice and tight with the top up. It does wrap around behind the end supports for 99% coverage. I find that it’s both useful for keeping heat in (we run a petrol Webasto heater), and for keeping heat OUT as that vinyl gets scalding hot in the sun! I’ll also loosely put up the window coverings to allow airflow but act as a shade if too much sun is pouring in.

If anyone wants a specific pic, just ask!

Rear left corner when closed
fb21ada2232f77e4898970081d8eb205.jpg


Front left corner when closed
61fdb58cf85ed54b1ef6f2f6caa115b1.jpg


Rear right corner when closed
028acbd141ef38268f6b945be2df490d.jpg


Top velcro portion when open
f8bfea833cb0dca14c7ec0fede87172f.jpg


Bottom left rear corner when open
ed91f9d6aeacc71de7c0285b69252f2e.jpg


e079d1d972d4599b4f68f8bb7d5cc77e.jpg


47ca7e94bb6405bc58a194eac372388f.jpg


Sent from my iPhone using Tapatalk
 

Forum statistics

Threads
187,135
Messages
2,891,283
Members
227,790
Latest member
coast runner
Top