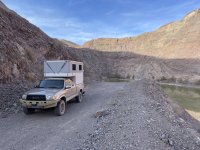
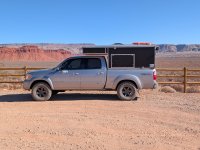
OVRLND CAMPERS ONLY : Post your OVRLND Camper build here or a link to your build thread to inspire others!

dstefan

Well-known member
I couldn’t keep using my Wave 3 due to some past respiratory issues that it triggered, but that shouldn’t bother most folks. They’re not real bad at producing CO, but there’s always a risk.

In researching heaters and CO alarms I learned that virtually all the standard “alarms” are set to trigger at 70ppm after an hour at that level. 25 ppm is enough to make you feel really bad, and I have had that happen. IMO, while 70 ppm maybe fine in a house where there’s lots of space and O2, it’s pretty concentrated in a small camper.

I have a standard CO alarm that was installed with my Truma, but I don’t rely on it. After some digging I settled on this ”monitor", which seems to be an industry gold standard for folks that deal with CO professionally. It gives you an accurate PPM measure point by point and allows you to manually set a much lower alarm. It’s quite useful, even for just peace of mind and I think it defaults to 25ppm as a threshold, not after a long time.

I would suggest getting something like this to know what you’re experiencing. Unfortunately they’re not cheap — mine was $164 on Amazon about 18 months ago — but neither is getting sick from CO, not just death in the more extreme cases.


dirtnsmores

Active member
I couldn’t keep using my Wave 3 due to some past respiratory issues that it triggered, but that shouldn’t bother most folks. They’re not real bad at producing CO, but there’s always a risk.

In researching heaters and CO alarms I learned that virtually all the standard “alarms” are set to trigger at 70ppm after an hour at that level. 25 ppm is enough to make you feel really bad, and I have had that happen. IMO, while 70 ppm maybe fine in a house where there’s lots of space and O2, it’s pretty concentrated in a small camper.

I have a standard CO alarm that was installed with my Truma, but I don’t rely on it. After some digging I settled on this ”monitor", which seems to be an industry gold standard for folks that deal with CO professionally. It gives you an accurate PPM measure point by point and allows you to manually set a much lower alarm. It’s quite useful, even for just peace of mind and I think it defaults to 25ppm as a threshold, not after a long time.

I would suggest getting something like this to know what you’re experiencing. Unfortunately they’re not cheap — mine was $164 on Amazon about 18 months ago — but neither is getting sick from CO, not just death in the more extreme cases.


thanks. i will definitely invest in that no matter which heater I am running. I actually have 3 CO detectors in there, one of them is small and handheld. All 3 have a digital readout that are supposed to show the ppm starting at zero. They've always showed zero in the camper but I suppose I should test at home with the stove to make sure they actually work.
 

locrwln

Expedition Leader
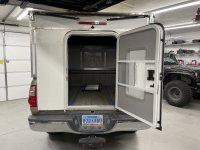
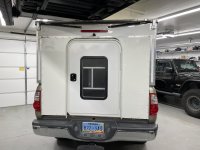
Wrapped up a little modification to my newly purchased OvrLnd camper on my 1st gen Tundra. I ordered it with the rear hatch as I planned on removing it along with the tailgate as well. I went back and forth on whether to build my own door or just purchase one. As you can see, once I made some measurements, I found a door that was the perfect dimensions. I framed it out in 2”x2” aluminum square and my wife wrapped the aluminum sheeting in vinyl wrap and we riveted the aluminum skin onto the frame and set the door into the framing. I drilled through the OvrLnd flange that the original hatch sealed against and installed nutserts on the backside of the framing to secure the frame to the camper. On the bed side; I drilled holes through the framing to allow access to the tailight bolts if I ever have to change a bulb (new bulbs were installed). I removed the tailgate cable anchors and the latches and used two of those three bolts on each side to anchor the framing to the side of the truck bed. As a final attachmen, I added four “L” brackets to the bottom of the framing and then drilled through the rear of the truck bed floor to tie everything together.

Gathering the rest of the stuff for the interior build out.
 

Attachments

  • IMG_5459.jpeg
    IMG_5459.jpeg
    1.6 MB · Views: 42
  • IMG_5458.jpeg
    IMG_5458.jpeg
    1.5 MB · Views: 41
Last edited:

dstefan

Well-known member
Really nice job and mod! Looks like you’ll have good room on either side of the door to mount stuff, eg, propane tank or Maxxtrax. Is that the plan?
 

locrwln

Expedition Leader
Really nice job and mod! Looks like you’ll have good room on either side of the door to mount stuff, eg, propane tank or Maxxtrax. Is that the plan?
Thank you and yes. I’m going to mount fuel cans on the top of bumper between the door and taillights on either side.

Jack
 

dirtnsmores

Active member
Wrapped up a little modification to my newly purchased OvrLnd camper on my 1st gen Tundra. I ordered it with the roof hatch as I planned on removing along with the tailgate as well. I went back and forth on whether to build my own door or just purchase one. As you can see, once I made some measurements, I found a door that was the perfect dimensions. I framed it out in 2”x2” aluminum square and my wife wrapped the aluminum sheeting in vinyl wrap and we riveted the aluminum skin onto the frame and set the door into the framing. I drilled through the OvrLnd flange that the original hatch sealed against and installed nutserts on the backside of the framing to secure the frame to the camper. On the bed side; I drilled holes through the framing to allow access to the tailight bolts if I ever have to change a bulb (new bulbs were installed). I removed the tailgate cable anchors and the latches and used two of those three bolts on each side to anchor the framing to the side of the truck bed. As a final attachmen, I added four “L” brackets to the bottom of the framing and then drilled through the rear of the truck bed floor to tie everything together.

Gathering the rest of the stuff for the interior build out.

So just to get this right you had them originally make you a flat wall for the rear? Or you just completely removed whatever doors or hatch they installed and put up your own wall and door?
 

sn_85

Observer
Wrapped up a little modification to my newly purchased OvrLnd camper on my 1st gen Tundra. I ordered it with the roof hatch as I planned on removing along with the tailgate as well. I went back and forth on whether to build my own door or just purchase one. As you can see, once I made some measurements, I found a door that was the perfect dimensions. I framed it out in 2”x2” aluminum square and my wife wrapped the aluminum sheeting in vinyl wrap and we riveted the aluminum skin onto the frame and set the door into the framing. I drilled through the OvrLnd flange that the original hatch sealed against and installed nutserts on the backside of the framing to secure the frame to the camper. On the bed side; I drilled holes through the framing to allow access to the tailight bolts if I ever have to change a bulb (new bulbs were installed). I removed the tailgate cable anchors and the latches and used two of those three bolts on each side to anchor the framing to the side of the truck bed. As a final attachmen, I added four “L” brackets to the bottom of the framing and then drilled through the rear of the truck bed floor to tie everything together.

Gathering the rest of the stuff for the interior build out.

That's bada$$. Would love to see more pictures of this unit on your FGT.
 
Wrapped up a little modification to my newly purchased OvrLnd camper on my 1st gen Tundra. I ordered it with the roof hatch as I planned on removing along with the tailgate as well. I went back and forth on whether to build my own door or just purchase one. As you can see, once I made some measurements, I found a door that was the perfect dimensions. I framed it out in 2”x2” aluminum square and my wife wrapped the aluminum sheeting in vinyl wrap and we riveted the aluminum skin onto the frame and set the door into the framing. I drilled through the OvrLnd flange that the original hatch sealed against and installed nutserts on the backside of the framing to secure the frame to the camper. On the bed side; I drilled holes through the framing to allow access to the tailight bolts if I ever have to change a bulb (new bulbs were installed). I removed the tailgate cable anchors and the latches and used two of those three bolts on each side to anchor the framing to the side of the truck bed. As a final attachmen, I added four “L” brackets to the bottom of the framing and then drilled through the rear of the truck bed floor to tie everything together.

Gathering the rest of the stuff for the interior build out.
Locrwin, I am impressed with your rear door build. I have a OVRLND on our F250 with the barn doors. Been thinking about adding the full door option, on our truck but it appears it would leave a 1 1/5" gap at the bottom of the bed. I like your idea of a full rear hatch. You mentioned that you used 2" aluminum tubing did you weld the aluminum together or used rivets? Do you have any more pictures from the back of the door frame. Thanks Jeff
 

locrwln

Expedition Leader
So just to get this right you had them originally make you a flat wall for the rear? Or you just completely removed whatever doors or hatch they installed and put up your own wall and door?
They made it with the standard rear hatch with my tailgate in place. I removed all of that and built the rear wall and framed out for the door.

Jack
 

locrwln

Expedition Leader
That's bada$$. Would love to see more pictures of this unit on your FGT.
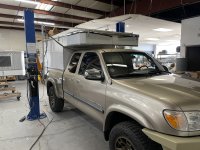
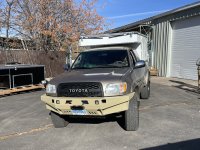
Thank you. I havent taken too many photos as we did the cannonball run to Flagstaff and back. Then it’s been in the garage pretty much since while building the rear wall and building out the interior. We did camp in it the first night on our way back from Flagstaff.
 

Attachments

  • IMG_5425.jpeg
    IMG_5425.jpeg
    1.9 MB · Views: 18
  • IMG_5426.jpeg
    IMG_5426.jpeg
    2.5 MB · Views: 18
  • IMG_0004.jpeg
    IMG_0004.jpeg
    3.3 MB · Views: 18

locrwln

Expedition Leader
Locrwin, I am impressed with your rear door build. I have a OVRLND on our F250 with the barn doors. Been thinking about adding the full door option, on our truck but it appears it would leave a 1 1/5" gap at the bottom of the bed. I like your idea of a full rear hatch. You mentioned that you used 2" aluminum tubing did you weld the aluminum together or used rivets? Do you have any more pictures from the back of the door frame. Thanks Jeff
I welded everything together. I will get some additional photos later today.

Jack
 

dirtnsmores

Active member
Beautiful truck man! I just got back from a
Thank you. I havent taken too many photos as we did the cannonball run to Flagstaff and back. Then it’s been in the garage pretty much since while building the rear wall and building out the interior. We did camp in it the first night on our way back from Flagstaff.
1500 mile trip to Utah and my FGT did absolutely fantastic through desert and snow. What a trip that was. Mine is pushing 200k miles. Where are you at on the miles?

PXL_20250115_200911793.PORTRAIT.ORIGINAL.jpg
 
Wrapped up a little modification to my newly purchased OvrLnd camper on my 1st gen Tundra. I ordered it with the roof hatch as I planned on removing along with the tailgate as well. I went back and forth on whether to build my own door or just purchase one. As you can see, once I made some measurements, I found a door that was the perfect dimensions. I framed it out in 2”x2” aluminum square and my wife wrapped the aluminum sheeting in vinyl wrap and we riveted the aluminum skin onto the frame and set the door into the framing. I drilled through the OvrLnd flange that the original hatch sealed against and installed nutserts on the backside of the framing to secure the frame to the camper. On the bed side; I drilled holes through the framing to allow access to the tailight bolts if I ever have to change a bulb (new bulbs were installed). I removed the tailgate cable anchors and the latches and used two of those three bolts on each side to anchor the framing to the side of the truck bed. As a final attachmen, I added four “L” brackets to the bottom of the framing and then drilled through the rear of the truck bed floor to tie everything together.

Gathering the rest of the stuff for the interior build out.
Very cool project! I did the full length doors on my Tundra, and secured the passenger side against the side of my kitchen. During the process I looked at doing what you have done and thought it would have been cool!
 

Attachments

  • IMG_4234.jpeg
    7 MB · Views: 26
  • IMG_4226.jpeg
    4.7 MB · Views: 24

Forum statistics

Threads
188,499
Messages
2,905,846
Members
230,501
Latest member
Sophia Lopez
Top