Battery Bank, Generator, Aux Fuel Tank, Bed...my thoughts.
This past year I turned 65 y/o, and it has been pretty rough due to my ongoing medical issues. Actual construction has pretty much come to a standstill. However, not a day goes by that I don’t think about this project, conduct research on the internet, or locate and order parts for it.
I was in a lot of pain this past weekend, so I put my brain into overdrive to distract me. In the process, I believe I have solved four of the problems I’ve been pondering.
1. Battery bank location and mounting options - I will need to confirm the exact measurements, but I believe they will sit in a drawer right at the base of the electrical closet. Since the batteries are AGM, they can be mounted inside with no problems, this centers the 300 lb. weight almost perfectly, and they are protected from the temperature and weather.
My new 2000W Magnum Dimensions Inverter mounted on its MMP panel has all the main breakers already, so the grey Shore Power breaker box will be removed, as it’s no longer needed. The IOTA converter for the A/C will be moved up, along with the battery cables and terminal post. That should leave about 12” to 14” of clear space at the bottom.
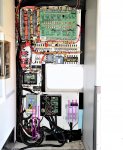
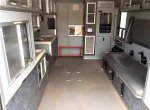
I have a big gray door from an older model like my 1993 had at the top of the electrical closet, so it can be cut down and should match perfectly as the battery drawer front. The closet wall will have to come out about 6”, but it needs to anyway to provide clearance for the back of the Blue Sea panels that will get mounted on the tall skinny door on the left side. The pic below is not my actual rig, but a stock picture of an ambulance interior almost identical to mine.
 2. Honda EU3000i Generator Box
 – Since I need to mount my generator on the tongue, I went looking for ready made boxes I could modify, rather than hiring someone local to build me one from scratch. I found a few Diamond Plate generator boxes on the net, but they are all in the $1,500.00 range, with no place for an auxiliary fuel tank. I made the mistake of getting on Weather Guard’s site, and they do have some very nice, well-built stuff, but all at a hefty price.
I found a
Weather Guard 60”x 24”x 24” underbed box that I really like, but it is
$981.59 & FREE Shipping. This is long enough I could put the generator in one end on the driver’s side, and an auxiliary fuel tank on the passenger’s side.
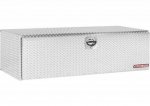
I already have a Road Gear Tool Box. It is 36”x 24”x 24” and will just sit on the 34” wide frame. It is just polished aluminum, not Diamond Plate. It looks out of proportion in this picture, but the measurements are correct. The generator is 26” long, so it will fit lengthwise, but no room for an auxiliary fuel tank by the time I add the intake fans and exhaust duct-work. The plan is to mount it so the door is facing forward, and the top can have a storage rack mounted on it.

Also, in the case of both boxes the door opening is only 19.5” high, and the generator is 22” high, according to the manufacturer’s specs. I haven’t measured the generator’s exact height myself, and it sits on brackets with rubber feet under the brackets, so I may be able to remove some pieces and gain that extra room I need. Although, it will be sitting on a slide out tray also.
3. Auxiliary Generator Fuel Tank – If I use the Weather Guard 60” box, this is covered. If I use the box I already have, then I need to find a suitable location to mount it. I allowed 36” of space on the frame between the front wall and the actual angled tongue for the generator mounting. Both of these boxes are 24” deep, so that leaves 12” of space behind the box and in front of the front wall.
I can mount a tall vertical tank similar to the one below, in that space and that will solve the problem. If I can find one that is 36” long and will fit the space, it would look great and be convenient to fill if I put the fill cap on the driver’s side like my truck is. A tank 36”x 6”x 24” will hold 22.44 gals, and is about what size I’m looking for. It could provide extra fuel for the truck as well, by adding a way to transfer it or fill gas cans to transfer it.
 4. Bed
 – Considering I want to keep my bench and the storage below it, the slat design seems to be the best option. You can open it for access below, and you can extent it as little or as much as you want, for one or two people. But, let’s face it, that’s a lot of work.
While looking for something else on Amazon, I came across this tri-fold
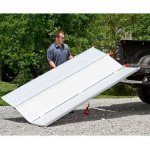
Plate-Style Aluminum Extra-Wide Tri-Fold ATV Ramp. The light bulb came on and the gears in my head started to grind. I have 72” of length available, and this is 77” x 54” x 1.9” inches when opened, with 18” panels, and will support 1,500 lbs., so the length would need to be shortened slightly.
I’m thinking this could be mounted with hinges on top of the bench and just behind the existing hinged bench top. When folded up it would tuck into that space where the seat belts usually go (I will remove mine since they are not needed in a trailer), and it might even be useful in supporting a back rest at an angle. Then all that would be needed is some fold up legs to support the third outboard section if it’s used, and a futon mattress or separate cushions.
Note! A single or Twin size bed is 39” wide. Two 18” sections is 36”…pretty close, huh? A Full size bed is 54” wide, and three 18” sections is guess what… 54”, imagine that!
36” should be wide enough for one person, and 54“ should be wide enough for two people, at least that works for me.
 Congrats on finding the Warn bumper.
![sshot-2018-11-09-[2].png sshot-2018-11-09-[2].png](https://forum.expeditionportal.com/data/attachments/392/392997-e610c7b3ccef8b6c2737f1ae47d73f78.jpg?hash=5hDHs8zvi2)


