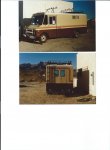
Suggestion even though they add some height Max air covers do work you can leave vents open while
driving and best when sleeping and the wind/rain blowing the flaping will not keep you awake.
Just something to think about.
Yeah, I have a plan. I'm actually going to put three very large solar panels on a rack that will end up above the vent by about eight inches. The vents will end up opening under the solar panels and be protected from wind and rain. The rack and panels will raise the overhead height about 10"-12", but that will still be less than vent covers, and the vent covers won't shade the solar panels. It's a little complicated to explain, but you'll see down the road when I install it.
I absolutely love when this rig gets brought up. It really is one of my all time favorite settups, and seems to have been used well!! Thank you for showing it.
Me too.
I removed my roll up door in favor of a half door and fixed wall. I hate dust getting in. I am almost finished it so no real world testing. The guy who runs Boomer the Camper Van had started a project for pressurizing his cabin, not sure of the outcome.
I'll have to look that up. I can't run swinging doors as I'll have a motorcycle and a bunch of stuff on the rear bumper. Good luck on your seal!
Been eyeball freezing cold up here in Montana, but I got some Putt stuff done.
I was thinking it's time to put in the ceiling. I went for the easy one over the bed.
Left side of the over-bed ceiling. The aluminum channel is glued to the ceiling plywood. Holes let you screw it into the wall and cabinet around the perimeter. This trim treatment is important for my future lighting. I will adhere LED RGBW (red green blue white) strips onto the top of the bottom leg of the C-channel; the other side of the black painted part. This is for my future indirect lighting system.
After putting it in I realized ceilings aren't next...wiring is next. This back ceiling won't have a Phase 1 utility overhead light in it, but all the other ceiling panels will. As I looked forward in the cabin, I determined I had to do all the wiring before putting up the ceiling. Fine by me, I can just sit in my cozy, extension-cord electrically-heated cabin and solder stuff.
Had to hook up the bus bars to the switches with a bunch of shorty little cables.
The over-bed reading light and dinette table light will be wired to the "Courtesy Lights" circuit.
Here's the bed reading light.
Bunch of soldering and heat shrink---make sure you do them in the right order!
Shortest run to power was up and over across to the right side and into the electronics cabinet.
Here it's coming out of the wire conduits in the sidewalls into the electronic cabinet. (at bottom)
It runs in parallel with the table light on the "Courtesy Light" circuit.
Backside done.
Splicing them all together was a pain in the butt. (See what I did there?)
$1000 in the right crimping tools and connectors is probably the most high-reliability ways to go, but I've been soldering connections for a long time. It's what I know and am comfortable with. Old dogs and such. And cheap crimping tools and connectors is
way less reliable.
12 gauge wire is
way overkill but I'm not going to lose energy to voltage drop if I can help it.
All bundled up in heatshrink.
Seriously, 12 gauge wire is ridiculous, but, other than needing more solder and heat, the mechanics performed to make the splice is the same as if it was 16 gauge. I figure if I just get used to doing splices and connectors with this heavy gauge, down the road I'll actually be saving quite a bit of juice on the voltage drop of thinner wire overall. In a 12 Volt system, conductor resistance counts.
The cabin looks like an electronics repair station.


