Ram 5500 Fire Crew Carrier Overlanding Camper Build

OverlandFT

Well-known member
also for reference they do accept double sidedtape as permanently attached.

Ha, that's actually ridiculous. I'll make sure to bring the ADOT policy with me and hopefully won't have too much trouble. This truck is really starting to look & feel like a camper, which will hopefully make the inspection go smoother. Maybe they'll even qualify my fridge/freezer cooler as permanently built-in if I add some duct tape to the sides! :ROFLMAO:
 

OverlandFT

Well-known member
Awesome build !

I saw several of these (2002 Fords with the 7.3 diesel) and was pushing my buddy to snag one.

I wish I had seen this to show him (he's going to regret missing out).

:)


Here's one of those 2002 hotshots trucks for sale currently. This one seems like a great base, with the side entrance door and slightly bigger box (more interior room, less outer storage). Someone could make this thing awesome! Maybe I should buy it and build a fleet!

141560734_10158246495538759_4550244703735334461_n.jpg
 

OverlandFT

Well-known member
Could you post some more photos of the sliding rear tire carrier?

Here are some detailed pictures of the tire carrier. I couldn't find any examples when I was building this thing, so it was almost a trial to see if it would work. I used 2 heavy duty (ish) drawer slides as the base. These are still way too puny for the weight of the tire & carrier and may eventually need to be upgraded. I would have preferred using something with a teflon slide, but was in a hurry to get the tire mounted and couldn't find any options online. The nice thing about the drawer slides are they lock open and closed, which is an effective way to keep the tire carrier in the out position. The unistrut trolley does most of the work holding onto the tire and it's rock solid in the closed position.

20210205_081422.jpg
20210205_081431.jpg
20210205_081507.jpg
20210205_081517.jpg
20210205_082008.jpg
20210205_082029.jpg
 

OverlandFT

Well-known member
cfxiepP.gif
 

OverlandFT

Well-known member
I really need to get the plumbing all fixed and finished... but MAN, I just keep finding other things to do!


We needed a place to put clothes/personal items and now we each get a drawer. The top is a cubby/locker of sorts, with a hidden RFID lock. The drawer slides are all push-to-close and I'm hoping they will be strong enough to stay in the closed position without adding a latch. Wood working is not my thing and these took way too long to build!
20210109_102922.jpg
20210111_173305.jpg
20210207_124229.jpg


Next project is plumbing ?
 

ExpoMike

Well-known member
Here are some detailed pictures of the tire carrier. I couldn't find any examples when I was building this thing, so it was almost a trial to see if it would work. I used 2 heavy duty (ish) drawer slides as the base. These are still way too puny for the weight of the tire & carrier and may eventually need to be upgraded. I would have preferred using something with a teflon slide, but was in a hurry to get the tire mounted and couldn't find any options online. The nice thing about the drawer slides are they lock open and closed, which is an effective way to keep the tire carrier in the out position. The unistrut trolley does most of the work holding onto the tire and it's rock solid in the closed position.

View attachment 640628
View attachment 640629
View attachment 640630
View attachment 640631
View attachment 640632
View attachment 640633

Such an awesome idea and I am likely going to steal this. Been looking at different ideas for the spare on my M1010 project but have been trying to steer away from a swing out like my last rig. It worked fine but I needed to have space behind the rig to swing the tire out, to get into the camper. I couldn't do it parked in my driveway.
 

OverlandFT

Well-known member
Such an awesome idea and I am likely going to steal this. Been looking at different ideas for the spare on my M1010 project but have been trying to steer away from a swing out like my last rig. It worked fine but I needed to have space behind the rig to swing the tire out, to get into the camper. I couldn't do it parked in my driveway.

Thanks! That's the exact reason I didn't build a swing out tire carrier. Feel free to steal it! (y)
 

OverlandFT

Well-known member
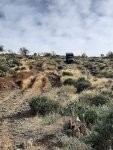
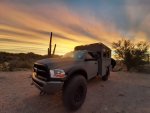
We took the truck out for a couple nights in the desert and had an awesome time. While we were exploring for a campsite, I found myself navigating a jeep trail in the barge. Overall, the truck handled itself well considering the size and weight. The width makes it a little more challenging than my Jeep, but I still had plenty of clearance and traction. Also, Raptor liner was definitely a good choice, because the truck dragged everything along the side of the trail.

20210213_151652.jpg

20210213_152150.jpg
Teddy Bear Cholla (or Jumping Cholla) likes to break off and hitch a ride with whatever touches it
20210213_145543.jpg

Can't beat a desert sunrise
20210213_070538.jpg
 

DKNY

New member
Before really getting into the build, I was desperate to change the emergency yellow to something less conspicuous. After getting some expensive quotes for paint, I decided bed liner would be just fine for a vehicle being built for the backcountry. I purchased 16L of tint-able raptor liner and went to the local auto paint shop for a custom basecoat. Overall, we're super happy with the new coating/color. The prep and spraying was miserable though because it was outdoor work with a high temp of 116 degrees. Had it been cooler outside, we would have removed more trim and done some more thorough taping. I still need to finish the door jams and touch ups, but overall it turned out exactly as planned.

Prep: Tape and 120grit sandpaper. I had filled a few dents a couple weeks prior. I removed the front a/c condenser, which will no longer be used and plan to build a cargo rack over the cab.
View attachment 603553

Woke up at 5AM the day after prep to finish tape and spray before it got too hot outside. Phoenix heat baked on the coating for us.
View attachment 603554

This is two coats of raptor liner, most of the truck ended up with three coats.
View attachment 603555
View attachment 603572

In the sun
View attachment 603556

In the Shade
View attachment 603562View attachment 603564


I plan to finish the door jams, cargo doors, & touch ups in two weeks. We're going to take a break this weekend and SUP Horseshoe bend at Lake Powell.
Hi all. I was wondering if I could get some feedback from everyone. Im doing an 2015 f550 abulance conversion. I was going to do the buckstop super single conversion but the liquid springs on the rear are keeping me from doing this. I talked to liquid springs and they have a kit through buckstop but its for only 2017 and newer chassis. It was recommended to me to do a small lift and put 35" tires on it.(keeping it a dually) and recommendations on wheels and tires? I dont want to have to add spacers on tbe rear wheels.
 

OverlandFT

Well-known member
Hi all. I was wondering if I could get some feedback from everyone. Im doing an 2015 f550 abulance conversion. I was going to do the buckstop super single conversion but the liquid springs on the rear are keeping me from doing this. I talked to liquid springs and they have a kit through buckstop but its for only 2017 and newer chassis. It was recommended to me to do a small lift and put 35" tires on it.(keeping it a dually) and recommendations on wheels and tires? I dont want to have to add spacers on tbe rear wheels.

Pretty specific questions. You'd be better off posting a new thread asking your questions over hijacking this one. Especially since my setup has nothing to do with liquid springs or keeping duallys.
 

ExpoMike

Well-known member
We took the truck out for a couple nights in the desert and had an awesome time. While we were exploring for a campsite, I found myself navigating a jeep trail in the barge. Overall, the truck handled itself well considering the size and weight. The width makes it a little more challenging than my Jeep, but I still had plenty of clearance and traction. Also, Raptor liner was definitely a good choice, because the truck dragged everything along the side of the trail.

View attachment 644261

View attachment 644262
Teddy Bear Cholla (or Jumping Cholla) likes to break off and hitch a ride with whatever touches it
View attachment 644263

Can't beat a desert sunrise
View attachment 644264

Great shots and looks good out in the wild.

One question on your Raptor liner job, I have used that in the past so I am familiar with it but regarding the application you did. Did you have an issues trying to get it sprayed between the cab and the box, where you cannot really get the spray gun into? Just seems like a tight are that would not get good coverage. Also how did you prep that area before spraying?
 

OverlandFT

Well-known member
Great shots and looks good out in the wild.

One question on your Raptor liner job, I have used that in the past so I am familiar with it but regarding the application you did. Did you have an issues trying to get it sprayed between the cab and the box, where you cannot really get the spray gun into? Just seems like a tight are that would not get good coverage. Also how did you prep that area before spraying?


It was tricky spraying certain areas of the truck for sure. For the area between the cab/box, I reached in as far as I could with sand paper and scuffed it. Almost the same approach with the spray gun, just held the gun as far in as I could and tilted back and forth. That section is not really covered like the rest of the truck, but not bare enough to notice. Originally, I thought I would use a roller after spraying to give it a complete coat in that area, but I'm pretty content with how it is now. The piano hinges were also tricky, because I had to angle the gun differently to get good coverage on all sides. That technique caused the uneven coating on the first job.
 

ExpoMike

Well-known member
It was tricky spraying certain areas of the truck for sure. For the area between the cab/box, I reached in as far as I could with sand paper and scuffed it. Almost the same approach with the spray gun, just held the gun as far in as I could and tilted back and forth. That section is not really covered like the rest of the truck, but not bare enough to notice. Originally, I thought I would use a roller after spraying to give it a complete coat in that area, but I'm pretty content with how it is now. The piano hinges were also tricky, because I had to angle the gun differently to get good coverage on all sides. That technique caused the uneven coating on the first job.

Thanks for the info. I have been going back and forth between Raptor lining my rig or using Baer exterior paint and rolling on (this is very commonly done with the military vehicle crowd). Baer paint is way cheaper but Raptor will be more durable.
 

Forum statistics

Threads
188,026
Messages
2,901,339
Members
229,411
Latest member
IvaBru
Top