Rango.....1942 Willys MB

Metcalf

Expedition Leader
My jets came in!

I have never had so many options to choose from.....*evil laugh*

I am trying to be logical about it, so I swapped down one size last night. #47 to #46. Big jumps are not the right way to do it.

I do love the autolite 2100. You can indeed change jets without spilling a drop of fuel. All you need is a pair of vise grips, flathead screwdriver, and some needle nose pliers.

-pull the air cleaner off
-pull the top of the carb off ( 4 screws and the choke arm nut )
-set the top and top gasket aside
-check the float level at this time, wet ( a quarter is just about the right diameter to measure the float level at .955. It should just touch the bottom of the quarter )
-clamp the fuel line off with the vise grip ( I want to add a small valve to do this )
-pop the float spring off the needle seat with the screwdriver and set somewhere clean, don't loose the needle!
-Use the screwdriver to remove the jets
-Use the pliers to get the jets out of the bottom of the fuel bowl so you don't get your fingers smelling like gas.
-Install new jets.

Put everything back together.
Don't take the vise grip off the fuel line till the top cover is back on

I tried to clean off one of the old plugs, that didn't work. I need to pick up some fresh plugs for testing. The leanest cylinder is 5 or 6. Pulling the plug on 6 is pretty dang easy so I am going to use that one for tuning...

I did notice a pretty big seat of the pants improvement with just one jet size change. From my research I should be in the 44 range so I am still rich I think. I thought I saw the #6 plug lighten up a bit, but I can't tell for sure. It was reading pretty rich overall. Not fouled, but very rich with a pretty heavy carbon deposit at the base of the isolator and the flat. The engine felt more peppy in general and a little more snappy. Idle vacuum is starting to go into the 16" range at 7000ft elevation.

I wonder if I have to adjust the idle mixture with new jets? I did readjust it a bit. I probably needed to go back out to 2 turns and tune in again.

I am going to find a cool little box to hold all my new jets tonight and pick up some new plugs to use for tuning.
 

shmabs

Explorer
The end credits are most excellent.

As someone who has grown up in the age of fuel injection, i'm in awe of the trickery you are performing to get your 2100 off road friendly. it's a science im not familiar with but would love to learn.

And rango looks almost cartoon-ish, and i love it.

mike
 

Metcalf

Expedition Leader
Thank you very much. It has been, and will continue to be, a very fun project. Building a vehicle from basically scratch has been a dream of mine for decades....

I agree, tuning carbureted vehicles is a lost art of sorts. I am having to rediscover a lot of it that has been lost. Once and a great while you can find some old guy that can dive under the hood and tune the engine with a screwdriver, his ear, two pieces of bubblegum, and an old rusty nail. Those guys are getting hard to find so I decided to try and educate myself on the matter. Overall it fits really well with this basic nature of this vehicle. I didn't want to complicate this thing up with electronic systems that couldn't be field fixed. The autolite 2100 is, in my opinion, the best carburetor ever made for off road vehicles. They not only have the potential to function well, but they are just fix it with a stick and a rock simple. They have very few moving parts, parts are easy to find, and you can rebuild one with a flathead screwdriver and a crescent wrench in about 20 minutes. There really isn't much to go wrong with one. On the flip side, even a stupid simple carburetor like this is a rather complex system that most people just don't understand anymore. Getting the engine to run is easy, getting it to run well seems to be a deep black art.

And yes, its like driving a real life hot wheels car around....
 

Metcalf

Expedition Leader
Thanks, sure, post it where ever you want...

Off road videos are coming. I am still sorting through a lot of teething and tuning issues.
 

Metcalf

Expedition Leader
It sounds like the T18/D18 swap is going to happen. I am basically replacing my sm420 and shorty adapter. I was originally going to add some Tera 3.15 gears to the t-case but have decide to try and build an underdrive instead...

http://www.pirate4x4.com/forum/showthread.php?t=1023228

This will give me a stupid low crawl ratio for playing in the snow and super technical sections.

Without the need to milk every last bit of gearing out of the standard transmission, transfer case, and axle gear ratios to break the 100:1 range, I can now open up my options on axle gears.

So the question is basically 4.88 gears or 5.38 gears for the D30/44 combo I have now? The existing 4.30 gears just don't cut it really. I constantly right between 3rd and 4th at 40-45mph when going uphill.

I'm leaning more toward 4.88s since they are a little stronger, little cheaper, and a little more common than 5.38s in the D30 low pinion front.

This thing will never be a 75mph down the highway kinda rig. If it can do 60mph all day I will be happy.

Thoughts?
 

Metcalf

Expedition Leader
Did a little more carb tuning tonight...

I would say one lacking area on the autolite 2100 is the ability to adjust the accelerator pump linkage.

Untitled.jpg


There are 4 positions in the pump arm ( red circle ) AND 4 holes in the lever arm (green circle) on the throttle shaft. There is no cam as far as I can tell like on a holley.

Anyways. The rod that links the pump arm to the lever arm ( yellow circle ) will NOT work properly in all positions. Basically you end up having to rebend the arm a bit to make the arm change length a little bit to use different pump settings. You basically have to fiddle with it.....

Using the outer two positions on the pump arm is pretty easy. There is a small tab on the bottom of the linkage rod that needs to be in the right place before the rod will pull out allowing you to change which hole you want to use.

The inner positions on the pump arm are almost impossible to use if your factory connecting rod was on the other two holes. You would have to bend it a LOT and I don't know if it would be long enough.

So how does it work....( I think? )

Pump arm. (red) As you move further away from the pivot point you make the arm less sensitive and your accelerator pump shot will be smaller for a given distance of travel from the lever arm that is connected to the throttle.

Lever arm. (green) As you move further away from the pivot point you are increasing the stroke of the accelerator as it relates to throttle movement.

Link Rod. (yellow )This basically connects the the two arms. On the autolite 2100 this is the only way to adjust any free-play or pre-load on the accelerator pump.

On my engine the picture above is where I am at so far. I am basically on one of the smallest accelerator pump settings you can get. I am on the outer most hole on the pump arm and the 2nd hole from the center on the lever arm. The link rod is adjusted so there is just a SMALL amount of 'slop' in the accelerator pump arm. This seems to help the engine feel a little more snappy off idle. I think it allows the throttle plates to SLIGHTLY get ahead of the fuel shot from the accelerator pump.

If anything I think that the accelerator pump is still a little fat. I get a slightly hesitation at about 2000-2500 rpm when snapping the throttle under no load. Under a load, as in driving, there is no flat spot at the same speed.

Still tuning.....
 

jeepdreamer

Expedition Leader
While I have a difficult time imagining much "snap" out of trying to spin up that monster flywheel *grin* I see what your saying. Couldn't you build a rod for the accel pump that uses some turnbuckles and threaded rod? Maybe allow you to shorten or lengthen it as needed?
 

Metcalf

Expedition Leader
While I have a difficult time imagining much "snap" out of trying to spin up that monster flywheel *grin* I see what your saying. Couldn't you build a rod for the accel pump that uses some turnbuckles and threaded rod? Maybe allow you to shorten or lengthen it as needed?

Surprisingly it's pretty snappy, and getting better with tuning. I was surprised. If your on gravel, dirt, or sand you can pitch the rear end around pretty easy. 3000lbs and about 2-3 times the power of the stock (L134 4cyl) engine is pretty fun. I can't wait till I build the spare motor a little bit...another 100hp would be fun!

The link rod is a really funky shape that would be hard to duplicate AND provide some way for adjustment. All in all the stock link rod works with slight 'adjustement' for the two outer pump arm positions and at least 3 positions on the lever arm. If you needed to use the inner most positions on either arm I think you would have to make a new arm.
 
Last edited:

jeepdreamer

Expedition Leader
It would be really cool to find an all aluminum Buick V6 or the Rover/Buick aluminum V8 to shave even more weight and add some ponies...
Zooooooooooooooooooooooooooooooom! ;)
 

Metcalf

Expedition Leader
113_0602_01_zaluminum_buick_v6ta_performance_engine.jpg


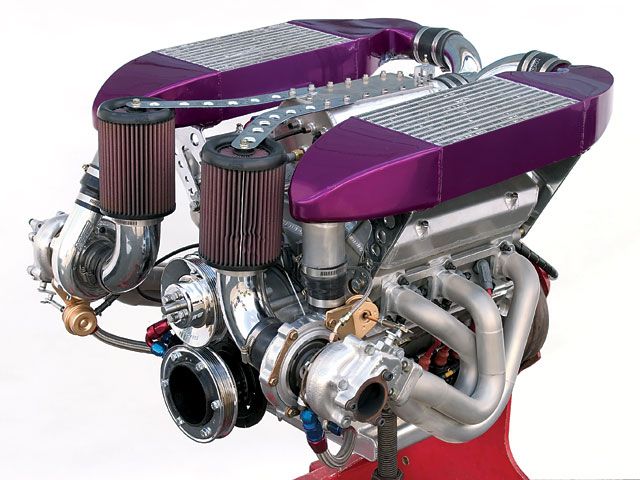
700hp....that is practical right? All aluminum twin turbo buick V6 from TA performance.....

In reality I think going to an aluminum intake will be a nice 1st step. The 'spare' engine is probably going to get a 4bbl intake and 4100 motorcraft carb. I have been looking into retrofitting the better flowing even fire heads on my odd fire block. That would open up the intake choices a bit too....
 

jeepdreamer

Expedition Leader
Oh... SURE! That is most defiantly practical! ;) Kinda like the 500 Caddy I put in my old Galaxy Station wagon.
I'm not sure but I kinda remember there being some reason why the heads from an "even" won't work on an "odd"...But I may just be remembering stuff related to exhaust manifolds or maybe Dizzys.? I do like TAs valve covers a lot though. :)
 

Forum statistics

Threads
188,337
Messages
2,905,752
Members
229,959
Latest member
bdpkauai
Top