Rango.....1942 Willys MB

Metcalf

Expedition Leader
Tonight's progress....


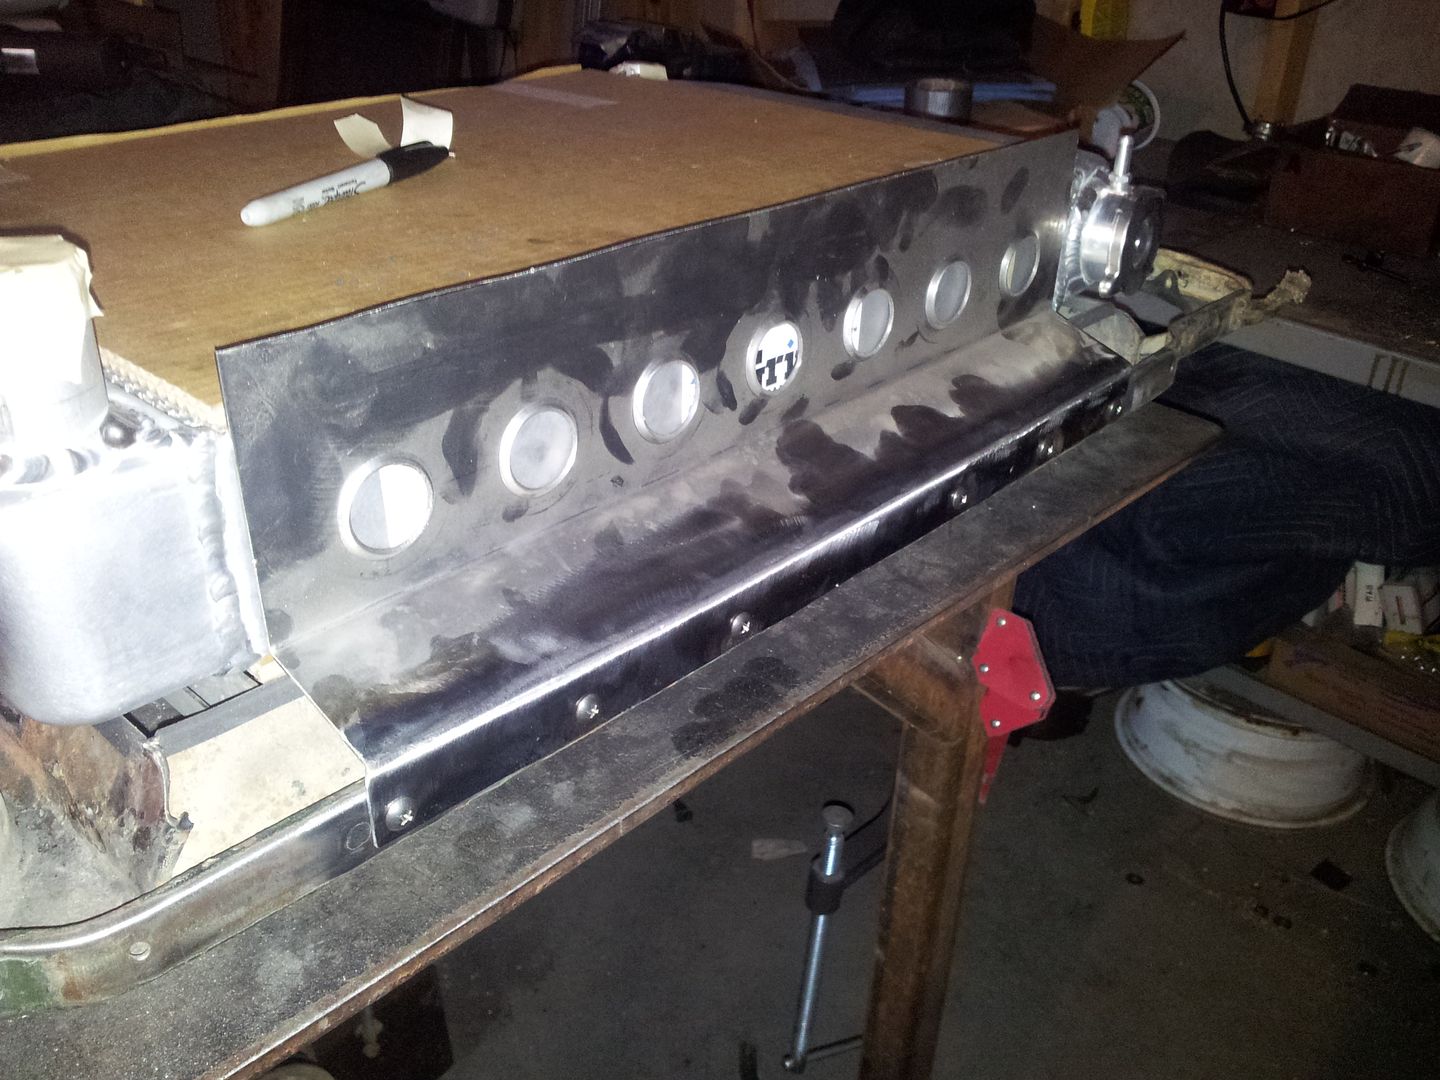
The upper mount is getting close. It will also form the upper mount for the radiator shroud if all goes according to plan. It was kinda a pain in the rear to make. It is two parts. There is a slight curve to the top of the flat fender grill shell so that flange couldn't really be bent. There was a lot of grinding and fitting of the two parts. They where then tack welded on the outside. Then I pulled the bracket and welded the back side of the seam. The top was welded and ground down smooth.

I added some dimpled holes. I slightly reconfigured my dimple die so that there was a little LESS clearance between the die. This have a MUCH flatter finished product.

All in all I am pretty happy so far.

I need to work on putting the mounting hardware for the bottom bracket in tomorrow. I have an idea for an inner brace for the bottom bracket I want to try so that all the weight of the radiator isn't on the bottom flange alone. Then I should be able to move onto the shroud and fan mount.
 

Metcalf

Expedition Leader
Victory is mine!


Of course this time it took all of 30 minutes to bolt the clutch on and get the motor in place. I didn't really do anything different. It went all the way flange to flange with the dowel pins in place with just a little wiggle.

After the engine was back in its home again I moved back to working on the radiator mounts and packaging.....


I added another flange to the bottom bracket that will attach to the fan shroud and sandwich everything in place.


Here is what it looks like so far....
 

Metcalf

Expedition Leader
Some good progress tonight on a radiator shroud to mount my new Volvo fan onto.....


First you need to make the pattern. I did a few bending trials on some small 1" strips of 16 gauge to get a feel for how it was going to bend. This is a pretty simple box design. The top and bottom flange are designed to be 90 degree bends with the sides at 45 degrees to give it a little different shape. I laid out the hole for the fan but I suggest you don't cut it till almost last. It is much easier to form the shape without the hole.


I was able to do the upper and lower bends in my press brake. It did a really nice job. Since I don't have a box/pan style brake I had to improvise on bends on the sides. The shroud is made from 16 gauge ( .06ish ) material so it bends pretty easy. I was able to rig up a little clamp system on the edge of the table to use for a bending guide. The bend went in pretty easy. I used a large deep throat crescent wrench to get the bend started...probably less than 10 degrees. Then I finished it off with a nylon head hammer and lots of light hitting. Don't get in a rush, take your time. All you really need is the weight of the hammer falling almost....light hits, lots of them, spread as even as possible.


After some fitting I welded up the corners. Then I cut the hole out for the fan. It ended up fitting really nicely I think.


Here is what it will look like with the fan in place. Tomorrow I will put in all the mounting hardware. The shroud will attach to the upper and lower radiator mount. The fan will attach to the shroud. When it is all assembled it locks itself together so the fan can't go anywhere. All in all I think it turned out pretty well. Then finally all the parts needs some cleanup, edges softened, corners rounded, primered, and painted.

I can move onto the final assembly of everything on the engine after that!
 

Metcalf

Expedition Leader
Here is my progress for the day.....
The


I added all the attachment hardware for the shroud to the upper and lower brackets along with the hardware that holds the fan to the shroud. I decided to use all 6 of the stock attachment holes in the Volvo shroud by rotating the fan just right. Everything is using the same captured nuts like I used before. There are about -24- 10-24 fasteners holding the entire mess together. The bolt pattern isn't symmetrical on the flange, but the fan can be replaced with another OEM unit without have to transfer a custom pattern over on the flange. Finally I trimmed the top and bottom of the flange off to clean up the look a little bit.


This is how much 'extra' room I have left over. I should have JUST enough room to be able to slide the shroud and fan back off the upper and lower bracket if I need to replace anything or work on anything.

Then I tore it all down for primer and paint....

It was time to move onto getting everything back together on the engine. The manifolds went back on. Exhaust hooked up. Starter installed. I modded the switch wire with a quick connect so you don't have to get a little wrench on the back of the starter to attach it when its in the chassis. Water pump was installed. Crank and water pump pulleys installed. Alternator mount bolted to the head. I also modded the intake for the carb adapter....


On a stock Buick 225 intake manifold I think it is best to block off these two heat riser passages under the carb. I turned down two press in plugs out of some aluminum bar stock. They where a hammer in press fit.

I also started playing around with my coolant bypass manifold. I had to make a custom M14x1.5 female to 1/2" npt male plug adapter for my new BMW based fan temp switch. I need to find a crush washer to go under the sensor sense its not a tapered thread.

This is what I looked like when I stopped for the day.....


I will be back at it tomorrow. I should be most everything put back together that was being reused from the last install. The last big challenge is going to be finding an upper and lower radiator hose to work with the new double pass radiator.....
 

Metcalf

Expedition Leader
More progress tonight....


Power steering pump is back on. Drivers fender is back on. Grill and radiator assembly is back together. I got the lower radiator hose figured out...


It is from a 1972 chevy C10/K10 pickup with a v8. I had to chop both ends down. The water pump side was a LITTLE big in diameter but the lower end is just find. I had to add my old lower radiator hose spring to this new hose...they don't come with them anymore? The hose had the perfect 95-100 degree bend you need to get around the belt for the alternator with the buick water pump.

I'm drawing a blank on the upper radiator hose....

From the thermostat housing it needs to go down 35 degrees, then go straight for only a few inches, then a 90 degree right hand bend, then go straight for a bit, then a 90 degree left directly into the radiator inlet. Edit: The upper radiator hose is 1.5" at both ends.

If anyone has any ideas I would much appreciate it. I would like to use a factory hose but I think I may have to combine a few things?
 

Metcalf

Expedition Leader
Progress for the night....getting closer....

Upper radiator hose WIN!


I could not ask for a better fit for a factory hose. I didn't even have to trim it at all!

The hose is a Dayco 71041

One application is a 1981 Ford F150 or Bronco with a 351M engine.

Finding that pretty much made my day.

I did a few more details......


I turned this little press in choke for the heater hose bypass manifold. I blocked off the rear port. I am building a manifold that comes off the port at the back of the thermostat. This should force all the water on the passenger side of the engine to go through the head. This choke will keep the flow that bypasses the radiator and goes back into the water pump to a minimum. It should allow the remote mounting of the sensors to read more accurately.


Here is the rough assembly of the manifold. The rear sensor is a BMW dual speed fan control switch. The passenger side outside fitting is the temp sensor for the gauge. The front of the cross goes to the water pump bypass. This is the heavily restricted passage.

More tomorrow!
 

Metcalf

Expedition Leader
I am getting close to firing the new engine. Tonight I installed the carb along with the throttle cable(s) bracket. I found a new power steering belt that was a bit shorter to pull the power steering pump away from the inner fender. I had to make a new hard line for the fuel pump to carb. I ended up routing it a lot different so clean things up and hide it a bit. The new line goes up over the timing cover, under the coolant bypass, and up in front of the non-stock autolite carb. I only kept a small section of rubber line maybe 5" long so I can still clamp the fuel supply off for jet changes with a set of needle nose vise grips.


Tech tip for the day....


I found an affordable easy to find thick 'insulated' gasket that will fit the motorcraft/autolite ( or holley ) 2bbl carb. It is from Napa, # 2-7605. These are going for $9 which is a lot less than the other thick options on the market.

Hopefully tomorrow I will be moving onto wiring....
 

Metcalf

Expedition Leader
Getting close now....

Tonight I got the passenger fender bolted back on. I hooked up all the old factory wiring except I gutted the old fan stuff. All the hoses are clamped down. All the belts are back on. The carb linkage is all back to normal. The vacuum gauge is hooked up. I installed the old temp sender in the new coolant bypass manifold.

Then I moved onto a few new small projects....


I started building an overflow recovery tank. I found an oil aluminum gas sample bottle at work that needed a new purpose. I chopped off the factory top in the bandsaw since I think the old top was molded/spun in place. Then I turned a new top on the lathe out of some aluminum stock and pressed it in. I had a piece of copper tune left over to make into a 'draw straw' and pressed/epoxied it in place. It goes within 1/4" of the bottom of the bottle.

Tomorrow I will finish the bracket where it will live.


I made a new dipstick out of some stainless TIG filler material and an old part I had turned a year or two ago. I was able to get some measurements in another thread, thanks guys! The stainless rod was nice and springy with a good memory.


I used one of the end stampings for the fill/full mark! The new dipstick fits MUCH better than anything I have had in the past. Even with my rebent tube the new stick goes in and out really easily.

It feels like it is getting really close now!

Does anyone know what is the best practice for priming the oil pump? I have to install the distributor and route all the plug wires after priming....how long is too long to wait before firing it?
 

Metcalf

Expedition Leader
Somehow buying the parts for and wiring in the fan control took most of the afternoon...


The relay pack is from a Volvo car, generally the same one the fan came from. It is a totally integrated OEM level part. I used a BMW dual speed grounding fan switch. I am running a 180 thermostat so I selected the version that turns the low speed on at 195 and off at 185. The high speed turns on at 205 and off at 195. My hope with the new 'overkill' radiator this should allow the engine to be warmer and more efficient.

I hope that if I get out into the shop early tomorrow I can get the last of the little stuff buttoned up and fire the engine.
 

Metcalf

Expedition Leader
Ok....what did I do today to get the jeep running. Honestly it's kinda fuzzy. I think I started out there about 8:30 this morning.....then all of a sudden it was like 4pm already.

The basic list of things....

-Made the mount of the recovery tank
-Mounted said tank.
-Filled the cooling system, it was just about 3 gallons total.
-Swapped on the old valve covers after I painted them.
-Filled the engine with oil
-Primed the engine using an old screwdriver I turned down in the lathe in a hand drill. That gave me about 30+psi of oil pressure to start things off.
-Installed the distributor pretty much straight up.
-Installed plugs and plug wires. I need to do something about looming the wires.
-Finished wiring up the switch for the fan control in the dash.
-Pulled the top off the carb and filled the fuel bowl with fresh gas.

Then she was ready to fire. I pushed it back outside.....

Pulled the ignition switch and hit the stater button. She fired up pretty dang quick. Maybe 2-3 turns before she lit off.

The it was up to 2000-3000 rpm for the next 20 minutes to break in the cam. I tried to vary the speed throughout the entire time. The engine stayed running for the entire time but I did have some issues....

-I had an pretty steady oil leak coming from the oil pump seam. I don't know what happened. Oil pressure stayed above 30psi for the entire test so I just let it drip. The oil was going to be changed after the 20 minutes anyways. I ended up taking the oil pump apart and resealing it with some high tack. That seemed to fix the leak. I don't really know why it was leaking but it isn't now. Repacking the oil pump with some p-jelly was fun. There might have been some swearing.

-The bmw coolant sensor doesn't seem to be working? I was a little nervous with letting it get above 205, but nothing happened. Luckily I had wired in a high speed bypass that I hit to keep the temps down during the cam break in. Once the fan was on the temp went all the way back down to the 180 thermostat temp and stayed there 100%. I need to pull the relay pack plug and jump the ground to see if the low speed is working? I think maybe I had an air bubble in front of the fan switch? I don't know.

-I have about half a dozen exhaust leaks on the manifolds/heads. I used the new gaskets included in the kit and they sucked. I had my doubts up I tried them anyways. I have already ordered another version that is specific to the 225 that looks like they should fit better. I also had a leak on the passenger side collector that I was able to fix with double gasket and some goop. I will be limited on driving it this week till the new exhaust gaskets show up.

Once the cam break in was done I changed the oil and filter again. That is like the shortest oil change ever!

I finally found my timing light and was able to set the base timing to 7-8 degrees or so. I will try it there and see how it does on the road.

I don't think there was much to take pictures of....or time....but I did take one of the recovery tank. It ended up kinda steampunk-ish.


Metcalf

Expedition Leader
A candid picture from the weekend....


The misses caught me in the whirlwind that was this weekend. At this point I am trying to remember how the heck a timing light works. Is this thing on. It took me a while to find my old Montgomery Ward timing light. It has been with me for a lot of years for sure. It isn't the brightest light in the world. In the picture I was flashing it onto my hand to see if it was on. In the end I ended up having to pull the flattie back into the garage to get it 'dark' enough to work. Sticking a little more black sharpy in the mark on the dampner also helped.

Installing the distributor this time I was able to get the vacuum advance to basically point directly forward like it is suppose to(?). I don't think it matters THAT much but it seemed to work out well. I was able to use one of the short posts in the odd-fire cap for #1. This is suppose to make it easier to set the timing. I was surprised how sensitive it was to movement vs timing. I ended up getting it set at about 6-8 degrees for base timing. That seems to be working pretty well so far.

One of these days I need to go back through my vacuum advance stuff and hook up it back up. I think it could use a little more base timing with some full manifold vacuum advance. That would keep the timing while cranking/starting to about where it is now ( or a little less ). It would add advance at an idle which could be nice. It would add some advance while cruising at high vacuum on the main circuit. It would limit total advance also which would probably be good. I don't think I need much, maybe 5 degrees at most. I'll stick it on the list :shaking:
 

Metcalf

Expedition Leader
Ok, ok.....best day ever!


If that wasn't enough.....which is was......but anyways....

I fired up the flattie and took it for a short drive around the neighborhood to warm up the coolant so I could run a few more tests on the fan switch. I was getting it up to about 205-210F according to the gauge. RIGHT when I was going to turn off the engine the fan kicked on all by itself?!?!?! I guess the garage gnomes decided to pay me a visit and fix my fan system?

Now, it isn't perfect. The low speed is coming on at about 200-205 according to my gauge. The low speed does bring the temp down but not nearly as fast as the high speed manual bypass does. The fan shuts off at about 185 according to my gauge? That range is a little bit off from what it is suppose to be? The gauge could be off I guess?

It does make me a little nervous to see when the high speed would kick on by itself....

I have a few more switches coming. One of the same thing I got from a difference place, one of the lower temp unit.

Once I get the exhaust manifold gaskets replaced I will do some more testing.

Then I fixed another problem in like 2 minutes....the clutch. The clutch was not disengaging like it should. I had the same issue when I put it together last time. It is basically a lack of available throw on the hydraulic throwout bearing before the fittings crash into the pressure place. I had adjusted the clutch pedal down a little bit to prevent that issue from happening last time....and the clutch fuzz basically wore off and things worked. I hadn't noticed any throwout bearing fittings hitting the clutch disc noise so I decided to dial the clutch pedal back out slowly. I think I got 2-3 full turns and nothing was hitting yet. Uh.....odd. Then I jump in for my little drive and the clutch works 100% like it is suppose to...the pedal might even be a little high now.

This afternoon was total win!
 

Metcalf

Expedition Leader
I installed the gaskets last night. No more exhaust leaks.

I took it for a test drive last night. You get some really odd vibrations when you have one hub locked in with an automatic locker. Other than that things seemed to go pretty well. Power seems good. Honestly it feels much the same as before 2-3K definitely feels very smooth. I haven't pushed it much past 3K for long yet.

The bad. I think the rear main is leaking. Sucko. It's not bad, but it drips when things are fully warmed up. I guess I will have to change it out during the first oil change. That is going to suck a little bit.

I think I am in that hypersensitive stage where I think every little noise is the engine blowing up. I'm trying not to worry about it too much, but since I built it in my garage I worry a bit. I do have a little bit more driveline vibration at 3K than I remember. I need to look at the angles again and see how things look.

I drove it to work this morning. It seemed to do just fine. 2-3K is definitely more peppy than it felt before. I did a few short burst to 4K and it pulled pretty well. I did notice this morning that my cruise mixture with #47 jets was just a bit on the lean side at 14.5-15:1. It was pretty cold this morning. I think on the way home when its 70F out it will be back to 'normal'. I guess the engine could need a little bit different jetting with the rebuild, new heads, and new cam. I will keep an eye on it.

I'm not 100% happy with when the fan kicks on. I think after running 50+mph down the road and then basically stopping things got a little heat soaked. It never got over 210, but I thought the high speed came on. It seems like maybe the low and high speed might be a little too close together or something? It cooled right back down after stopping. The fan maybe ran for 60 seconds and then shut itself off.

We will see how it does going uphill back home after work...
 

Metcalf

Expedition Leader
I think that totally catches up this thread to the present day. That was probably post overload, sorry....
 

Forum statistics

Threads
186,626
Messages
2,888,236
Members
226,766
Latest member
Josh00333
Top