S10 Build getting started

Meili

Adventurer
Gorgeous day, got lots done.

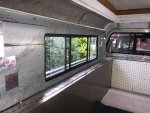
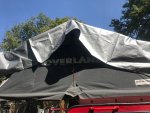
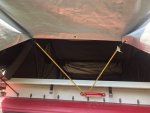
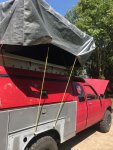
Opened up the tent for the first time in months to air it out and for some headroom while working.

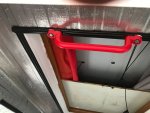
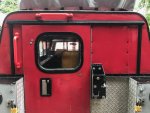
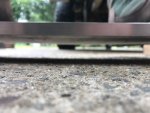
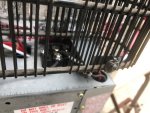
Added the last 2 handles to the tent base. Now I can just step on the tire and pull myself right up, easy peasy.

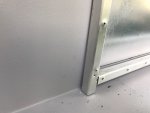
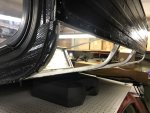
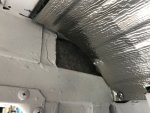
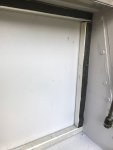
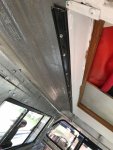
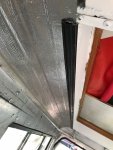
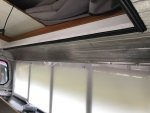
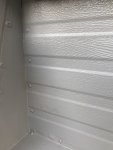
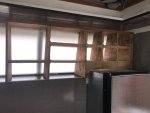
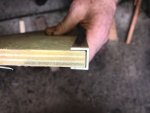
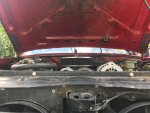
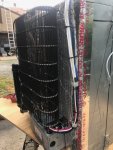
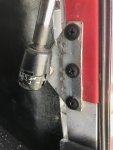
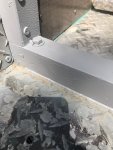
Since flattening out the brackets for the p/s hatch struts worked out well I did the same to the d/s. Scabbed a piece of aluminum behind it

and then caulked both sides.

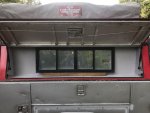
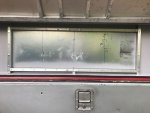
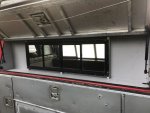
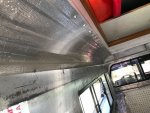
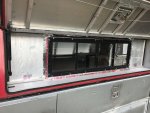
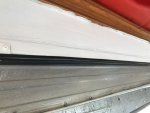
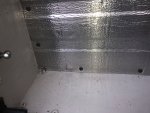
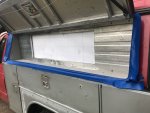
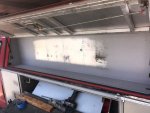
Tried some Flex seal stuff to compare to the Rustoleum sealer. Flex seal wins hands down. Still have to work with light coats but goes on much better, not

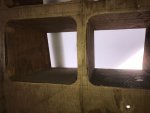
watery. Did not cover the center since it will be cut out for the sliding window. Also hit the door sill.

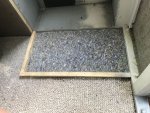
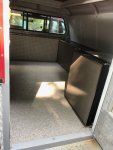
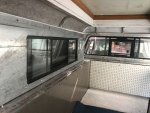
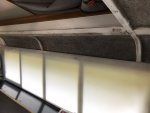
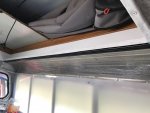
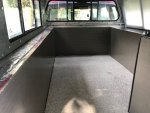
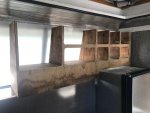
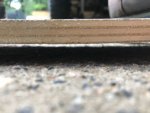
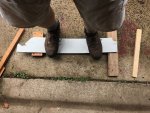
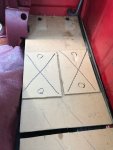
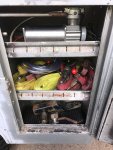
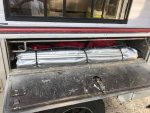
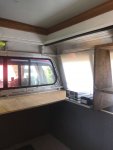
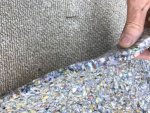
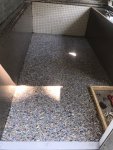
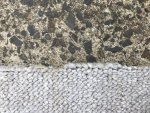
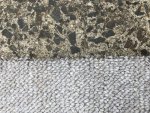
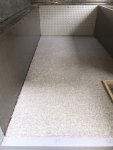
Added 1/2" carpet pad and then some carpet, both leftovers. Since berbers like to unravel hit the edges from about a foot away with your propane torch.

Melts the edges, no more fraying. Added 2 layers of padding in the frig nook.

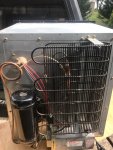
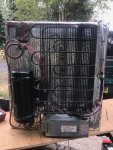
I remember installing appliances back in the day and noticing they had reversible panels to change the color to match the other appliances.

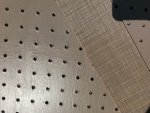
The front panel on the mini frig was sloppy, so I pulled it a part , same deal. I added a extra layer of foam and then cut a piece of leftover paneling

from the inside lower walls. Well la, matching designer frig!

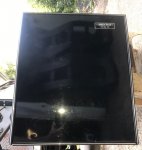
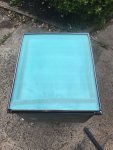
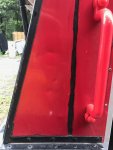
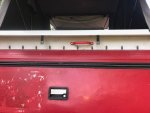
Cleaned the letters and adhesive off the Plexiglas, lights up nice and bright.

I think the carpet really ties the room together! ;)

16263
 

Attachments

  • s10 handle 9.JPG
    s10 handle 9.JPG
    48.4 KB · Views: 27
  • s10 wall 10.JPG
    s10 wall 10.JPG
    96.8 KB · Views: 29
  • s10 wall 11.JPG
    s10 wall 11.JPG
    132.8 KB · Views: 28
  • s10 wall 12.JPG
    s10 wall 12.JPG
    72.1 KB · Views: 27
  • s10 wall 13.JPG
    s10 wall 13.JPG
    68.5 KB · Views: 27
  • s10 carpet.JPG
    s10 carpet.JPG
    104 KB · Views: 27
  • s10 carpet 1.JPG
    s10 carpet 1.JPG
    183 KB · Views: 26
  • s10 carpet 2.jpg
    s10 carpet 2.jpg
    146.6 KB · Views: 26
  • s10 carpet 3.JPG
    s10 carpet 3.JPG
    163.2 KB · Views: 27
  • s10 carpet 4.JPG
    s10 carpet 4.JPG
    157.9 KB · Views: 27
Last edited:

Meili

Adventurer
Too many pics!
 

Attachments

  • s10 frig 19.jpg
    s10 frig 19.jpg
    72.7 KB · Views: 25
  • s10 frig 20.JPG
    s10 frig 20.JPG
    163.3 KB · Views: 25
  • s10 frig 21.JPG
    s10 frig 21.JPG
    164.9 KB · Views: 23
  • s10 frig 22.JPG
    s10 frig 22.JPG
    119.1 KB · Views: 28
  • s10 frig 23.JPG
    s10 frig 23.JPG
    136.7 KB · Views: 28
  • s10 frig 24.jpg
    s10 frig 24.jpg
    142.7 KB · Views: 28

Meili

Adventurer
Still chasing a brake gremlin that is frustrating me but if it was easy........

While under there noticed 2 things, one the suspension is flexing enough for the tires to rub the frame. The other is at full drop the brake hose

is stretched tight!

The tire rub is only dangerous on 1 side, look at the shiny bolt end in the picture. It will be shortened and also plan in 1/4" wheel spacers.

For the brake hose, since I was replacing it, moved the mount up one bolt on the differential. This reduced the length by about 2 1/2 inches.

This caused me to have to shorten the P/S line on the rear and make a new line for the D/S since metal lines don't stretch to easily. ;0

The vent for the rear will also be lengthened.

Decided to switch it up and work on the D/S window. Removed the window and frame for my donor cap.

Mocked it up for height using a hi tech spacer (2X4). Trimmed the frame to fit, used it's ID to mark cut lines. Used a hole saw on the corners to reduce

chances to metal tears/cracks.

Just roughed in now but I like to look and function. The latch will need to be switched to the inside so no one can lock me in.

The whole exterior wall will be packed out to be flush with the window, insulated and covered.

Also came up with an idea on how to cover the upper curved areas inside of the cap, stayed tuned!

16420
 

Attachments

  • s10 brake 1.JPG
    s10 brake 1.JPG
    109.4 KB · Views: 21
  • s10 brake 2.JPG
    s10 brake 2.JPG
    124.4 KB · Views: 21
  • s10 brake 3.JPG
    s10 brake 3.JPG
    140.8 KB · Views: 17
  • s10 brake 4.JPG
    s10 brake 4.JPG
    150.3 KB · Views: 22
  • s10 window.JPG
    s10 window.JPG
    63.3 KB · Views: 24
  • s10 window 1.JPG
    s10 window 1.JPG
    60.1 KB · Views: 24
  • s10 window 2.JPG
    s10 window 2.JPG
    52.4 KB · Views: 24
  • s10 window 3.JPG
    s10 window 3.JPG
    64.2 KB · Views: 25
  • s10 window 4.JPG
    s10 window 4.JPG
    95.8 KB · Views: 24
  • s10 window 5.JPG
    s10 window 5.JPG
    95.3 KB · Views: 24
Last edited:

Meili

Adventurer
Since my old cap gave it's life donating it's slider window, I did not want it's death to be in vain.

I figured since the outside top corners on the skin were already curved, they would work well as inside wall corners in my camper.

First cut a over sized piece from the old cap. Then trimmed it to fit with metal shears. The back was sprayed with adhesive and

a layer of foam was installed, then trimmed to fit.

Used the existing holes a the bottom to screw it into the frame and the top was screwed into the wood brace.

I have an idea to trim/cover the top screw headed using another part donated from the old cap.

The majority of the piece will remain raw aluminum, figuring a low wattage light mounted along the length would reflect nicely.

Insulated the p/s so it will get the same treatment tomorrow.

Next, packed out the d/s slider area with more parts pirated from the old cap. The pieces would not sit flush do to massive rivets holding the box together.

The rivets were drilled and punched out. Used the holes left for the new screws holding the frame pieces, installed from the inside.

The voids were filled with foam board insulation and taped up.

Going to skin the area with, you guessed it, parts from the old cap.

God I am cheap!

Found a area that leaked during recent rain in the l/f corner. That area was recaulked and taped up.

16600.
 

Attachments

  • s10 window 6.JPG
    s10 window 6.JPG
    84 KB · Views: 19
  • s10 window 7.JPG
    s10 window 7.JPG
    227.2 KB · Views: 20
  • s10 window 8.JPG
    s10 window 8.JPG
    207.2 KB · Views: 19
  • s10 window 9.JPG
    s10 window 9.JPG
    78.8 KB · Views: 19
  • s10 window 10.JPG
    s10 window 10.JPG
    90.2 KB · Views: 19
  • s10 window 11.JPG
    s10 window 11.JPG
    44.9 KB · Views: 19
  • s10 window 12.JPG
    s10 window 12.JPG
    65.8 KB · Views: 19
  • s10 window 13.JPG
    s10 window 13.JPG
    128.8 KB · Views: 18
  • s10 window 14.JPG
    s10 window 14.JPG
    58.8 KB · Views: 18
  • s10 window 15.JPG
    s10 window 15.JPG
    76.2 KB · Views: 18
Last edited:

Meili

Adventurer
Forgot to mention yesterday that I had painted the exposed wood with Killz to help seal it up. Hit the back of the pegboard with a coat

while I was painting.

Today, hit it with some exterior paint that is a close match to the paneling. Just need some throw pillow and a couple of paintings from Sears!

Did the same on the p/s cut, trim, add foam, installed curved roof section.

I took the exterior trim from the donor cap and used to finish the edges. Even used the screws from the cap, frugal.

Got on a roll and capped the rear section of the interior roof too. I think it looks pretty darn good for a bunch of repurposed parts!

The exterior roof has been sprayed with sealer and 1/2" jute glued to it. The metal pieces I just installed have a foam packing.

The two combined leaves a sealed 1/2" air gap between them.

Input needed, anyone think the metal will sweat in the winter?

16722
 

Attachments

  • s10 trim.JPG
    s10 trim.JPG
    74.2 KB · Views: 32
  • s10 trim 1.JPG
    s10 trim 1.JPG
    90.8 KB · Views: 32
  • s10 trim 2.JPG
    s10 trim 2.JPG
    135.7 KB · Views: 32
  • s10 trim 4.JPG
    s10 trim 4.JPG
    132.8 KB · Views: 32
  • s10 trim 5.JPG
    s10 trim 5.JPG
    62.1 KB · Views: 32
  • s10 trim 6.JPG
    s10 trim 6.JPG
    63.6 KB · Views: 32
  • s10 trim 7.JPG
    s10 trim 7.JPG
    60.6 KB · Views: 32
  • s10 trim 8.JPG
    s10 trim 8.JPG
    77.5 KB · Views: 33
  • s10 trim 10.JPG
    s10 trim 10.JPG
    90.7 KB · Views: 31
  • s10 trim 11.JPG
    s10 trim 11.JPG
    113.9 KB · Views: 31
Last edited:

Meili

Adventurer
Nobody has any input on the metal sweating/condensation, huh?

Any wood workers/carpenters may want to avert your eyes.

The contractor cap came with a wood shelf unit that the previous owner had made. I wanted to reuse it but it's opening are to the outside for

obvious reasons.

Basically I had to drill holes with a hole saw somewhat blindly, drill did not fit existing openings, to make access from the inside.

Added a top plate for strength. Still have a lot of prep/sanding to do. Will eventfully get sealed and painted.

What is on the shelves will be easy to see during daytime!

Since the roof skin went so well, I did the same for the d/s window area using the side panel of old cap.

After cutting it to fit and screwing it in place, hit the whole area with Gray Flex Seal.

The window got some foam tape on the back of the mounting surface and was screwed in with 40 + screws! I guess Leer did not want it falling

out.

Last installed the trim that covered the screws for a finished look. The bottom shelf area will be getting a layer of Trex or something similar.

16920
 

Attachments

  • s10 window 21.JPG
    s10 window 21.JPG
    74.5 KB · Views: 36
  • s10 window 20.JPG
    s10 window 20.JPG
    139.3 KB · Views: 33
  • s10 window 19.JPG
    s10 window 19.JPG
    67.6 KB · Views: 34
  • s10 window 17.JPG
    s10 window 17.JPG
    77.8 KB · Views: 33
  • s10 shelf 1.JPG
    s10 shelf 1.JPG
    62.9 KB · Views: 32
  • s10 shelf.JPG
    s10 shelf.JPG
    111.7 KB · Views: 32
  • s10 window 18.JPG
    s10 window 18.JPG
    74.7 KB · Views: 34
  • s10 shelf 6.JPG
    s10 shelf 6.JPG
    53.6 KB · Views: 33
  • s10 shelf 3.JPG
    s10 shelf 3.JPG
    45.5 KB · Views: 34
  • s10 shelf 5.JPG
    s10 shelf 5.JPG
    63.3 KB · Views: 32
Last edited:

Meili

Adventurer
Was able to sneak in about an hour of "labor" before leaving to spend the day with the family.

One good thing is with a project this big there are plenty of small things to do.

First, I was concerned how much the bed platform flexed under my weight (245#).

I had noticed some aluminum c-channel at the big box store and wondered if it might help sure up the unsupported platform edge.

Got a piece of scrap platform out of the truck and found a channel that fit it well. It will get glued to the platform edge with Gorilla glue.

Stood on the piece without and then with the channel. Made a huge difference, guesstimate 90% of the flex is gone.

Don't ask how I took the pictures while balancing on the board!

Next, filled the 2 seams on the back of the cap with 3m strip caulk, cut down some excess trim from the old cap and installed it.

Makes for a more finished look and should prevent any leaks.

17266

Oh, please vote as asked above. You can vote once a day per IP address, hint,hint.

Need that 50, thanks!
 

Attachments

  • s10 trim 12.jpg
    s10 trim 12.jpg
    74.8 KB · Views: 27
  • s10 trim 13.JPG
    s10 trim 13.JPG
    92.5 KB · Views: 27
  • s10 trim 14.JPG
    s10 trim 14.JPG
    74 KB · Views: 27
  • s10 platform.JPG
    s10 platform.JPG
    44.8 KB · Views: 27
  • s10 platform 1.JPG
    s10 platform 1.JPG
    122.2 KB · Views: 27
  • s10 platform 2.JPG
    s10 platform 2.JPG
    55.5 KB · Views: 26
  • s10 platform 3.JPG
    s10 platform 3.JPG
    45.3 KB · Views: 27

Meili

Adventurer
Another short day.

Started some wiring for my house power. Right now it is more of a "long weekend" set up vs "long term" power.

I do have a larger inverter but that's for another time. As usual this is put together with used/leftover stuff.

The isolator is about 25 years old but never used. It will be mounted in the engine bay.

The switch is my old kill switch from my race car. It is for emergency use tying house and start batteries together.

The inverter I have had for a few years. Got it when it was on sale at Kmart for $20. Surprisingly it is actually made by Schumacher. Works well to inflate air

mattress, charge phones and even was used on a Cpap machine. Side note: air mattress pumps can really get a campfire going. Lol.

The solar side is a cheap Harbor freight setup I got from a guy that was moving for $40. Did research so I know not to expect much from it!

The distribution blocks are from the junkyard, S10 and mid size Chevy trucks.

The wires and connectors are free, Amazon kept sending me a wrong alternator kit and did not want the wrong ones back. Win.

I took the controller apart so I could remove the bolts for the feet and then ran screws threw from the inside out to mount it to the board.

The battery power will come in from the controller side and then on to the mini frig. May also wire up my mini compressor.

Did I mention I need votes for the Expo East Cool Rides contest??? If half the people that view this vote, I will make it to the "finals". ;)

Thanks

17364
 

Attachments

  • s10 power.JPG
    s10 power.JPG
    132.9 KB · Views: 25
  • s10 power 1.JPG
    s10 power 1.JPG
    68.5 KB · Views: 25
  • s10 power 2.JPG
    s10 power 2.JPG
    73.8 KB · Views: 25
  • s10 power 3.jpg
    s10 power 3.jpg
    69.1 KB · Views: 25
  • s10 power 4.jpg
    s10 power 4.jpg
    87.8 KB · Views: 26

Meili

Adventurer
Too much liquid sunshine today.

Did manage to get the isolator and switch installed.

Finally got batteries for my meter and put it on the alternator, it was reading just under 13v and would move up to max of 13.2v.

The previous owner had only 1 wire hooked up for the dash gauge.

Did some research and found a CS130D will charge as is but will adjust output with the sense wire attached (kinda obvious).

The result was 14.3v at the alternator! Depending on draw, the isolator will "eat" between a .23 and .48 of a volt.

I had larger but older battery then what is in the S10. Been maintained on the trickle charger at home so I stuffed it in.

The 34/78 has 800 CCA,940 CA vs the smaller batteries 590 CCA,725 CA.

17485
 

Attachments

  • s10 power 5.jpg
    s10 power 5.jpg
    172.7 KB · Views: 21

Meili

Adventurer
Found all sorts of wiring issues to correct.

Got them straightened out but could not get the alternator to charge without a hot lead from the battery. Kinda defeats the purpose of the isolator!

Started a thread in the "Power" section so I will not bore you with the details. Take a peek if you want, open to ideas.

I did step up to a AD244 alternator to replace the CS130D. This thing is a beast and puts out an additional 30 amps. The alt was not quite a bolt in.

The alt is just a little wider at the mount, so I had to remove the slip collar. The AD244 did not have a ground boss so I used the end of the ground as a spacer,

worked great. It's a tight fit but it's in there. It does clear the hood and I have found no evidence to engine torque making it touch.

Gonna take a few posts to catch up.

17892
 

Attachments

  • s10 power 6.JPG
    s10 power 6.JPG
    166 KB · Views: 25
  • s10 power 8.jpg
    s10 power 8.jpg
    128.5 KB · Views: 25
  • s10 alt 3.JPG
    s10 alt 3.JPG
    68.3 KB · Views: 24
  • s10 alt 4.JPG
    s10 alt 4.JPG
    113.5 KB · Views: 25
  • s10 alt 6.JPG
    s10 alt 6.JPG
    81.2 KB · Views: 25
  • s10 alt 5.JPG
    s10 alt 5.JPG
    133.6 KB · Views: 24
  • s10 alt 7.JPG
    s10 alt 7.JPG
    141 KB · Views: 24
  • s10 alt 8.JPG
    s10 alt 8.JPG
    77.3 KB · Views: 24
  • s10 alt 9.jpg
    s10 alt 9.jpg
    148.9 KB · Views: 24
  • s10 alt 10.JPG
    s10 alt 10.JPG
    75.7 KB · Views: 23

Meili

Adventurer
Also started the base for the battery bank/shelf in the cab.

Made templates out of cardboard first. It will be bolted down using the old holes/bolts from the removed jump seats.

Used PVC sheet the can be worked like wood, lite and electrically neutral. $$$$$$$ Ouch!

Was tricky to get it in around the seatbelt mounts and still have acces to the seatbelt bolts.

Also the perimeter cab joints are filled with sealer so had to back cut it at 25 degrees to sit flush.

The back edge of the base is supported by a 6 inch ledge, sides by 3 inch ledge and the front a 2 foot 2x4. More to come.

I had ordered a 10'x18' black/silver heavy duty tarp that came in. It will act as a second skin/rain fly as needed.

Sunny,warm weather will be silver side out to reflect the heat. Cold day will be black side out to absorb the heat. Rainy day, does not matter!

Looks bad now but will fit better as it loosens up from packing.
 

Attachments

  • s10 bank 1.JPG
    s10 bank 1.JPG
    109.5 KB · Views: 23
  • s10 bank 2.JPG
    s10 bank 2.JPG
    110.4 KB · Views: 25
  • s10 bank 4.JPG
    s10 bank 4.JPG
    98.2 KB · Views: 25
  • s10 bank 5.jpg
    s10 bank 5.jpg
    156.3 KB · Views: 26
  • s10 bank 6.JPG
    s10 bank 6.JPG
    55.1 KB · Views: 29
  • s10 tarp.JPG
    s10 tarp.JPG
    84.8 KB · Views: 29
  • s10 tarp 1.JPG
    s10 tarp 1.JPG
    55.9 KB · Views: 30
  • s10 tarp 2.JPG
    s10 tarp 2.JPG
    158.1 KB · Views: 28
  • s10 tarp 3.JPG
    s10 tarp 3.JPG
    105.9 KB · Views: 31
Last edited:

Meili

Adventurer
Almost caught up to date.

Started to fill some of the utility bed cabinets.

The P/S front cabinet has a 12 volt compressor (not wired yet), straps, tow rope, 25 foot chain, hitch equipment etc etc.

The D/S middle has my folding chair, the rolled up tarp and RTT supplies. Still it's only half full.

The D/S is undercover of the tent overhang so this is where I will cook, drink, hang out and so on.

I did steal the limiting chain from the other side since I want this shelf to be stable when open.

Did a basic interior layout.

The shelf will be 3/4" and supported from below to hold my dual cooler. The cooler will weigh just south of 60# when full!

Power station will be mounted on the p/s shelf for now.

Dropped the truck off at the trans shop since the pump seal leak is getting real bad.

Up to date, whew!
 

Attachments

  • s10 storage.JPG
    s10 storage.JPG
    158.2 KB · Views: 27
  • s10 storage 1.JPG
    s10 storage 1.JPG
    102.2 KB · Views: 27
  • s10 int 18.JPG
    s10 int 18.JPG
    80.7 KB · Views: 28
  • s10 int 19.JPG
    s10 int 19.JPG
    87 KB · Views: 27
  • s10 int 20.JPG
    s10 int 20.JPG
    79.8 KB · Views: 27
  • s10 int 21.JPG
    s10 int 21.JPG
    67.7 KB · Views: 26

Meili

Adventurer
Still working "on the truck" while its at the trans shop.

Continued with the battery box. It now has 4 sides. The underside will get a aluminum plate that will help secure the batteries.

Milk crates will fit real well in the cubbys on either side. Also plan on making a package tray about 6 inches above the box but need the truck for that.

Next, insulated the back of then frig with Refelctix. I am under no illusion of what Refelctix can and can't do. It offers very little in tradtional R value (conduction).

In this case it is perfect, will refect the radiant heat from the coils away from the back of the frig. A fan will be added to take the heat away.

The rest will get addditional foam board type insulation.

The wiring was a mess so I added a terminal stripe and did crazy things like soldering and using heat shrink.

Should be marginally better the twisted wires and wad of electrical tape!

18080
 

Attachments

  • s10 batt box.JPG
    s10 batt box.JPG
    104.8 KB · Views: 16
  • s10 frig 24.jpg
    s10 frig 24.jpg
    149.2 KB · Views: 16
  • s10 frig 20.JPG
    s10 frig 20.JPG
    187.5 KB · Views: 16
  • s10 frig 25.JPG
    s10 frig 25.JPG
    102.4 KB · Views: 17
  • s10 frig 26.JPG
    s10 frig 26.JPG
    56.1 KB · Views: 18
  • s10 frig 23.JPG
    s10 frig 23.JPG
    79 KB · Views: 17
  • s10 frig 22.JPG
    s10 frig 22.JPG
    142.1 KB · Views: 17

Forum statistics

Threads
186,674
Messages
2,888,753
Members
226,864
Latest member
Nowhereman
Top