Sewing Thread....A discussion on making your own adventure textile gear.

williaty

Member
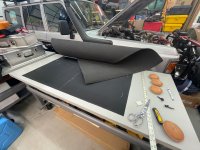
Brings up one of my pet peeves: All the tables sag

Do I level like you did from the ends of the table (since it should look the best visually)?

Do I level the bed of the machine itself (since that determines oil flow)?

Do I level the area of the table nearest to the needle (since that's where I work)?


Grrrrrrrrr!
 

BritKLR

Kapitis Indagatoris
Brings up one of my pet peeves: All the tables sag

Do I level like you did from the ends of the table (since it should look the best visually)?

Do I level the bed of the machine itself (since that determines oil flow)?

Do I level the area of the table nearest to the needle (since that's where I work)?


Grrrrrrrrr!
So true! I've often thought of adding a couple pieces of aluminum angle stock to make the table straight but, then I visit several large commercial sewing manufacturers and all their tables sag.......
 

alia176

Explorer
hello folks,

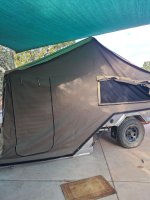
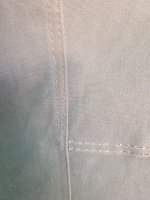
I need some guidance with a sewing project of mine. The stitching on my canvas has been coming apart and I'd like to remove the whole thing off the camper and re-stitch over the factory stitching. Obviously this is a LOT of material that needs to fit through the opening of a sewing machine. I'm thinking I'm going to need some special machine but I'm not sure what exactly. The canvas has zippers so that it can be separated from the camper quite easily.

While I'm at it, I'd like to install two vinyl windows on the inside.
 

Attachments

  • IMG_20240530_104127.jpg
    IMG_20240530_104127.jpg
    299 KB · Views: 12
  • IMG_20240530_104132.jpg
    IMG_20240530_104132.jpg
    429.4 KB · Views: 12
Last edited:

BritKLR

Kapitis Indagatoris
hello folks,

I need some guidance with a sewing project of mine. The stitching on my canvas has been coming apart and I'd like to remove the whole thing off the camper and re-stitch over the factory stitching. Obviously this is a LOT of material that needs to fit through the opening of a sewing machine. I'm thinking I'm going to need some special machine but I'm not sure what exactly. The canvas has zippers so that it can be separated from the camper quite easily.

While I'm at it, I'd like to install two vinyl windows on the inside.

Yep....looks like the factory machine lost thread tension or the needle broke (ripped holes) on that last stitch resulting in the damaged seam/thread/holes.

I've had luck rolling/folding large pieces of canvas and gently feeding them through a standard machine arm while sewing long seams. But, it maybe easier (and cheaper then purchasing a long arm industrial machine) to locate a local boat cover maker or tent/awning company and see what they'll charge you since the window project will require a bit of skill and access to UV/auto grade clear vinyl.

Goodluck!
 

alia176

Explorer
Paul - thanks for your input. That was my thought as well, see what the local outfit would charge when I take the whole shebang over to them.

I have two normal sewing machines and will attempt this on my own first just to see if I can do it. I'm going to have to setup several bobbins so that my work flow doesn't slow down a whole bunch. I might setup one machine as a bobbin winder!

Might you have a suggestion on the best type of thread I should be using for this application? I'd like to use black threading just so I can see the new threads easily.

Thanks again.
 

BritKLR

Kapitis Indagatoris
Might you have a suggestion on the best type of thread I should be using for this application? I'd like to use black threading just so I can see the new threads easily

The largest nylon thread your machine can handle and can still punch through the material. Here's a great brand/example of a bonded thread similar to what I use. I purchase bulk from my commercial supplier so this is as similar as it gets. Nylon is UV resistant (not as much as Poly Thread) but is stronger both in application and when sewn so you don't have thread failures during long sewing sessions.


Goodluck!
 
Last edited:

BritKLR

Kapitis Indagatoris
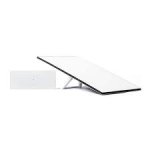
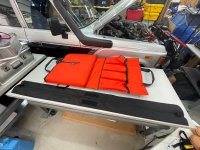
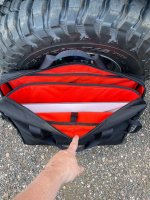
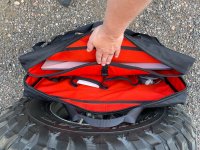
Another fun side project for a friend that needs a heavy duty case for his Gen3 Starlink system.

Since he and his family travel the world and his gear gets a great deal of use I decided to over build this case for their adventures!

Started with black Ballistic 1750D nylon exterior, 1000d Cordura orange interior, waterproof high density foam padding, 1" nylon wedding re-enforced pockets, 2" riggers webbing handles fully wrapping the bag, massive #10 YKK zippers, nylon Shoulder Strap D-rings (so they don't rattle against things), rain fly, 1" wedding grab handles......this bag has upto 4 layers of nylon and padding i the hard wearing areas!

Designing, patterning, cutting and sewing this new design took about 16 hours so given the time and quality materials used this thing would be $$$$ if I was to produce them! As for IP thieves.....I'm not too worried since for the most part they are to cheap to produce such a bag!

The main antenna pocket has HD foam on the back, sides, front and bottom and the antenna is kept in place by a adjustable fastex buckle. The four other pouches will hold the router, cables, etc. They are also protected by HD foam on the back and bottom.


IMG_7067.png
IMG_7066.jpegIMG_4054.jpegIMG_4052.jpeg
 

Fenderfour

Active member
Around 2007? I bought a sailrite LSZ to make climbing equipment. I started making haul bags out of 40oz VCP and 2" webbing, it was... a challenge and I learned a lot. Since then I've built 3 different event tents for Burning Man out of 12oz VCP, each about 20' in diameter. They have survived 50+ mph gusts and are still going strong. There was a lot of creative sewing on those tents. I usually had at least one helper rolling fabric and wrangling the roll through the machine. In one case we put the sewing machine on a skateboard and moved it along the seam instead of movign the fabric through the machine.

I'm currently building a pop-up truck camper for a 1994 Hiace truck. It's come time to make the tent, and I'm once again using my Sailrite. I recently upgraded to the worker bee motor, and it's very much worth it. The tent is made from 10oz sunseeker pre-shrunk, DWR treated cotton canvas. It is sooo much nicer to work with than VCP. I don't have many in-process photos, but here is window getting ready to sew the zipper on.

image0(21).jpeg

Overall, it's a pretty simple construction, 12' on the long sides, 6' on the short side. The whole tent body is one piece, 36" wide (final pop up height is 30"). Each window is cut from separate stock and is assembled with the zipper, then sewed into a cut opening on the main body. Zippers are all #10 nylon coil.
 

ITTOG

Well-known member
Around 2007? I bought a sailrite LSZ to make climbing equipment. I started making haul bags out of 40oz VCP and 2" webbing, it was... a challenge and I learned a lot. Since then I've built 3 different event tents for Burning Man out of 12oz VCP, each about 20' in diameter. They have survived 50+ mph gusts and are still going strong. There was a lot of creative sewing on those tents. I usually had at least one helper rolling fabric and wrangling the roll through the machine. In one case we put the sewing machine on a skateboard and moved it along the seam instead of movign the fabric through the machine.

I'm currently building a pop-up truck camper for a 1994 Hiace truck. It's come time to make the tent, and I'm once again using my Sailrite. I recently upgraded to the worker bee motor, and it's very much worth it. The tent is made from 10oz sunseeker pre-shrunk, DWR treated cotton canvas. It is sooo much nicer to work with than VCP. I don't have many in-process photos, but here is window getting ready to sew the zipper on.

View attachment 844381

Overall, it's a pretty simple construction, 12' on the long sides, 6' on the short side. The whole tent body is one piece, 36" wide (final pop up height is 30"). Each window is cut from separate stock and is assembled with the zipper, then sewed into a cut opening on the main body. Zippers are all #10 nylon coil.
Are your windows going to have mesh, vinyl, and the cover all sewed together? I ask because I have a pop-top slide-in I built and I have Sunbrella as the fabric. I am leanings towards makeing the windows myself but not sure what sewing machine to get.
 

Fenderfour

Active member
Are your windows going to have mesh, vinyl, and the cover all sewed together? I ask because I have a pop-top slide-in I built and I have Sunbrella as the fabric. I am leanings towards makeing the windows myself but not sure what sewing machine to get.
I spent some time engineering the windows for a successful build. The windows open from the top, the bottom doesn't open.

The windows are cut out of the main body, leaving a 3" flap at the bottom and a generous seam allowance around the opening. This material is offcut, to be used for patching/reinforcement. This allows me to finish the openings by rolling the edge. I designed a 15" dia on the corners to facilitate rolling. Each opening is rolled & ironed before sewing. This turned out better than I expected and I credit that to using canvas. This approach wouldn't be possible with the Vinyl Coated Polyester (VCP) i'm used to.

Each window panel is cut from a different piece of material, again with seam allowances to fold over the edge. Each edge is folded and ironed then the zipper is pinned on. The zipper flap covers the raw edge of the window panel. I sew two seams, one as close to the sipper as I can with a zipper foot, the other at the edge of the sipper flap to capture the raw edge.

The window panels are then pinned back into the main tent body, all around the zipper and lower flap. I start by sewing around the zipper, close to the teeth with a zipper foot. Next is to sew one straight seam at the flap to window panel join. Then I roll the remaining flap over a couple of times to capture the raw edge and add a second seam. Next is to add a faux bar-tack to the edge where the flap is slit on the opening. Final step is to sew the second seam on the zipper.

Here's the drawing I made. The radius switched to 15, and there seam diagram on the right has changed. I decided to not try to get the window and the screen on the same seam.
TentDIA.JPG

-this is as far as I have gotten, the rest is only a plan-

Once all the windows are in the main tent, I will come back and add reinforcing patches where the zippers terminate at the flap. This closes a small hole and will prevent the silt from the flap from migrating.

After patches are in, I'll cut the screens. They will need have the edges rolled, and I may use bias tape and a binder attachment to keep the edge tidy. They will get sewn on the outside.

I acknowledge that this all may not be the best set up for a tent, the selection of cotton canvas being a possible source of mold, etc... But this is the easiest part of the camper build and if I need to make a new tent in a year or two, it's not the end of the world.
 

Fenderfour

Active member
Are your windows going to have mesh, vinyl, and the cover all sewed together? I ask because I have a pop-top slide-in I built and I have Sunbrella as the fabric. I am leanings towards makeing the windows myself but not sure what sewing machine to get.
I should also reply that the sailrite can sew anything you can fit under the foot.four layers of 40 oz VCP juuuust fit under and it's almost 1/4" of hard grabby material.
 

ITTOG

Well-known member
I spent some time engineering the windows for a successful build. The windows open from the top, the bottom doesn't open.

The windows are cut out of the main body, leaving a 3" flap at the bottom and a generous seam allowance around the opening. This material is offcut, to be used for patching/reinforcement. This allows me to finish the openings by rolling the edge. I designed a 15" dia on the corners to facilitate rolling. Each opening is rolled & ironed before sewing. This turned out better than I expected and I credit that to using canvas. This approach wouldn't be possible with the Vinyl Coated Polyester (VCP) i'm used to.

Each window panel is cut from a different piece of material, again with seam allowances to fold over the edge. Each edge is folded and ironed then the zipper is pinned on. The zipper flap covers the raw edge of the window panel. I sew two seams, one as close to the sipper as I can with a zipper foot, the other at the edge of the sipper flap to capture the raw edge.

The window panels are then pinned back into the main tent body, all around the zipper and lower flap. I start by sewing around the zipper, close to the teeth with a zipper foot. Next is to sew one straight seam at the flap to window panel join. Then I roll the remaining flap over a couple of times to capture the raw edge and add a second seam. Next is to add a faux bar-tack to the edge where the flap is slit on the opening. Final step is to sew the second seam on the zipper.

Here's the drawing I made. The radius switched to 15, and there seam diagram on the right has changed. I decided to not try to get the window and the screen on the same seam.
View attachment 844395

-this is as far as I have gotten, the rest is only a plan-

Once all the windows are in the main tent, I will come back and add reinforcing patches where the zippers terminate at the flap. This closes a small hole and will prevent the silt from the flap from migrating.

After patches are in, I'll cut the screens. They will need have the edges rolled, and I may use bias tape and a binder attachment to keep the edge tidy. They will get sewn on the outside.

I acknowledge that this all may not be the best set up for a tent, the selection of cotton canvas being a possible source of mold, etc... But this is the easiest part of the camper build and if I need to make a new tent in a year or two, it's not the end of the world.
I have done some research but definitely not as much as you. I like that you are unzipping the top of the window to prevent water from getting inside the canvas if you made your zipper at the bottom. That is the primary decision I have made. I also like that you are radiusing the corners, this will prevent the potential for tearing if it was a right angle. I want to do this but not sure given I feel it will be harder to sew. Still learning, scheming, questioning my commitment to learn how to sew, procrastinating, etc.

I should also reply that the sailrite can sew anything you can fit under the foot.four layers of 40 oz VCP juuuust fit under and it's almost 1/4" of hard grabby material.
Okay, wow, that is very thick. I should be well within those tolerances. I will have to look at that sewing machine. I wish it had a longer throat (I think that is the right term) though.
 

Forum statistics

Threads
188,343
Messages
2,905,827
Members
229,959
Latest member
bdpkauai
Top