Sleeping Platform, not your typical one

College Kid

Adventurer
I am short, and I have an even shorter son. I am thinking about mounting a sleeping platform accross the back of my D2. The idea is that when we are out camping this summer that my son and dog could share the truck and my girl and I could have the tent.

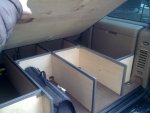
I am not interested in building a storage system with drawers and such as I need the rear of the truck open for everyday use. I also don't want to have to worry about flipping the seats down I also don't think I am gaining anything from this. The back seat is where the dog would sleep, so what I am thinking is this.

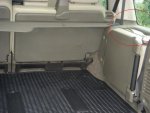
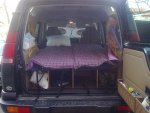
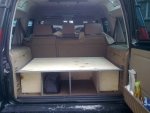
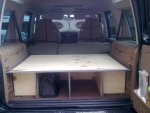
mounting/placing a 3/4 inch peice of plywood (probably covered in carpet) accross the back of the cargo area, above the 6 and 7th seat. I am wondering what is under the rear panel? and if it would support the weight? If it was just my son it would be about 50-60 pounds max, but I am thinking this would be a perfect place to stetch out during some of my personal excursions, which would mean more like 200 pounds.

By rough measurements you have about 69x29 space to work with.

Thoughts?
 

Attachments

  • stc50082-dog-guard2.jpg
    stc50082-dog-guard2.jpg
    24.4 KB · Views: 461

Wander

Expedition Leader
With the weight you mentioned (200lbs) I think you will need to support that platform on the ends and in the middle. If you can fit widthwise why not just sleep in the back seat and let the dog have the cargo area?
 

Paladin

Banned
I can help as I have mine apart right now making a cargo system. What exactly is it you're looking for? Behind the plastic side panels? Not much. Pretty much the only thing back there that you can use are the bolts that support the hinges on those seats.
 

College Kid

Adventurer
The rear seat in the Disco has a very formed rear seat which makes sleeping on it very uncomfortable. Also on a personal preference the width of the rear seat makes it alot less comfortable.

Paladin, I am wondering if there is a support bar under the plastic right below the window. If I push down on it it seems to be pretty secure but I am not sure.

What is behind here?
 

Attachments

  • land-rover-discovery-face-lift-af03swu-extra-seats.jpg
    land-rover-discovery-face-lift-af03swu-extra-seats.jpg
    25.1 KB · Views: 99
Last edited:

Wander

Expedition Leader
Sorry I forgot the rear seat in the DII is different than my DI.

I don't have the link handy but there is a free download of the RAVE which is a very detailed program the dealers use in the shop. It has scematics of the body panels and directions on removing the trim. On the DI there isn't much behind the trim panels, not enough to build off of, not sure if that is the same on a DII but I'm guessing it is. You could build the platform like a table so it would support itself near the corners and not even mess with the trim panels. Maybe do folding legs- two on each end and one in the middle to add support.
 

Paladin

Banned
Kid, if I understand what you're asking, there's not much there. The top of those plastic panels, are pretty much self-supporting. There are a few weak brackets for the plastic push-pins. I think any vertical load is born directly by the panel, and the panel is sitting firmly on the carpeting. The only thing of substance back there is the seat mounting brackets. And even then... they're not great.

You probably could stick a piece of plywood right on top of the plastic, and would probably hold. If you were careful. For a while. Maybe.

Your best bet would probably be similar to what Matt is saying. Make a table structure with 4 legs out of steel to hold up the wood. You would need to make them sit where the tie down bolts fasten. There's not too much structure to the floor anywhere else. I've actually got my main cargo barrier/roll-hoop bar bolted to the floor NOT where the tie-downs are, and without any back-stays installed yet, the whole hoop can be pushed fore and aft easily. The floor just flexes. I've actually never seen any floor so flimsy before.

Currently the bottom of the hoop has 4"x4" plates, but I'm expanding it to 6x12 just to avoid having the hoop simply punch through the floor if the truck rolled.

Anyway, too much information for what you're doing, but just so you know.

And FWIW, my trailer has a sleeping area that is 48"x60", made of... 1/2" or 3/4" ply, completely unsupported in the middle. Just around the edges. It's plenty strong enough for my weight. No problem at all. It's a bit springy, sort of like a posture board.
 

College Kid

Adventurer
Thanks Paladin, never too much info!

I am thinking that I could fab up some sort of legs that would be removable when not been used as a bed.

Thinking maybe just some electrical counduit that could screw into the bottom on the board. That way I could stagger them accross the load but still have room for storage under.

I think the plastic would for sure hold my son but I don't really think that if I was to try and sleep there it would probably crack over time.
 

Chazz Layne

Administrator
What is behind here?

This. :D


As-is, I wouldn't trust them with more than 50 pounds between the pair. With a little help they can be made pretty sturdy.


I wouldn't use it load-bearing off road, but for sleeping it would easily handle the weight. I went for the whole storage/platform route myself, but I do have several pictures up of what is hiding behind the trim panels - click either picture to jump to the Flickr set.
 

College Kid

Adventurer
Chazz,

first off I am jealous of your build......some days I wish I was just 2 and a dog......

Thanks for the pics of the supports. After looking at your pics I am thinking I will pull the plastic and see if I can't fab up a support bracket with a couple of bolts.

nemoaz, check out Chazz's build thread it's amazing design and build, his build is out of plywood cover in Hurculiner.
 

Paladin

Banned
Chazz, any finished pictures?


Yeah, so like I said, not much.

Now, that bracket to which you bolted the aluminum angle, what is that used for at the factory? The horizontal holes are for push-pins. But the vertical holes... I dunno. Must be for the seats which I don't have.

And Chazz, I'm interested in what you did with the plywood floor. Well first, let me explain my situation.

I'm keeping the rear seat in, so everything is being done behind the rear seat. I was planning on taking out the carpet, but keeping the plastic lower side panels and cubbies. I've got a roll-hoop/cargo barrier fit right behind the rear seat. I was going to make an upper level plywood at the level with the bottom of the cubby bin lids. So I'd have simple bi-level storage. Like I said, keep out the carpet, I was going to put down asphalt matting, then bedliner over the floor, and call it good enough. Then I saw those two channels welded on the floor, I think they are for the seats. Those are about 3/4" higher than the rest of the floor. I didn't like that. Tried to remove them with a cold chisel, but instead of tearing the spot welds, the floor started tearing instead.... so I stopped. Ok, then I figured I'd just put down some plywood for a floor. But with those channels there, how to get it to fit flat? I'd have to cut out for the channel. And the fuel pump. Ah, screw it. I'll just put in drawers.

I see you fitted a plywood floor. How did you get it to sit flat and level with those channels there?
 

alexstoilov

New member
This is my sleeping platform,it is very practical and comfortable.
 

Attachments

  • 01042011383.jpg
    01042011383.jpg
    584.5 KB · Views: 212
  • 07032011363.jpg
    07032011363.jpg
    125.8 KB · Views: 172
  • 07032011364.jpg
    07032011364.jpg
    107.8 KB · Views: 159
  • 07032011365.jpg
    07032011365.jpg
    130.9 KB · Views: 166

Chazz Layne

Administrator
Thanks for the pics of the supports. After looking at your pics I am thinking I will pull the plastic and see if I can't fab up a support bracket with a couple of bolts.
Measure first of course, my memory may be way off as it has been about a year since I gutted it, but if I do remember correctly there is plenty of room under the trim to hide a support bracket. Since you have the jumpseats back there I'm sure there will be a little extra hardware bolted to those brackets, sandwiching your reinforcement between the bracket and that extra hardware might work. You could then do a spacer to make up the difference in plastic thickness so you can get the shelf good and tight, without harming the trim.

The ones I have on there currently might even fit - measurements are 1.5x1.5 at 1/8th thick and they are T6061 aluminum angle. The plus on aluminum, besides weight, is when moisture DOES make it in it is the same metal as the body so corrosion isn't nearly as high of a risk. :)

Chaz, what is that material? Just plywood covered with bedliner? Something else?
Yep, 3/4th birch ply with Herc over the outer surfaces. The inside will get exterior home paint, color matched to the Rover gray interior trim. I love the look of the birch, but it really needs to be sealed in a vehicle this small with a weather-junkie like me at the helm. :D

Chazz, any finished pictures?
Not yet. Funding dried up, so I'm slowly making progress on the rest of the wood.
Now, that bracket to which you bolted the aluminum angle, what is that used for at the factory?
It's for the jumpseats. It gets some extra hardware that secures the seats when they are folded up.

I see you fitted a plywood floor. How did you get it to sit flat and level with those channels there?
A lot of patience, and steady work with a planer. You can somewhat make it out in this upside down shot, as well as the 10x10 square for fuel pump access (which I have to remove the cellar drawer to get at).

I don't want to hijack the thread too bad, so if you need more details feel free to drop me a line or ask in the build thread. :)
 

Forum statistics

Threads
190,127
Messages
2,924,222
Members
233,417
Latest member
dhuss
Top