Smittybilt Scout Trailer Reviews?

mep1811

Gentleman Adventurer
I bought a Harbor Freight tongue box to mount on the fender. Looks like I have to remove the tie down hooks for the lid to open fully.

How have you, who have done this , bolted the box to the trailer? I was all set to remove the Smittlybilt emblem and noticed that the rib looks like it is bolted on from the inside of the box. How have you bolted down the box?

I figured I'd ask and hope someone who has figured this out share the solution.

Thanks
 

ebrabaek

Adventurer
OK You get my vote for the nicest build. My company is currently building a pretty sweet setup and were are starting with the propane. We have the 11 lb Worthington, Camp Chef Triton Water heater, and have a design for a built in Dometic 2 burner setup. We want a quick disconnect propane line setup. Should we have two difference regulators branched off of the main line, one for the heater and one for the burner, and which ones do you recommend due to the PSI rating for the units?

Thank you for those kind words. It have been a great build, and very satisfying to see it through.
The Triton shares the same internals as the ECO temp, from what I remember as I researched them before buying the unit. Mine came with a 0.5psi regulator, and as I experimented with the variable pressure unit I intended to use, I decided the EcoTemo did not combust really well above that 0.5 psi. I would say it would work acceptable up to 0.7 psi, but then it was too much heat and burning too rich. So I kept that info and began on the stove. anywhere from 2-3 psi would be needed when I whipped out the big wok for stir fry. So ideal for me a 5 psi variable regulator would be ideal. But I did not find a real good answer with a gauge, so a 0-20 psi was accepted. I then plumed it all hard, but was having issues with cooking while heating water, and ultimately decided the only way this would work would be if I re installed the 0.5 psi regulator inline with the hard plummed line from the bottle and the EcoTemp. That solved the problem as what ever pressure I had going for the 60000 btu burners, the EcoTemp would always work correct. Now I was free to go for 2-3 psi on my big burners.
I think you will find that your triton likes the 0.5 psi so I would try to use the regulator it came with. Most small camping appliances comes with a 0.5 psi unit. The triton is extremely efficient and don't need any more. I suspect your dometic unit will be in the 0.5 to 1 psi range, but you can get that info from Dometic as they are good at getting back to you.
The unit I bought was this one, but that was just because it was available, and had the gauge and SS line.

https://www.amazon.com/gp/product/B07BK11RGY/ref=ppx_yo_dt_b_asin_title_o00_s01?ie=UTF8&psc=1

The more compact stoves as the dometic don't do as well when you increase the propane pressure to cook hotter as compared to the cast iron burner, where you can tweak the flame. That being the case you can hard plum them both from the bottle with each having their stock regulators right before the respectable units. So line from the bottle, and T off to the two units with a regulator for each. Would work fine.
You have another option which is to hard line from the bottle to a dual quick release as I did, but with two different regulators behind each quick release.

I hope I did not confuse you further as it is late, and been a while since I had coffee... :) :)
I will circle back tomorrow and see whar ya think.

Regards

Erling
 

ebrabaek

Adventurer
I bought a Harbor Freight tongue box to mount on the fender. Looks like I have to remove the tie down hooks for the lid to open fully.

How have you, who have done this , bolted the box to the trailer? I was all set to remove the Smittlybilt emblem and noticed that the rib looks like it is bolted on from the inside of the box. How have you bolted down the box?

I figured I'd ask and hope someone who has figured this out share the solution.

Thanks

Mine is in there as I believe I was the first one doing it.
Pictures are in there somewhere back.
 

ebrabaek

Adventurer
But how did you mount the box? Did you drill through the support rib? Remove the rings?

Covered in there as well.
But to answer your question:
Remove the two rings front and rear.
Only one to stay is the lower aft ring that I use to run the propane line through.
Smitty logo now goes on the inside of the main box.
So you just cut the sealant and reverse the logo which have the two bolts on it.
Hold the HF box in place on top of the fender and drill the two holes in the the HF box from the inside of the main box.
Lay a fat bead of sealant on top of the fender before setting it on top of the fender.
Tighten the two bolts.
Done
 

mep1811

Gentleman Adventurer
Link to box. https://www.amazon.com/Dee-Zee-M207...502373086&sr=8-1&keywords=dee+zee+atv+toolbox

Note this thing is NOT designed to sit in this direction, its aluminum and if you put large heavy items in it I'm sure it would bend. I added some large fender washers to each mounting bolt and only plan to store light weight items inside it. I would not store tools or spare parts inside it. JMHO.

How did you mount the box ? Did you drill through the support ribs?
 

Silverback07

Adventurer
How did you mount the box ? Did you drill through the support ribs?

I did not drill through the support ribs. I used the outside tie-down mount holes and the holes used to mount the outside piece of trim. So only new holes were in the toolbox, not the trailer. I used the factory outside tie-downs and put them inside with large washers in the side box, same with the trim piece, just mounted it inside with bolts sticking out and added some large washers to spread the load.
 

mep1811

Gentleman Adventurer
I did not drill through the support ribs. I used the outside tie-down mount holes and the holes used to mount the outside piece of trim. So only new holes were in the toolbox, not the trailer. I used the factory outside tie-downs and put them inside with large washers in the side box, same with the trim piece, just mounted it inside with bolts sticking out and added some large washers to spread the load.

Thanks I think my box sits just inside of the tie down rings. I'll have to recheck. Is the trim piece you're referring to the Smittlybilt logo or the raised rib ?

I see where that is bolted in from inside. Thanks
 

Silverback07

Adventurer
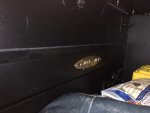
Yeah, I guess you call it a rib, but it also has the Smittybilt logo on it. Its originally on the outside of the trailer, held on by 3 nuts IIRC. Just remove it and mount it on the inside with the bolts sticking to the outside of the box.

A view from inside.
524635
 

mfcoffroad

New member
Thank you for those kind words. It have been a great build, and very satisfying to see it through.
The Triton shares the same internals as the ECO temp, from what I remember as I researched them before buying the unit. Mine came with a 0.5psi regulator, and as I experimented with the variable pressure unit I intended to use, I decided the EcoTemo did not combust really well above that 0.5 psi. I would say it would work acceptable up to 0.7 psi, but then it was too much heat and burning too rich. So I kept that info and began on the stove. anywhere from 2-3 psi would be needed when I whipped out the big wok for stir fry. So ideal for me a 5 psi variable regulator would be ideal. But I did not find a real good answer with a gauge, so a 0-20 psi was accepted. I then plumed it all hard, but was having issues with cooking while heating water, and ultimately decided the only way this would work would be if I re installed the 0.5 psi regulator inline with the hard plummed line from the bottle and the EcoTemp. That solved the problem as what ever pressure I had going for the 60000 btu burners, the EcoTemp would always work correct. Now I was free to go for 2-3 psi on my big burners.
I think you will find that your triton likes the 0.5 psi so I would try to use the regulator it came with. Most small camping appliances comes with a 0.5 psi unit. The triton is extremely efficient and don't need any more. I suspect your dometic unit will be in the 0.5 to 1 psi range, but you can get that info from Dometic as they are good at getting back to you.
The unit I bought was this one, but that was just because it was available, and had the gauge and SS line.

https://www.amazon.com/gp/product/B07BK11RGY/ref=ppx_yo_dt_b_asin_title_o00_s01?ie=UTF8&psc=1

The more compact stoves as the dometic don't do as well when you increase the propane pressure to cook hotter as compared to the cast iron burner, where you can tweak the flame. That being the case you can hard plum them both from the bottle with each having their stock regulators right before the respectable units. So line from the bottle, and T off to the two units with a regulator for each. Would work fine.
You have another option which is to hard line from the bottle to a dual quick release as I did, but with two different regulators behind each quick release.

I hope I did not confuse you further as it is late, and been a while since I had coffee... :):)
I will circle back tomorrow and see whar ya think.

Regards

Erling
Great words. I was thinking the same. Do the quick disconnects find themselves prone to leakage? I have found a few with ball valves built in, so my guess is they can leak. Your plumbing ideas were how I envisioned my setup as well. I will post some pictures of what I have going on shortly. The domestic unit is pretty sleek. Wish we had more room for a dual sink and burner setup.
 

mep1811

Gentleman Adventurer
Yeah, I guess you call it a rib, but it also has the Smittybilt logo on it. Its originally on the outside of the trailer, held on by 3 nuts IIRC. Just remove it and mount it on the inside with the bolts sticking to the outside of the box.

A view from inside.
View attachment 524635

Thanks I saw that and was not sure if I wanted to modify this support rib.
 

mep1811

Gentleman Adventurer
Covered in there as well.
But to answer your question:
Remove the two rings front and rear.
Only one to stay is the lower aft ring that I use to run the propane line through.
Smitty logo now goes on the inside of the main box.
So you just cut the sealant and reverse the logo which have the two bolts on it.
Hold the HF box in place on top of the fender and drill the two holes in the the HF box from the inside of the main box.
Lay a fat bead of sealant on top of the fender before setting it on top of the fender.
Tighten the two bolts.
Done
Thanks
 

ebrabaek

Adventurer
Great words. I was thinking the same. Do the quick disconnects find themselves prone to leakage? I have found a few with ball valves built in, so my guess is they can leak. Your plumbing ideas were how I envisioned my setup as well. I will post some pictures of what I have going on shortly. The domestic unit is pretty sleek. Wish we had more room for a dual sink and burner setup.

The QR couplers I have used all have the ball valve built in. I dont think it is because of leakage but as a safety as it is a flammable gas. So to plug the male in, you have to turn the ball valve off. Then after plugging in you turn it on which now locks the Male in. You cannot remove the male part without first turning the valve off.
Pretty slick.
I have used them for the past 25 years. I have never seen any of them leak. As a matter of fact. The two QR I purchased 25 years ago I still have and they are working great still.
I agree on the sink.
I threw the stock sink on the shelf, and bought a collapsible unit that sits on our camping table instead.
Looking forward to your build for sure.
 

mep1811

Gentleman Adventurer
Covered in there as well.
But to answer your question:
Remove the two rings front and rear.
Only one to stay is the lower aft ring that I use to run the propane line through.
Smitty logo now goes on the inside of the main box.
So you just cut the sealant and reverse the logo which have the two bolts on it.
Hold the HF box in place on top of the fender and drill the two holes in the the HF box from the inside of the main box.
Lay a fat bead of sealant on top of the fender before setting it on top of the fender.
Tighten the two bolts.
Done
Thanks
 

emtmark

Austere Medical Provider
dc69081892f1d4fa224d711f21023e83.jpg
ad9e0eb5bf608a1a0e24869d0ea9cad9.jpg
1cc7c3eb5372d0c91a3e1ad6f8166c77.jpg
c9ebc9e41894ebf9987c716c8b15a4cd.jpg


So while on my week long family campout my trailer came in! They said I needed to come and get it because they didn’t have room at the San Jose store so I dropped everything the next day and was in the door at 9am sat morning.

That’s where stuff went sideways.

They had no way to load the trailer into my trailer. They had a pallet jack and no way to roll it on that into the shop to use a lift, they were all full of brodozers anyways. Flat out they had no plan and the managers only idea was to get everybody in the shop outside (6 people) to lift it on. Wasn’t going to happen. Worse, my plan to toss my stakes on the flat bed and forklift it on top so it wouldnt crush my fenders was not going to work with out a forklift. I ended up using three floor jacks a come along and those six guys pushing with me directing and pushing to get it on. I rolled it 90 degrees. Lifted it up high enough to get the edge on the deck then used the comealong to pull it and the jacks towards the trailer to load it on the deck.

I got through all that it was now 1100hrs. I had to leave in the next 10 minutes to get to work on time and was told , only have two tires, can only find one rim.

So I left.

Now I have a trailer but no wheels. It’s like the hits never stop with this process.

But it is home


Sent from my iPhone using Tapatalk
 

Forum statistics

Threads
188,069
Messages
2,901,854
Members
229,418
Latest member
Sveda
Top