Spot Messenger or Connect Hardwire to 12V Battery Source

lbrito

Broverland Expert
Background: I recently purchased a SPOT Connect, which I use almost exclusively on trips in the vehicle.
The SPOT Connect device requires the Energizer Lithium 8X batteries, which are expensive and only last about a day and a half.
Each trip I have to carry a ton of these batteries, since using a regular battery just barely makes it through a single day before the SPOT starts failing to transmit track logs. SPOT claims that they use the Lithium due to their stability through its life of the battery maintaining 1.5V.

Problem: I am growing tired of dealing with batteries and losing access to the SPOT device while on trips. SPOT was not helpful in providing the Voltage/Current requirements for the SPOT Connect device, and simply told me that they don't recommend it, and it would void my warranty.

Question: Has anyone hard wired their spot device to a vehicle battery source? Or does anyone know what the Voltage requirements are for a SPOT device?

Thoughts: I'm assuming that since they do use batteries, and that the device does work with non Lithium batteries for shorter periods of time, that it is not extremely sensitive to input voltage. I just had the idea of fabricating a power source that would allow the spot to be hard wired to a 12V plug, but still accept batteries when needed.
The idea is to make "AA" battery sized dowels and put metal contacts on them so that they fit in the SPOT the same way that AA batteries do. The contacts will be wired to voltage regulators with heat sinks to provided regulated 3V supply (have to double check that the 2 x 1.5V AA's are wired in series for 3V, but fairly certain they are) to the SPOT.

Basically [12V Car battery]---->[9V Voltage Regulator]---->[3V Voltage Regulator]---->[AA style connector into SPOT]

Sticking the 9V regulator in there as a safety factor so that all the heat isn't bared on just a single VR. But, ultimately, the 3V voltage regulator can provide 3V +/- 0.015V. This has to be stable enough for the SPOT right?

Anyone think this would not be good enough?

I suppose I should measure the 1.5V Energizer Lithiums to make sure that they are indeed 1.5V and not something higher that dies out at 1.5V.

If only I knew what the real concern with using rechargeable batteries or non-lithium batteries was... is it that they drop out too low? or go up to high? or swing in voltage too much?
Might have to sacrifice my spot to find out.... hopefully someone can chime in!
 

mrlocksmith

Adventurer
You can search the net for a 3V regulated voltage source with -/+ 8-14V IN. Should not be all that hard to breadboard one up and have it work.

Mark
 

evldave

Expedition Trophy Winner
I'm pretty sure the Lithium are 1.2v, so you would need a 2.4v power supply...

That said, measure the batteries and make sure you have a good (clean) regulated 2.4v (or 3.0v) supply and you could probably just wrap the wires up to where you attach the batteries and it should work.
 

lbrito

Broverland Expert
Its almost been a year since I started this post, an update is in order as I'd gotten some PMs about this before.

Let me start by saying that in my initial post, I was over thinking it waaay too much, and should have done a little more research, but was hoping someone else had already done it. The only reason they use the Ultimate Lithiums is because they provide 1.5V up until death. A brand new AA Lithium battery measured in at from 1.78V to about 1.85V in my batch of batteries. A near dead one measured 1.52V then when it got down to almost nothing, went down to about 1.35V, but this happened at over 95% depletion. A traditional Alkaline battery will start at these higher levels, but will drop down into the 1.5, 1.4, 1.3V range a lot earlier, at about 50% life, its at 1.5V already, and dies out at about 1.1-1.2V. They also suffer a lot when a higher current demand is placed on them and they are not at > 50% charge, resulting in fluctuating voltages.

I measured 600mA of current on my SPOT Connect at one point. 20mA on powered but idle state. Nothing crazy, I also noticed that it did not show a low battery indicator at 2.9V, so that's an acceptable level still.

So, there's nothing special about the input requirements for the SPOT, it is just important that you get a clean 3.0V+/- 0.1V or so from the batteries and that the batteries can provide the current necessary to send messages to the satellite reliably for most of their useful life.

I went ahead and made my own solution. It is simple, and cost about $10 to make.

I used an LM317 adjustable voltage regulator. This regulator will regulate a supply up to 30V down to whatever voltage you want (you select it via a resistor network). If you look at the datasheet for an LM317, you will see how simple it is to setup. In fact, here is a link to a calculator that shows the circuit, and lets you put in resistor values and calculates the output for you. http://www.electronics-lab.com/articles/LM317/

Now, they show 2 capacitors in that diagram, and they are to filter some noise, but in this application, they are not necessary, and the input is just not that sensitive. I measured no fluctuation on the LM317DT that I used even when I put in 28V at the input, and even when the SPOT was in transmit mode sending a Check-in/OK message. So, the capacitors are definitely not needed.

You will notice that the only space you have is where the batteries were, I opened up the SPOT device and there is NO SPACE inside, it is very efficient in its use of space.

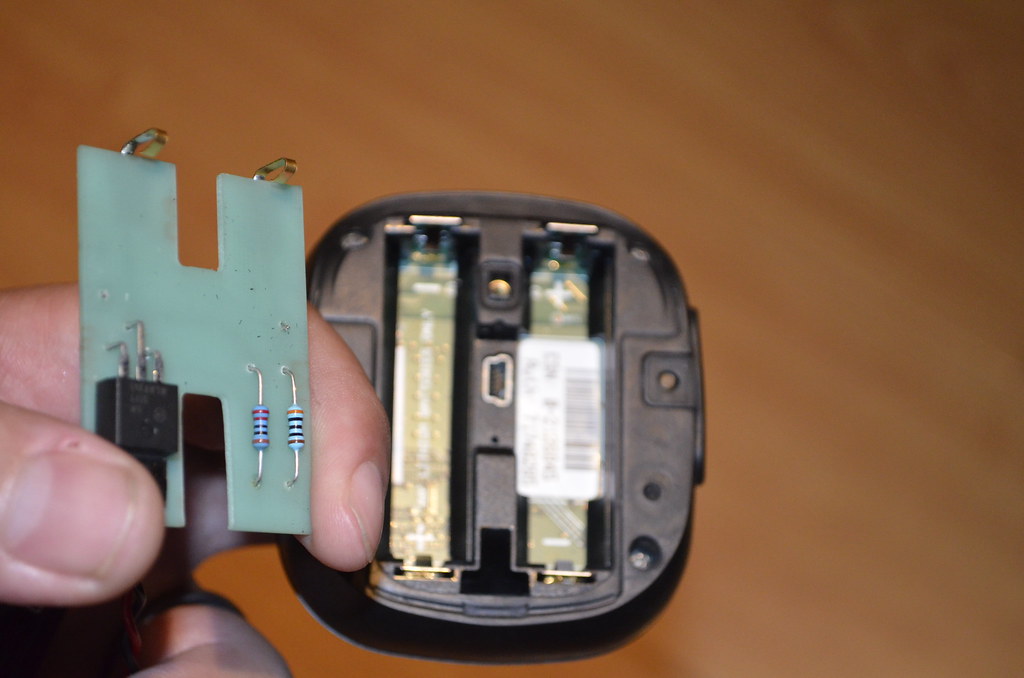
So, what I did was make a custom circuit board that fit into the "H" cavity where the batteries go, and sits on top of the center space where the USB connector is. Its perfect, because the "H" is not the same on both sides, so it also serves to help you "key" how to insert the adapter. The two spring connectors that are above the Power/Satellite/Message/SOS LEDs are the positive and negative inputs, the other side is just a bus bar that connects the 2 batteries together to add them up in series and do the 1.5V+1.5V = 3.0V. Using the H, it is impossible to insert the board in the wrong direction. I measured the dimensions with a caliper, so if anyone wants to etch their own board and wants the measurements, just let me know.

So, in the end, all you need is:
1 x Proto Board (either a perf board, or etch your own board)
1 x LM317DT (i used the DT, a TO-220 3 pin package)
1 x 220 ohm 1% resistor (you don't need 1%, you can use a 5%, but, 1% is definitely better) [I used this for R1]
1 x 300 ohm 1% resistor (again, 1% good, 5% acceptable, just cherry pick em) [used this for R2] {So, with 220/330 resistors, that calculates to 2.95V, but in my case with 1% tolerance, I ended up with 3.02V. If you use 5%, I recommend 240/360}
2 x springy contacts (you can use a thicker bus wire, or thick wire as a contact also, basically anything that will make a positive connection with the spring contacts that are on the device and be rigid enough to maintain a connection).
1 x cigarette lighter plug
1 x red and black wire for +/- of whatever length you need.
1 x diode (optional, for reverse polarity protection, in case somehow you really manage to get the board in there incorrectly, or something else crazy happens through acts of God and Nature) [Put this on the cigarette plug side, to save space].

So, you will notice that a TO-220 package LM317 fits ride inside the cavity where 1 battery goes, plenty of space left. The 2 resistors of course can go on the other side, but really, can squeeze them all on one side if necessary.

Here is a photo of what that looks like:
8376171882_53ed83d7eb_b.jpg

You can see the spring contacts I mentioned that I used there, too.

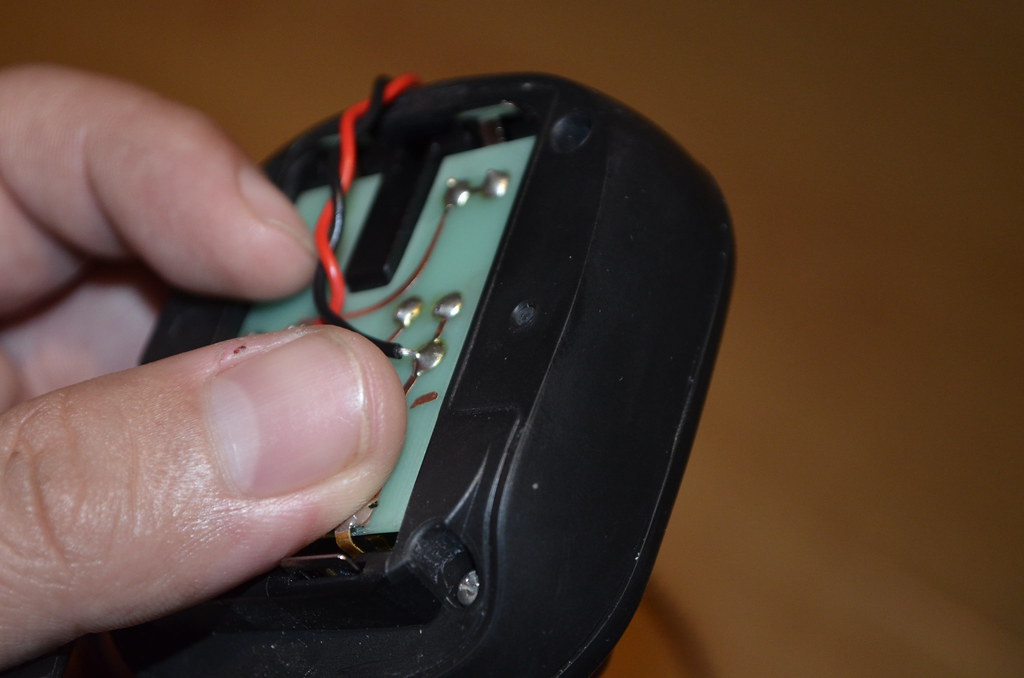
This is what it looks like when inserted into the device:
8376171722_84751cbfb9_b.jpg


The springy contacts make contact with the +/- spring contacts on the device, and you're good. The red and black wire have a cigarette lighter plug on it (I since added a sleeve for these). And you can cut a small notch in your battery cover to let them come out the side. I recommend ordering a new battery cover too, in case you want to use it with batteries and ensure that it can still float and stay dry per spec. But, if you can't get a new cover, then you can still use the screw hole for the cover and go get a thin piece of plastic as a backing and screw it on to that hole so that it covers the back and holds the board in place, even if it doesn't seal up like the standard lid.

That's pretty much it. Now you can be sure that all your messages will go through, regardless of how long you are out, since it will get 100% power all the time.
 

lbrito

Broverland Expert
It does help a great deal if you turn off the device, or at least, the active tracking at the end of the day. With the Connect, it also helps to turn off the bluetooth connection to the phone, and with the newest firmware, the SPOT connect will auto-reconnect the phone and keep this bluetooth interface going. The manual says 4.5 days in Tracking mode, so up to 108 hours.

nice!
I've been using a SPOT Messenger almost every day, 3-12 hours a day, for 7 weeks now and have only changed the batteries three times so it's apparently much less demanding on batteries but I would still like a 12v hardwire solution.
Bookmarked.
 

modernbeat

Jason McDaniel
Any chance you might be able to check your power supply in a Delorme Inreach? A 12v solution is available for them (and looks like it could be gutted and used in the Spot) but it isn't compatible with the RAM mount.
 

lbrito

Broverland Expert
Mainly size, cost, and performance. The converters you linked are more suited as power supplies for devices that consume more current. Most of their size comes from heat sinks and capacitors. You'll notice that a lot perform far less than an LM317, one of the better ones has 1% regulation. But, they can do this for large currents, some in the 20 amp range. The LM317 will deliver a precise voltage with an input anywhere from 0.7V to 30V DC, and keep that voltage steady and clean, BUT, the max is 1A if you use a singe chip. But, for something like the SPOT, this is actual ideal. 1 amp is a good safety margin, if the 317 shorts, it does so gracefully. The LM317DT also only costs $2 to $3, and is tiny in comparison.

But, if you happen to have a DC-DC that delivers 3V, it should work just fine with the SPOT. Even if its an old charger for some device that has a cigarette plug and delivers 3V at up to 750mA, it should work fine. Just clip off the connector end and find a way to interface with the battery +/- connectors on the SPOT, could even use small clip leads. It would depend on how stable your SPOT is situated, mine does a bit of bouncing, so I needed something a little more secure from being bounced off.

The circuit is simple enough, small enough, and low power enough that you don't even need a circuit board, you can just solder the components point-to-point together and then dip them in some liquid electrical tape so nothing can short out. With the stronger duty clip leads, and making it fit with the back cover on, the back cover would definitely keep the clip leads in place through any kind of bouncing and then you can save the $3 on copper clad board or perforated prototype board.

But, the SPOT can handle 2.7V to 3.6V (with 2 new lithiums, it sees 3.6V every time you put a fresh set of batteries in). So, its not very sensitive and can handle a 5% supply variation any day so a 317 is not necessary either, its just pretty affordable. Another option would be a Zener Diode. But you'd save maybe $3 for a less precise solution. That would take almost 0 space though. Lots of options.

Any reason not to use one of these dc to doc converters to get to 3v?

http://www.powerstream.com/dcdc.htm
 

JRhetts

Adventurer
Its almost been a year since I started this post, an update is in order as I'd gotten some PMs about this before.

Ibrito,

Thanks for coming back and updating your OP. It's really nice to see the actual, concrete resolution you came up with.
 

JDVN

New member
I measured the dimensions with a caliper, so if anyone wants to etch their own board and wants the measurements, just let me know.

Thank you, this is a great alternative to burning through batteries on a long trip.

I would like the measurements, please, as well as a wiring diagram (or a photo of the connections side of the board). Am currently in Vietnam, so many of the items are unavailable; I'll wait until I'm stateside again to make one.
 

Matt_OCENS

Observer
Any chance you might be able to check your power supply in a Delorme Inreach? A 12v solution is available for them (and looks like it could be gutted and used in the Spot) but it isn't compatible with the RAM mount.

There is a RAM mount for the inReach. You can see it here: http://www.ocens.com/inReach-SE-Vehicle-Mount-P578C128.aspx. In my opinion, gutting the inReach would be a lot more difficult (if even possible), because of its construction.
 

ravenranger

New member
Reviving a zombie thread, I know, but....

I also have a spot connect and spent a very frustrating time with it the summer of 2016. It was just churning through batteries and constantly turning itself off.

I found a place called battery eliminators (batteryeliminatorstore.com) and ordered their 2 AA battery eliminator and plugged it in to my motorcycle and my spot.

I write this because I discovered that the spot connect is a bit finicky about how much juice it gets. The battery eliminator showed a constant 3V when plugged into the bike and set in the spot connect case. BUT, when I turned on the spot connect, it dropped down to 2.9V and dropped down to 2.8 when I sent a message or told it to track. This resulted in a "low battery" message and the unit would run for about an hour and then shut itself off.

So, I bought a DC Buck Converter (available on AMAZON). I wired this up with a usb plug and plugged it into the motorcycle and adjusted the output down to 3V. Got the same result turning on the spot connect so adjusted the converter up. After playing with it some, found that the spot connect really likes about 3.7V and can handle up to 4.5V without getting hot.

(This experiment leads me to believe that should one not want to futz about soldering things up one could order the 3AA battery eliminator and have enough juice to get the spot connect to run properly. However, this theory has not been tested.)

I suspect the buck converter would also work for wiring up pretty much any battery operated device that one would rather have run off of vehicle power. The only negative with the buck converter is it's size.
 
Last edited:

LR Max

Local Oaf
Looks like they sell a kit:

http://www.findmespot.com/shop/inde...oducts_id=39&zenid=jnmbr8945tm1drjq6oe82gu5m1

Also they have a cigarette lighter plug in. You could take that apart and use it. Done that with a couple of other chargers.

I hard wired my Garmin 176c back...lordy...2003? 04? Best mod ever. Never put batteries in it and keep it on all the time. Pretty nice as it doesn't draw enough power to be a problem. Left it on overnight by accident a few times but never drew enough off the engine to cause a problem.
 

Forum statistics

Threads
188,395
Messages
2,904,142
Members
230,274
Latest member
mbauerus1
Top