Sprinter 4WD Conversion Idea, GMT-800 IFS.

I went with 5 hole factory steels in black. No plastic cover. I will probably use chrome capped lugs and paint the hub black to match.
View attachment 581345

Thanks.

Those are the ones (at least look the same as OEM) you rejected last July because backspace was too deep. Oh well, live and learn. I can probably get 6 at the junk yard and finagle selling the other ones I pulled then which have less backspace.

Will you do me the honor of measuring the actual backspace when you get them? Looks like they are aftermarket, not OEM according to the website info. May be some difference.

Thanks
 
Last edited:

luthj

Engineer In Residence
Mmmm rubber.
IMG_20200422_174943018

I ground down the used bearings to make a setup set.

IMG_20200423_123007440

Axle is about ready for paint. Need to get some rust remover for the compound curves my grinder won't reach. Fully disassembled I can lift the housing myself. It doesn't look like GM plated the axle, or use a corrosion resistant primer. So the rust spread under the paint a bit. Nice thing about Mercedes is the running gear got a sacrificial primer.

IMG_20200423_123019535
 

luthj

Engineer In Residence
Yeah, sorry for the confusion. They don't look like they will fit in the model, but they just barely clear the brake line assembled.
 

luthj

Engineer In Residence
Got the canbus bridge program working right. I accidentally transposed the bit positions (0-7), I was using bit 6 instead of bit 1. So it was corrupting the shifter position.

Going through the canbus frames, it should be possible to implement a "manual" mode. In this mode the trans can be forced into 1st-4th gear based on what the shifter has selected with the +/- bump. Essentially a switch can be flipped which triggers a function. This function checks to see if a max gear other than D is selected. It then forces the minimum gear to be equal to that gear, effectively requiring the trans to be in that gear at all times. The trans should still up-shift to prevent an engine overspeed event though.

I have the diff in the freezer, and the bearings in my toaster oven. Going to try and fit those today.

I got notification that my axle brackets are being cut today or Monday. Should have those next week. I need to mount the tires up, and drive the bearings into the axle. After that I just need to jack the van and get everything mocked up.
 
Last edited:

luthj

Engineer In Residence
Did some testing with the express springs. They are a bit longer, but the locating pin and dimensions are close enough that they will fit. The express springs are about 2x the weight of the MB springs, they are about 1" longer overall, and about 0.2" narrower.


Unfortunately they are a bit soft. They are on the final thick leaf when loaded. That puts the van about 1.3" lower than my current spring with 2" block. Not very ideal as it makes them very progressive in bump. They could be sacked out, but I think they must be passenger comfort springs? Its good to know I can swap from the express application down the road if needed.

I did some measuring, and the MB spring will fit on the express mount and U bolts with a bit of light trimming. I need to take 1/16" off each side to clear, so 1/32 from the spring, and 1/32 from the U bolt. Given the generous radius on the springs It shouldn't affect spring rate. I can re-use my 2" blocks as well. With the axle being larger diameter, and the perch being slightly taller, I should get about 0.6" of extra lift. Which will match the front decently.

IMG_20200425_151755694 by J Luth, on Flickr

The MB spring has a locator pin. This is not a through pin, its pressed in, and about half the springs depth. Down the road if I need to adjust the spring rate, I can drill out the pin, and replace with a bolt. That will let me add a leaf without to much work.

1587866894938.png
 

shade

Well-known member
If you think you may have to experiment with shims, you may want to change over to bolts with head extension collars now so you can slip a wedge in there without full disassembly.

How are the bump stops? Upgrading from the hard rubber ones to much more progressive stops was very noticeable on my truck when off-road.
 

luthj

Engineer In Residence
If you think you may have to experiment with shims, you may want to change over to bolts with head extension collars now so you can slip a wedge in there without full disassembly.

How are the bump stops? Upgrading from the hard rubber ones to much more progressive stops was very noticeable on my truck when off-road.
Good ideas all around.

I am hopeful I can measure the pinion loaded, and weld it in one shot. But who knows how that will shake out.

I have factory rubber stops. They actually compress 1.3" from rest, but I have been looking at what other options might fit the budget.
 

shade

Well-known member
Good ideas all around.

I am hopeful I can measure the pinion loaded, and weld it in one shot. But who knows how that will shake out.

I have factory rubber stops. They actually compress 1.3" from rest, but I have been looking at what other options might fit the budget.
The OE stops on my Tacoma were terrible, but at least they matched the rest of the rear suspension. If you were sitting in the rear, even small bumps with much of a load resulted in a kick in the butt. I really like the Timbren SES replacements, but they aren't cheap. I'm not sure what Sumo Springs costs, but that's a similar option.

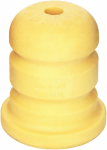
I've seen people adapt some yellow foam bumps from GM with good results, and iirc, they were surprisingly cheap. Not sure if they're up to your load rating, though.

Something like this: https://www.amazon.com/Genuine-GM-15039397-Axle-Bumper/dp/B00GU9G9EQ

1587865837545.png
 

luthj

Engineer In Residence
Looks pretty good I think.


Decided on 1.5 degrees below the TCase. That should put it within 1 degree when loaded.


The sway bar didn't want to fit up, it was hitting the cover. Eventually figured out I had it on upside down (at least I think I did). My angle finders CCW rotation failed. I noticed when the left brackets were 18 degrees lower than they should be. Easy enough to fix, just use the CW direction!


Here are the brackets tacked. I may need to grind a little bit out around the sway bar, its close enough it might contact.


My plan is to pull the axle tomorrow, weld up the brackets. Then fit R&P, seals, and locker. Thursday I should be able to paint. The epoxy primer cures pretty quick, so I can topcoat that evening. If all goes well I can bolt it up friday.
 

luthj

Engineer In Residence
Anyone got feedback on this mesh pattern? My first though is its a bit deep, do maybe go down 3-5 thousands? Wanted to get a second opinion, as its a pain to pull the diff with the fragile copper air line.


Forum statistics

Threads
188,365
Messages
2,906,108
Members
230,117
Latest member
greatwhite24
Top