You are using an out of date browser. It may not display this or other websites correctly.
You should upgrade or use an alternative browser.
You should upgrade or use an alternative browser.
T100 "Bluebonnet"
- Thread starter HongerVenture
- Start date
kcowyo
ExPo Original
HongerVenture said:KC thought I was a little opportunistic in my acquisition of the blue T100... but I think he was just jealous.
Well yeah... and I was about over it until I saw how good everything looks on your truck.... Thanks for opening up some old wounds!!
I've always liked that shade of blue on the T100's, but I seem to be in the minority. That was a good looking outfit. I have saved somewhere, an older pic of that blue T100, bone stock but with a white topper! I may have sent that one to you Joel....? I'll try to find it again.
So I don't recall, do you have a bench or bucket seats? Did you keep the CB and lights from the rack? Are the Aisin hubs worth having to get out in the snow to turn them? I like the ADD a lot, but again I seem to be in the minority.
I've seen some preview pics of the sleeping/storage deck. I think everyone's going to like it! :jumping:
BajaTaco
Swashbuckler
kcowyo said:I like the ADD a lot, but again I seem to be in the minority.
You're not alone. I love mine too.
HongerVenture
Adventurer
Musings...
Truth be told, I think that blue T100 was absolutely gorgeous. I've always been a fan of white vehicles, but the color isn't why I kept my T100 over the blue one. The moment I picked up that blue T100 I was in love with that color... such a deep blue. Spending more than half a day polishing and waxing it only made it worse... ultimately one had to go and that's the one I let go of.
I just couldn't quite convince my wife to let me keep both... nor did I try very hard
The blue T100 had Warn manual hubs... I had already placed a set of Aisin manual hubs on mine. I love my ADD just as much as you KC. I only get out of the truck 2 or 3 times a year to lock/unlock the hubs. I turn lock them as winter sets in and unlock them when winter leaves... during that whole time I have ADD just like you. Now, during the summer months, when I'm not on a trip/trail, I can have them unlocked. This gained me about .5 mpg on average and also greatly reduces wear on the CV joints. After pulling the front axles once to replace the boots... I don't want to do it again anytime soon. :Wow1:
blupaddler
Conspirator
My T100 was the Sunfire Red color. :sunny:
I had black steel rims with 31" BFG's. Ironically enough, I saw it a couple of months ago. It was for sale, and in worse shape than when I left her.
I had black steel rims with 31" BFG's. Ironically enough, I saw it a couple of months ago. It was for sale, and in worse shape than when I left her.
HongerVenture
Adventurer
Camper Deck
Ever since I logged on to Bajataco's site and saw his camping deck, I have been inspired to build one of my own. It seems like the ultimate expedition platform for 1-2 people. After seeing other people pull it off a little differently I began to form my own plan. My first intention was to put in some heavy duty drawers under the deck. However, that quickly fell out of favor as I evaluated my needs. The deck for me had to meet the following criteria:
1) It had to be removable. I use my truck as my daily driver and I use the bed frequently enough that I don't want to give up that flexibility.
2) The deck had to be quick to install and remove. If it takes me more than an hour or two to install or remove then it is missing the mark.
3) I needed access to the back of the bed under the deck. I didn't want to be using a hook or similar to fish things out of the back sections.
4) It needed to be of a flexible design. I had to be able to make changes without starting over from the drawing board.
5) My wife and I needed to be able to read comfortably. Not necessarily a full sit-up situation, but comfortably slouched against pillows would work.
6) It needed to be CHEAP! If something gets damaged or broken, I don't want to be out too much money.
My solution was a wood deck, covered with outdoor carpeting, providing compartmentalization via store bought plastic totes. Read on for more info…
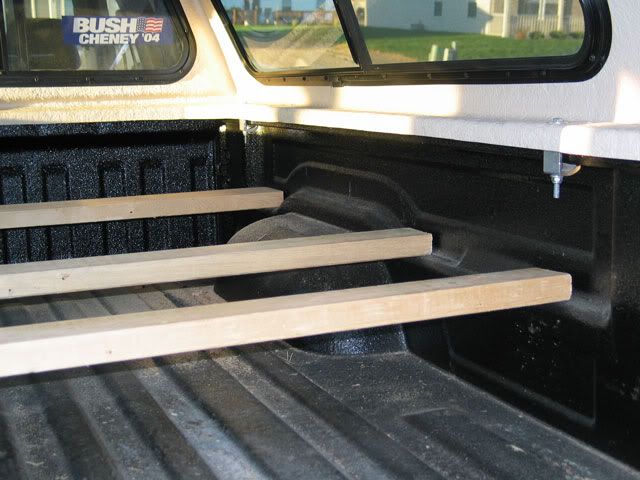
The T100 was manufactured with pre-formed slots on the inside of the bed to span 2x6's across the bed area. Promotional literature showed this feature being used by a contractor to haul lumber as well as tools separated from each other. I found a better use. ;-)
I spanned those pre-formed slots with 2x6' and 2x4's where appropriate. Laying a board across the top of the wheel well matches the elevation of the boards across the pre-formed slots (those engineers at Toyota don't miss much!). I didn't need 2x6's throughout because of the proximity of some of my 2x4's. The following picture was a conceptual layout of some boards spanning the bed via the pre-formed slots.
I made the deck from 3/4" OSB in 4 panel sections. These sections were cut to match the contours of the bed side to make for a snug fit. I don't want this deck shuffling around during transit nor do I want anything (keys, flashlights, etc) falling through cracks while my wife and I are using the deck for “living” space. The following picture shows two of the deck sections as well as the vertical piece of OSB giving me a front and back compartmental separation.
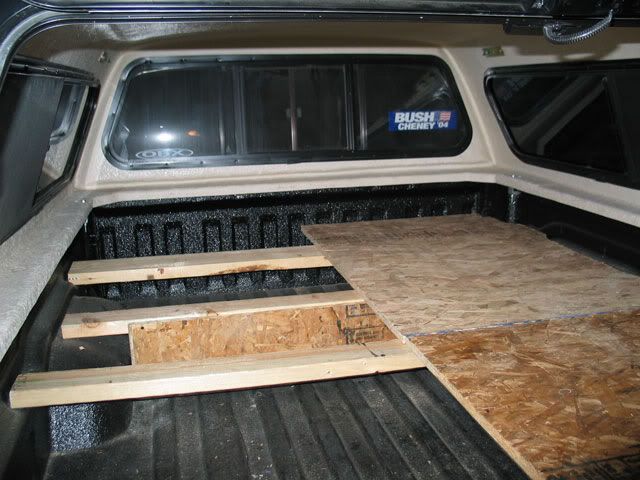
I used a jigsaw to cut the deck pieces to match the contours of the bedside precisely. As I was doing this at first I was thinking of elevating the deck to avoid having to make such detailed cuts. In retrospect I'm glad I didn't. The elevation allows me to still use the tie downs that are built into the bed. I made the cuts with a little bit of play so that the carpeting would have room to come over the edge of the deck pieces.
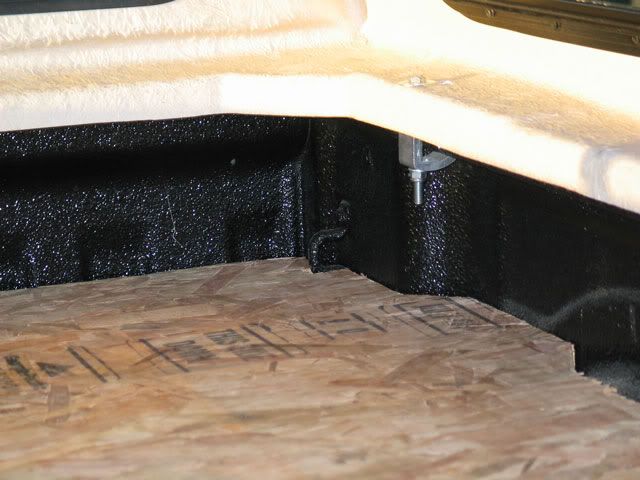
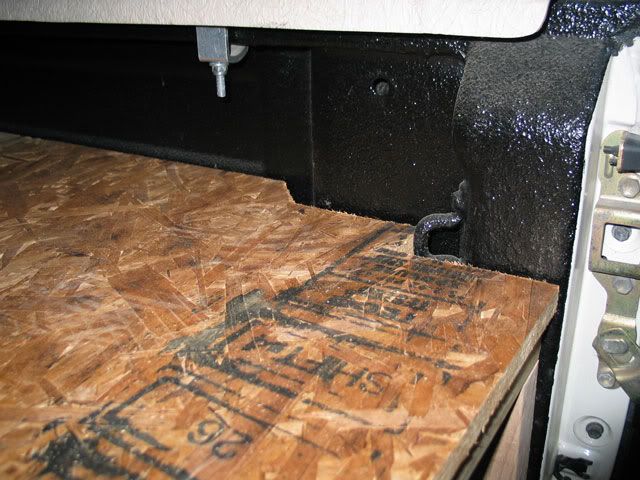
I painted all of the wood pieces, including the underside of the deck pieces. I used a flat latex paint. I wanted something to basically seal up the wood and prevent splinters. The latex paint went on nice and thick and sealed the wood up nicely. This will protect the wood from minor spills and protects the occupants from splinters. Additionally this gives the deck a nicer finished appearance. In the following picture you can see the finished wood boards and the plastic totes we used to compartmentalize our storage. Lying on top of the totes is a piece of OSB I used to divide the rear compartment in two sections. I ran that piece of OSB in line with the truck right down the middle of the bed.
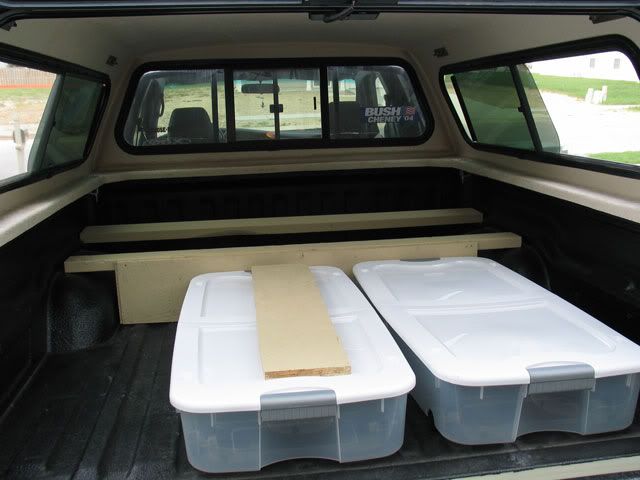
And finally, a finished product picture. Here you can see the deck completed with the outdoor carpeting covering the deck sections. Each section is screwed into the frame in just two places. This is mainly just to prevent any kind of shuffling as well as to keep the deck from bouncing on top of the boards. At the tailgate end of the bed I built a 2x6 frame to hold up the very end of the deck. There are no pre-formed slots for boards at this point and I wanted a well supported deck right at the tailgate. When closed, the tailgate snugs right against the carpet of the decking… perfect!

The totes are Sterilite underbed storage containers. These suited my needs perfectly! Their lids open in two sections so that I can open the lid without pulling the container out all of the way. In retrospect I would have gotten the containers without the little wheels. The slide just fine and the little wheels fall off from time to time. One tote stored all of our non-perishable food needs. The other tote stored our cookware as well as a few other miscellaneous items.
To the left of the totes you can see that I placed a 2x6 for additional compartmentalization. This prevented the totes from moving side to side. Part of the flexibility of my system is the way I can move 2x6's or small pieces of OSB to aid in compartmentalization. I can set it up to suit my specific needs or containers. Left of the totes we kept our camp chairs, camp mats, and shoes/boots.
The rear lids work on flush-mounted piano hinge. I made two lids so that you can access one side or the other or you can have one big opening if you leave the back as one large compartment. We kept our clothing back in one of the rear compartments and our gear (camelbacks, binoculars, etc.) and a few other odds and ends in the other side. Eventually I'd like to adapt part of the rear compartment area to house a water bladder as our water supply or perhaps have a tank fabricated to fit in there.
How it meets my needs:
The deck is easily removable. I can assemble it in about 15 minutes and disassemble it even faster. The flexibility offered by wood construction is just what I was looking for. By securing an extra divider here and there I can divide up the space to my hearts content. The level of the deck is perfect. We can sit up enough with pillows behind us to read quite comfortably… and did so one evening in Tennessee. The most expensive parts were the piano hinge and the plastic totes… not too bad at all! I probably spent around $50 as the lumber was from stuff I had lying around.
Unfortunately I didn't take any action shots while in TN on its maiden voyage. It worked very well though! I don't know what I was thinking not taking pictures!
Sorry for the length of writing, just wanted to share all the details.
Joel
Ever since I logged on to Bajataco's site and saw his camping deck, I have been inspired to build one of my own. It seems like the ultimate expedition platform for 1-2 people. After seeing other people pull it off a little differently I began to form my own plan. My first intention was to put in some heavy duty drawers under the deck. However, that quickly fell out of favor as I evaluated my needs. The deck for me had to meet the following criteria:
1) It had to be removable. I use my truck as my daily driver and I use the bed frequently enough that I don't want to give up that flexibility.
2) The deck had to be quick to install and remove. If it takes me more than an hour or two to install or remove then it is missing the mark.
3) I needed access to the back of the bed under the deck. I didn't want to be using a hook or similar to fish things out of the back sections.
4) It needed to be of a flexible design. I had to be able to make changes without starting over from the drawing board.
5) My wife and I needed to be able to read comfortably. Not necessarily a full sit-up situation, but comfortably slouched against pillows would work.
6) It needed to be CHEAP! If something gets damaged or broken, I don't want to be out too much money.
My solution was a wood deck, covered with outdoor carpeting, providing compartmentalization via store bought plastic totes. Read on for more info…
The T100 was manufactured with pre-formed slots on the inside of the bed to span 2x6's across the bed area. Promotional literature showed this feature being used by a contractor to haul lumber as well as tools separated from each other. I found a better use. ;-)
I spanned those pre-formed slots with 2x6' and 2x4's where appropriate. Laying a board across the top of the wheel well matches the elevation of the boards across the pre-formed slots (those engineers at Toyota don't miss much!). I didn't need 2x6's throughout because of the proximity of some of my 2x4's. The following picture was a conceptual layout of some boards spanning the bed via the pre-formed slots.

I made the deck from 3/4" OSB in 4 panel sections. These sections were cut to match the contours of the bed side to make for a snug fit. I don't want this deck shuffling around during transit nor do I want anything (keys, flashlights, etc) falling through cracks while my wife and I are using the deck for “living” space. The following picture shows two of the deck sections as well as the vertical piece of OSB giving me a front and back compartmental separation.

I used a jigsaw to cut the deck pieces to match the contours of the bedside precisely. As I was doing this at first I was thinking of elevating the deck to avoid having to make such detailed cuts. In retrospect I'm glad I didn't. The elevation allows me to still use the tie downs that are built into the bed. I made the cuts with a little bit of play so that the carpeting would have room to come over the edge of the deck pieces.


I painted all of the wood pieces, including the underside of the deck pieces. I used a flat latex paint. I wanted something to basically seal up the wood and prevent splinters. The latex paint went on nice and thick and sealed the wood up nicely. This will protect the wood from minor spills and protects the occupants from splinters. Additionally this gives the deck a nicer finished appearance. In the following picture you can see the finished wood boards and the plastic totes we used to compartmentalize our storage. Lying on top of the totes is a piece of OSB I used to divide the rear compartment in two sections. I ran that piece of OSB in line with the truck right down the middle of the bed.

And finally, a finished product picture. Here you can see the deck completed with the outdoor carpeting covering the deck sections. Each section is screwed into the frame in just two places. This is mainly just to prevent any kind of shuffling as well as to keep the deck from bouncing on top of the boards. At the tailgate end of the bed I built a 2x6 frame to hold up the very end of the deck. There are no pre-formed slots for boards at this point and I wanted a well supported deck right at the tailgate. When closed, the tailgate snugs right against the carpet of the decking… perfect!

The totes are Sterilite underbed storage containers. These suited my needs perfectly! Their lids open in two sections so that I can open the lid without pulling the container out all of the way. In retrospect I would have gotten the containers without the little wheels. The slide just fine and the little wheels fall off from time to time. One tote stored all of our non-perishable food needs. The other tote stored our cookware as well as a few other miscellaneous items.
To the left of the totes you can see that I placed a 2x6 for additional compartmentalization. This prevented the totes from moving side to side. Part of the flexibility of my system is the way I can move 2x6's or small pieces of OSB to aid in compartmentalization. I can set it up to suit my specific needs or containers. Left of the totes we kept our camp chairs, camp mats, and shoes/boots.
The rear lids work on flush-mounted piano hinge. I made two lids so that you can access one side or the other or you can have one big opening if you leave the back as one large compartment. We kept our clothing back in one of the rear compartments and our gear (camelbacks, binoculars, etc.) and a few other odds and ends in the other side. Eventually I'd like to adapt part of the rear compartment area to house a water bladder as our water supply or perhaps have a tank fabricated to fit in there.
How it meets my needs:
The deck is easily removable. I can assemble it in about 15 minutes and disassemble it even faster. The flexibility offered by wood construction is just what I was looking for. By securing an extra divider here and there I can divide up the space to my hearts content. The level of the deck is perfect. We can sit up enough with pillows behind us to read quite comfortably… and did so one evening in Tennessee. The most expensive parts were the piano hinge and the plastic totes… not too bad at all! I probably spent around $50 as the lumber was from stuff I had lying around.
Unfortunately I didn't take any action shots while in TN on its maiden voyage. It worked very well though! I don't know what I was thinking not taking pictures!
Sorry for the length of writing, just wanted to share all the details.
Joel
Last edited:
HongerVenture
Adventurer
"Cool" New Mod!
Well, with another trip to Tennessee in the works for next weekend and a trip to West Virginia in June, it was about time for this mod. Not to mention the fact that the truck is now paid off! Yippee! The mods should flow a little quicker now. :ylsmoke:
Considerable discussion has centered around this mod on the forum...
Any guesses?
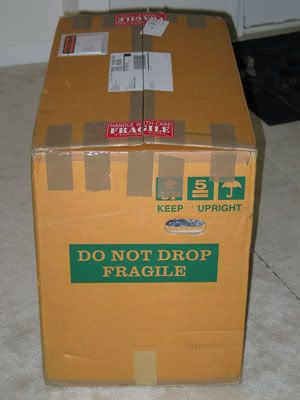
Okay, I can't wait until later to tell everyone, so here's a more telling photo...
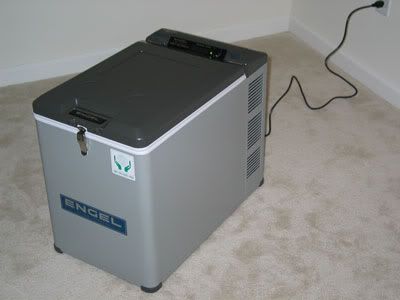
Yup, a Fridge/Freeze. 45 qt to be exact. It seems that many agree this should be one of the first mods. Since this will stick with me no matter my vehicle, it made sense to do this mod now. I picked this up from Nathan at Pangaea and really appreciated his quick and responsive service. I encourage you to do business with Nathan; he runs a great business and sponsors the forum.
I'm working out what setting to keep it on in my living room... 2.5 seems to just start turning a can of cola slushy... so I've bumped it down a notch.
I'm working on hardwiring a female 12volt auto connector into the back of the Xtracab. For now, it will share a battery with the rest of the rig. Over the next couple of days I'm going to see how much it can run without having to start the truck. I'll leave it on in the truck tomorrow while I'm in the office (with provisions to jump the truck if necessary). I want to become real familiar and comfortable with its battery drain before heading out to TN.
The next mod will hopefully be a dual battery system... two yellow-tops. A friend of mine has a relative who works for a company related to Optima and gets discounts. Stay tuned...
Well, with another trip to Tennessee in the works for next weekend and a trip to West Virginia in June, it was about time for this mod. Not to mention the fact that the truck is now paid off! Yippee! The mods should flow a little quicker now. :ylsmoke:
Considerable discussion has centered around this mod on the forum...
Any guesses?

Okay, I can't wait until later to tell everyone, so here's a more telling photo...

Yup, a Fridge/Freeze. 45 qt to be exact. It seems that many agree this should be one of the first mods. Since this will stick with me no matter my vehicle, it made sense to do this mod now. I picked this up from Nathan at Pangaea and really appreciated his quick and responsive service. I encourage you to do business with Nathan; he runs a great business and sponsors the forum.
I'm working out what setting to keep it on in my living room... 2.5 seems to just start turning a can of cola slushy... so I've bumped it down a notch.
I'm working on hardwiring a female 12volt auto connector into the back of the Xtracab. For now, it will share a battery with the rest of the rig. Over the next couple of days I'm going to see how much it can run without having to start the truck. I'll leave it on in the truck tomorrow while I'm in the office (with provisions to jump the truck if necessary). I want to become real familiar and comfortable with its battery drain before heading out to TN.
The next mod will hopefully be a dual battery system... two yellow-tops. A friend of mine has a relative who works for a company related to Optima and gets discounts. Stay tuned...
Last edited:
flyingwil
Supporting Sponsor - Sierra Expeditions
Looks good!
Don't worry about your battery and the the Engel. I had my MT45 set at 4, with the TwoZone on top for over 15 hours and the truck started right up. It is a bit nerve racking at first, but it a shot overnight at home and see.
I am using a blue sea fuse block and a female connector right now for my Engel Hook up. You can see my write up here. Most would work well with your set up!
Take care, and congrats on a great purchase!
kcowyo
ExPo Original
BajaTaco said:Joel, between you and KC, there is going to be some T-100 envy going down here at ExPo...
Yeah, but it's mostly between the two of us! I'm loving the fridge Joel! :bowdown:
I know you said once the truck was paid off, that the payment money was going to mods, and man you weren't kidding!! I'm really looking forward to your install since you'll be creaing the blueprint. At least I'm not aware of a T100 with an Engel....?
And a dual battery set-up? Awesome Joel! I'll be watching for your engineering expertise on how to put that together in the T100. How's the overhead console coming along?
Should we look into a 2 man "group buy" on snorkels? :jump:
HongerVenture
Adventurer
Fridge Installed
By popular demand... okay, maybe not popular. But KC has been e-mailing me prodding me to get some pics and info up on the install of my Fridge/Freeze.
First of all, what everyone else here says is true! The Fridge/Freeze is unequivocally the first mod that should be done for expedition travel. It has totally changed and eased the food/cooking aspect of our travels.
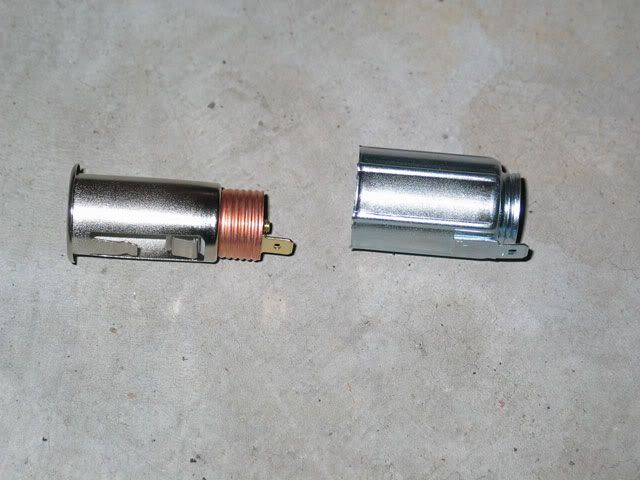
First of all, I selected a 12V outlet to install in the back of the XtraCab. I found one at Frye's that I thought would work but it ultimately broke while I was trying to solder leads to it... so it was out. I wasn't confident in its ability to carry the fridge loads anyway. I found this one at Autozone and it is a replacement cigarette lighter socket, plenty stout and of thick gauge material. Very capable of handling the loads. In addition, its two piece construction allowed me to use the sheet metal as the structural support for the socket. The right piece threads onto the copper part of the left socket piece and the sheet metal/carpet sandwiched between the flange on the socket and the right piece. Does that make sense?
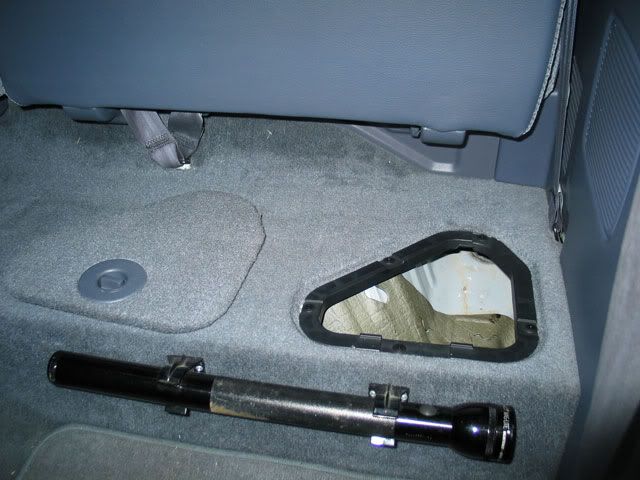
I decided the most suitable location was behind the driver's seat in the XtraCab. This allows my wife easy access while we are driving... and hinder's my access if I'm driving solo. This would force me to stop for access rather than succombing to the temptation to try and access contents while driving. That Diet Coke urge can overcome reason and logic. In any case, the hump under the jumper bench seat in the rear has an access panel which made this job easier.
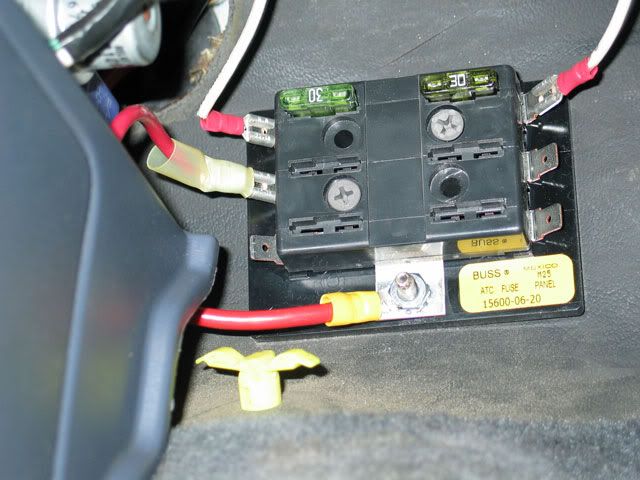
I already had a fuseblock installed in my truck. I haven't sprung for the fancy BlueSea fuseblock... yet. For now this Buss fuseblock does the trick, though the lack of enclosure makes me paranoid. A 10 gauge wire supplies power directly from the battery and a 12 gauge runs to the fridge/freeze socket.
The positive wire runs under the doorsill back into the hump area in the back. The ground wire is grounded to one of the metal body panels inside the compartment. I used a multi-meter to test the resistance of the ground at that point and was pleasantly surprised to see it was pretty low.
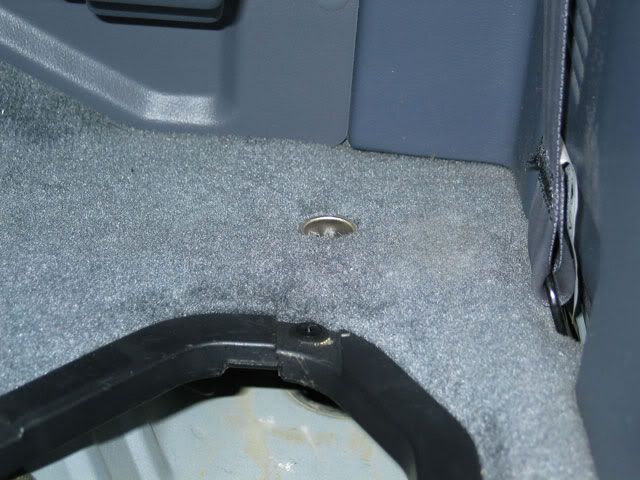
I installed the socket to sit flush with the carpet. I have a rubber stopper I use to plug it up when not in use (to prevent an accidental short by means of a peice of metal falling into the socket). I can fold the jumper seat down over the socket and you'd never know it was there.
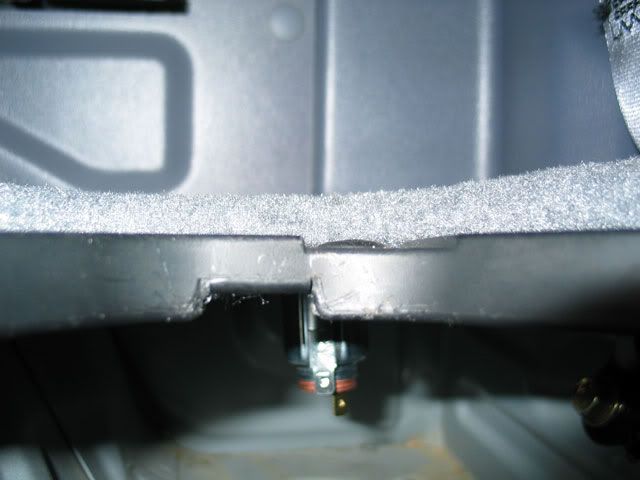
Here's a cross-section view kind of showing how it looks inside the access compartment.
I heaved the beast in the back to get an idea of how I was going to situate it. My first thought was just to place it on top of the jumper seat. Because of the angle of rest on the seat its lid wasn't able to open very far before hitting the back glass.
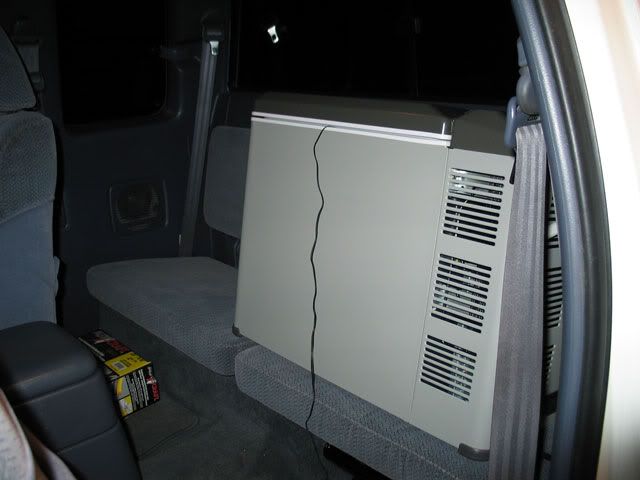
I folded up the jumper and rested it directly on the hump which worked great. However, the folded up jumper kept the fridge sitting too far forward, so I removed the jumper altogether and settled for this.
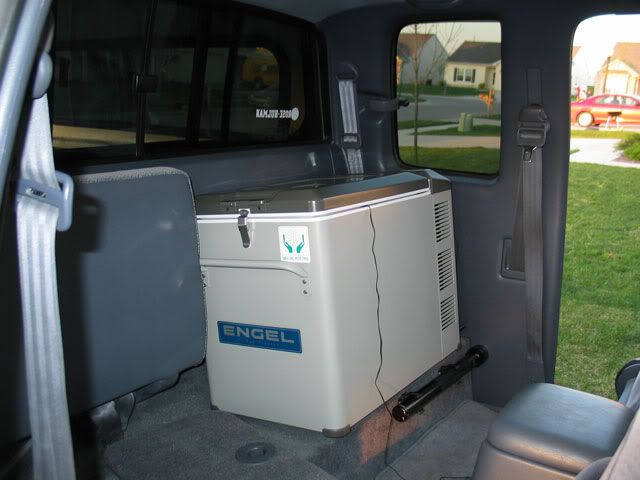
This is actually perfect. All four feet sit squarely on the rear hump. The lid opens to a full 90 degrees. In addition, the passenger side jumper can remain installed without conflict... just in case we ever need to carry an extra passenger. The little wire you see coming out of the fridge is the sensor wire for a little indoor/outdoor thermometer I picked up at Walmart for $9.99. This lets me know what the temps in the cab and in the fridge are. It looks something like this...
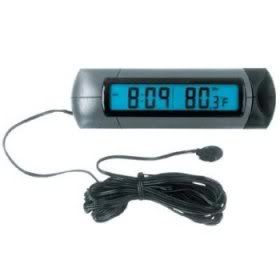
The display sits in my center console out of the way. I usually only use this once or twice just to make sure I'm avoiding freezing items.
I'll consider this mod finished after two little details are taken care of... a better fuseblock (a more secure and safer one) and a method of securing the fridge. Against my better judgement I've let the weight of the fridge be the anchor. This is a big no-no and I realize that. It should be easy enough to install some flush fitting tie downs into the hump and use some turnbuckles to secure the fridge/freeze.
We have used it on two trips and we love it! We generally freeze the meat for the second half of our trip in our home freezer. This gets loaded in the bottom. The meat for the first half of the trip stays thawed so it isn't a block when it comes time to cook. We pre-fridgerate in our home fridge before leaving. We then load up the wire basket and load it directly into the already installed fridge/freeze. This is a great system and only requires the fridge/freeze to maintain temp... which it does effortlessly.
I can leave the fridge/freeze on and maintaining 33 degrees for 2 days and the truck starts without any hesitation. Midway into the third day it is still maintaining 33 degrees, however I have to jump the battery at that point. Don't worry, I performed this test in the safety of my own driveway.
By popular demand... okay, maybe not popular. But KC has been e-mailing me prodding me to get some pics and info up on the install of my Fridge/Freeze.
First of all, what everyone else here says is true! The Fridge/Freeze is unequivocally the first mod that should be done for expedition travel. It has totally changed and eased the food/cooking aspect of our travels.
First of all, I selected a 12V outlet to install in the back of the XtraCab. I found one at Frye's that I thought would work but it ultimately broke while I was trying to solder leads to it... so it was out. I wasn't confident in its ability to carry the fridge loads anyway. I found this one at Autozone and it is a replacement cigarette lighter socket, plenty stout and of thick gauge material. Very capable of handling the loads. In addition, its two piece construction allowed me to use the sheet metal as the structural support for the socket. The right piece threads onto the copper part of the left socket piece and the sheet metal/carpet sandwiched between the flange on the socket and the right piece. Does that make sense?

I decided the most suitable location was behind the driver's seat in the XtraCab. This allows my wife easy access while we are driving... and hinder's my access if I'm driving solo. This would force me to stop for access rather than succombing to the temptation to try and access contents while driving. That Diet Coke urge can overcome reason and logic. In any case, the hump under the jumper bench seat in the rear has an access panel which made this job easier.

I already had a fuseblock installed in my truck. I haven't sprung for the fancy BlueSea fuseblock... yet.

The positive wire runs under the doorsill back into the hump area in the back. The ground wire is grounded to one of the metal body panels inside the compartment. I used a multi-meter to test the resistance of the ground at that point and was pleasantly surprised to see it was pretty low.
I installed the socket to sit flush with the carpet. I have a rubber stopper I use to plug it up when not in use (to prevent an accidental short by means of a peice of metal falling into the socket). I can fold the jumper seat down over the socket and you'd never know it was there.

Here's a cross-section view kind of showing how it looks inside the access compartment.

I heaved the beast in the back to get an idea of how I was going to situate it. My first thought was just to place it on top of the jumper seat. Because of the angle of rest on the seat its lid wasn't able to open very far before hitting the back glass.

I folded up the jumper and rested it directly on the hump which worked great. However, the folded up jumper kept the fridge sitting too far forward, so I removed the jumper altogether and settled for this.

This is actually perfect. All four feet sit squarely on the rear hump. The lid opens to a full 90 degrees. In addition, the passenger side jumper can remain installed without conflict... just in case we ever need to carry an extra passenger. The little wire you see coming out of the fridge is the sensor wire for a little indoor/outdoor thermometer I picked up at Walmart for $9.99. This lets me know what the temps in the cab and in the fridge are. It looks something like this...

The display sits in my center console out of the way. I usually only use this once or twice just to make sure I'm avoiding freezing items.
I'll consider this mod finished after two little details are taken care of... a better fuseblock (a more secure and safer one) and a method of securing the fridge. Against my better judgement I've let the weight of the fridge be the anchor. This is a big no-no and I realize that.
We have used it on two trips and we love it! We generally freeze the meat for the second half of our trip in our home freezer. This gets loaded in the bottom. The meat for the first half of the trip stays thawed so it isn't a block when it comes time to cook. We pre-fridgerate in our home fridge before leaving. We then load up the wire basket and load it directly into the already installed fridge/freeze. This is a great system and only requires the fridge/freeze to maintain temp... which it does effortlessly.
I can leave the fridge/freeze on and maintaining 33 degrees for 2 days and the truck starts without any hesitation. Midway into the third day it is still maintaining 33 degrees, however I have to jump the battery at that point. Don't worry, I performed this test in the safety of my own driveway.
Last edited:
HongerVenture
Adventurer
kcowyo said:Should we look into a 2 man "group buy" on snorkels? :jump:
Overhead console... hmmm. I've bought materials but made no construction progress.
I must have missed this reply! I'm all for a 2-man snorkel buy. :ylsmoke:
HongerVenture
Adventurer
A kinda mod...
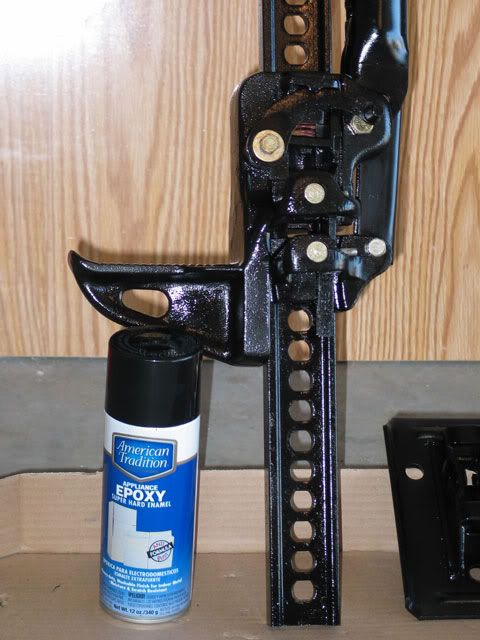
Well, my Hi-Lift was falling prey to rust. Before I had a house and garage, it had to sit out on my truck through a winter of Indiana road salt application. Ick!
I had my brother-in-law sandblast all the parts and I repainted it. I found this appliance epoxy at the hardware store and it worked well. With a few days of drying time it yielded a nice, thick, durable finish. Along with some new hardware it looks nice and blingy.

Similar threads
- Replies
- 3
- Views
- 1K
- Replies
- 12
- Views
- 3K
- Replies
- 2
- Views
- 1K
- Replies
- 0
- Views
- 645
