The Cactus Red mod thread.

crawler#976

Expedition Leader
Did a hundred miles of dirt, mud, heavy clay mud, snow, more mud, more clay, and dirt today with the new BFG KM2's.

On road the KM2's ride much softer than the MT/R's. The MT/R's are heavier by more than a few pounds as well.

I was aired down to 20 PSI today - I noticed a considerable sidewall bulge at that pressure, and felt that was a reasonable place to start. It seemed at 20 PSI the bulge was more than I got from the MT/R's at a slightly lower pressure.

The MT/R's were generally run at 18 PSI off highway, and had better traction, and cleaned out much better then the KM2's. In fact, on the exact same trail late last year, in pretty much exactly the same conditions, the truck barely even got muddy. It's gonna take a lot to clean up the truck after this trip. I've got mud stuck on the truck 4" deep in spots. The KM2's did OK, but the MT/R's certainly did better. I did have two places where the KM2's completely lost traction, to the point of sliding sideways off the road. The clay packed the voids, wouldn't clean out at low speed, and turned the tires into slicks. With very little scallop on the outside lugs, the tires would not pull out of ruts at all. Perhaps I could have dropped air pressure more, but I did feel the tires were almost too soft when crossing some ditches - it felt like the tires were bottoming out on the rims at one deep ditch when I crossed it at about 8 to 10 MPH.

On road they feel great - they took almost no weight to balance and spun very round on the balancer. None of them required anything more than a standard balance - the Road Force numbers were very, very low.

If the KM2's wear well, I'll be happy. The PW will get me thru pretty much regardless of how the tires perform
 

crawler#976

Expedition Leader
I ws fortunate enough to get them from BajaXplorer in new condition. He had them built in Phx somewhere. The drawer setup is really handy - all my tools and recovery gear are at hand.
______________

On another note, I had to replace ball joints at 14K. Passengers side had over 0.125 vertical slop, driver's side was almost that bad...

Dodge covered them under warranty with no questions asked even tho I have aftermarket control arms and a 1" spacer. That's good service!
 

crawler#976

Expedition Leader
Finally have a full sized spare with a matching PW rim. Found the rim at a wrecking yard in California for a buck and a half - not bad considering the dealer's want $660.00 for one. So I'll be rotating five tires now.
_____________________

Added a 20001 Chevy Prizm to the fleet. It serves two purposes, first it will take a lot of miles off the truck since it's been retired as a daily driver, and secondly it gets 33 MPG doing the daily drive. I was spending an average of $70.00 a week for gas at $2.85 a gallon. Including weekend trips I was driving the truck over 300 miles a week. The car will take about 180 miles of that each week, and only cost $16.00 buck doing it. I used a whopping 5.45 gallons this week :D
 

crawler#976

Expedition Leader
Added my steeeeeeeeeeeeekers to Cactus Red. It's now sporting the Scorpion along with a few other new steeeeeeeeeeeekers. As the last surviving member of Club Scorp, it was time to update the Dodge with the same steeeeeeeker as my old Tacoma. :sombrero:
 

Attachments

  • steeeekers.jpg
    steeeekers.jpg
    108.7 KB · Views: 259

Cypher

Full Time Traveler
Did a hundred miles of dirt, mud, heavy clay mud, snow, more mud, more clay, and dirt today with the new BFG KM2's.

On road the KM2's ride much softer than the MT/R's. The MT/R's are heavier by more than a few pounds as well.

I was aired down to 20 PSI today - I noticed a considerable sidewall bulge at that pressure, and felt that was a reasonable place to start. It seemed at 20 PSI the bulge was more than I got from the MT/R's at a slightly lower pressure.

The MT/R's were generally run at 18 PSI off highway, and had better traction, and cleaned out much better then the KM2's. In fact, on the exact same trail late last year, in pretty much exactly the same conditions, the truck barely even got muddy. It's gonna take a lot to clean up the truck after this trip. I've got mud stuck on the truck 4" deep in spots. The KM2's did OK, but the MT/R's certainly did better. I did have two places where the KM2's completely lost traction, to the point of sliding sideways off the road. The clay packed the voids, wouldn't clean out at low speed, and turned the tires into slicks. With very little scallop on the outside lugs, the tires would not pull out of ruts at all. Perhaps I could have dropped air pressure more, but I did feel the tires were almost too soft when crossing some ditches - it felt like the tires were bottoming out on the rims at one deep ditch when I crossed it at about 8 to 10 MPH.

On road they feel great - they took almost no weight to balance and spun very round on the balancer. None of them required anything more than a standard balance - the Road Force numbers were very, very low.

If the KM2's wear well, I'll be happy. The PW will get me thru pretty much regardless of how the tires perform

Interesting analysis and comparison Mark. Especially since you stole the works right out of my mouth... err.. keyboard. I have had KM2s and now have some MTR Kevlars. I completely agree with every aspect you have described. That being said, the KM2 are great tires, and now if I couldn't run MTRs I would run KM2s.

The truck is looking good! I forgot to mention that I was passing through Chino about about a month back and saw you on the road. Tried to get you on the Ham and CB but no answer. I am sure you didn't recognize the 100 series LC I was driving though.
 

crawler#976

Expedition Leader
Shucks - missed ya.

I rarely have the Yaesu on anymore unless I have a planned event.

Most of the local repeaters are pretty quiet, even the ARA Rim Link is almost always silent when I'm on (5:30 AM to 6 AM and 4:30 PM to 5PM), and it's been a year or more since I heard my call come up, so I just don't bother with it much.
 

crawler#976

Expedition Leader
Lighting update:

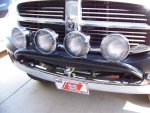
I had become accustom to HID's with the Tacoma. The Randy Ellis light bar would not accommodate the Checker/Kragen HID's, so I stuck 4 Hella 700FF driving lights on it. The original 55W bulbs were insufficient at best, so they were replaced with Hella Optilux 100W bulbs in hope of of replicating the amount and color qualities of the HID units.

While they were bright, they still didn't supply the kind of light I like.

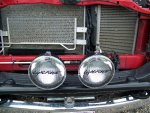
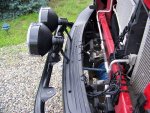
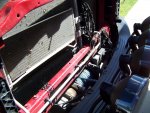
So, to keep myself motivated to be working on Saturday's, I decided to use part of my OT to get another set of lights. After reading the Overland Journal Gear issue and researching HID's I found that the Light Force 170 Striker HID units would fit the Dodge. With the front grill attached to the hood it swings in a large arc that limits clearance to about 2.5 inch's, and the Light Forces are only 55MM deep (2.165") since they use a remote igniter and ballast.

Mounting was pretty straight forward with the exception of the igniter's and ballast. In the photo attached you can see the ballast and igniter are integrated into the wiring harness, and one has no provision for mounting, the other very small holes for screws. Since I already had relays and the switch in place it only took an hour to get both lights on and running. I'll get a photo of the completed wiring and lights later if it's not raining this evening. I ended up using multiple heavy duty zip ties to attach the ballasts and igniter's to the bumper and frame.

When I purchased the lights from Wil at Sierra Expeditions he warned me that there is a star like pattern to the lights. I'd seen the photos of the light output in the OJ article, and felt the benefits of HID would outweigh any problems with the beam, and I was right. I also purchased two of the combo filters for the lights, and they spread the beam enough to virtually eliminate the star pattern. Also, the Lightforce Strikers have an adjustable beam like a Mag Light, and I was able to broaden the beam considerably from it's original position as a pencil to more of a flood pattern. In conjunction with the combo filter, I got excellent distance and side coverage with both lights aimed straight ahead.

After using them for 4 hours on Saturday night in clear, rain, fog, and muddy conditions, I'm very pleased with the results. They are bright - very bright. Even the upgraded Sylvania Silverstar headlight and fog lights seem very dim in comparison - almost like not having any lights on at all.


Mark
 

Attachments

  • lightforce 1.JPG
    lightforce 1.JPG
    215.7 KB · Views: 121
  • lightforce 2.JPG
    lightforce 2.JPG
    209.8 KB · Views: 85
  • lightforce 3.JPG
    lightforce 3.JPG
    235.2 KB · Views: 101
  • lightforce 4.jpg
    lightforce 4.jpg
    97.1 KB · Views: 84
Last edited:

crawler#976

Expedition Leader
Well, after having four Hella's on the truck, two HID's looked kinda wierd.

Added the second set last weekend, got to do some night driving yesterday into this morning.

I got some photos of the output.

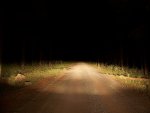
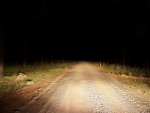
First photo, Low beams only

Second, Low beams w/ factory Fogs (all bulbs are Silverstars)

Third, High Beams

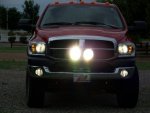
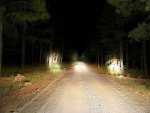
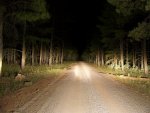
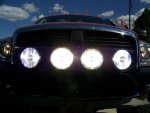
Fourth, High Beams and 4 Light Force 170 HID's w/ left and right lighs using wide filters, both lights pointing to the side about 15 degs, two center lights with combo filters pointed straight ahead.

Fifth, High Beams, no filters on HID's

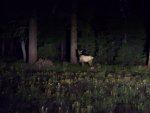
Since most of the off highway travelling we do is at low speed, having the filters on gives us awesome light to the sides, and plenty of forward light as well. What the photos don't show is the amount of light to the sides with the HID's on. The sides of the road are illuminated as bright as the center roughly 45 degs either way. We saw Elk and other critters off to the side over a 100 yards away with ease. Without a tripod for the photo it came out bit fuzzy, but it gives you an idea anyway.


Mark
 

Attachments

  • low beams.JPG
    low beams.JPG
    228.1 KB · Views: 56
  • low beams and fogs.JPG
    low beams and fogs.JPG
    298.3 KB · Views: 55
  • high beams.JPG
    high beams.JPG
    235.9 KB · Views: 58
  • side lighting.JPG
    side lighting.JPG
    206.8 KB · Views: 79
  • hid with no filters and high beams.JPG
    hid with no filters and high beams.JPG
    381.1 KB · Views: 67
  • hid and high beams.JPG
    hid and high beams.JPG
    391.9 KB · Views: 74

crawler#976

Expedition Leader
Lighting update:

Thanks to AZRACER I've finished up the lighting the way I originally wanted to.

I'll start at the beginning. When I installed the original Hella 700FF's I wanted to do an On Off On type of switch setup where I could have the lights on by themselves or switched via the dimmer circuit. When I tested the wiring at the bulb I found voltage present on both low and high beam wires at all times, and never did figure out which was which. I was also concerned about wiring into a harness that had voltage present all the time since I had no idea why it did that. So, I ended up with a single switch that turned on the lights. That was OK, but I really burned some retinas here and there reaching for the switch

Recently KP (AZRACER) gave me the info I need to do the job right via either dual relays or a simple On Off On setup. I'm only drawing a total of 140W with all four lights, so I decide to do it the simple way. KP had provided me with the missing piece of the puzzle - which wire was the high beam. He also let me know that the voltage present is only a test current used by the ECU to find a bulb fault.

I found a flat On Off On switch at the local hardware store - I'd already found that a standard toggle switch in the spot I used was prone to being bumped on, so I knew the common ones won't work. It was a super easy job pulling one more wire into the cab and attaching it to the High Beam wire and installing the new switch.

The new switch works with the top position for high beams only, bottom is on.

All four lights provide great options. I carry the clear filters along in the truck, so I have the option of poking holes in the night if need be, or using any combo of filters. We came home last weekend on the old railroad bed from Jerome AZ to home (Chino Valley was originally called Jerome Junction - it's where the narrow guage track ended at the main line from Prescott to Ashfork). Since it's wide open road we took off the center filters to provide some very long range light.

Mark

Thanks KP for taking the time to draw up the diagram and getting me straightned out on how the system works!
 

Attachments

  • Lightforce 170 Strikers.JPG
    Lightforce 170 Strikers.JPG
    235.4 KB · Views: 77
  • on off on switch.JPG
    on off on switch.JPG
    207.9 KB · Views: 90
  • outside wide filters inside combo filters.JPG
    outside wide filters inside combo filters.JPG
    133.6 KB · Views: 51
  • ziptie install.JPG
    ziptie install.JPG
    279.9 KB · Views: 70

crawler#976

Expedition Leader
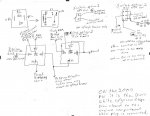
Here it is - many thanks to KP for getting it drawn up.

Again I chose to do it the simple way since I already had most of the wiring in place.

Originally I ran a red fused wire into the cab from the battery, and a yellow wire out to the relays. I had four 100W Hella's before the HID's, so I used a single wire split to both relays to actuate them. So all I needed to add was another wire from the high beam wire back to the cab. The switch only has three prongs - upper is the red direct to the battery, second is the yellow out to the relays, and the lower is the new blue wire from the high beam circuit. Simple and effective.

KP's primary method would be great if you wanted to add more lights to a roof rack, additional back up lights, fogs, or rock lights.

Mark
 

Attachments

  • light diagram.jpg
    light diagram.jpg
    80.2 KB · Views: 97

crawler#976

Expedition Leader
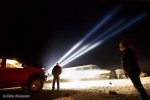
Mr. Marzonie captured this photo of the lights this last weekend. We were guiding in a vehicle to camp - made for a unique photo!
 

Attachments

  • bt photo.jpg
    bt photo.jpg
    110.8 KB · Views: 165

Forum statistics

Threads
188,224
Messages
2,904,060
Members
229,805
Latest member
Chonker LMTV
Top