You are using an out of date browser. It may not display this or other websites correctly.
You should upgrade or use an alternative browser.
You should upgrade or use an alternative browser.
The CrowsWing - Offroad Teardrop Trailer
- Thread starter jim65wagon
- Start date
EdwardBernal
Adventurer
Very cool Beth & Jim! Can't wait for the next ARSES adventure...
VanIsle_Greg
I think I need a bigger truck!
Super cool book...and great idea. The best reads are always about real people doing real things that we can all relate to.
You're extremely well married.
I'm not sure I've even posted in this thread before, but have followed it from the beginning and can definitely say that that is an understatement! Congrats to you both on not so much a great trailer, which it certainly is, but a great relationship.
Thanks for sharing!
IH8RDS
Explorer
The Teardrop Year
This is the coolest birthday present ever! My lovely wife, Elizabeth, authored, edited and self-published a book spanning our entire process of building the CrowsWing! My copy is signed by the author and I will cherish it forever!
Awesome book Jim and Beth. It was good to see you two again! Cheers!
onelow1ton
Adventurer
Awesome build ! The pix do not do it justice , I got the pleasure of seeing this in person today and man what an amazingly well built trailer , it truly looks better than a lot of production trailers . It was great meeting you and maybe one day ill see you out on the trails !
Nice build. My wife and I are in the planning phase of designing our tear drop. We plan to start building this August or September and finish it by next may or June of 2014. So many plans and ideas and thoughts on how to do these things. We are building ours on the bones of a utility trailer I built out of the back of a 1974 Dodge stepside 1/2 ton pick up. I am going to start a build thread here once we start construction. Right now we are in the design phase and see what we want and don't want in our setup.
jim65wagon
Well-known member
In between camping and working we've been doing a few modifications on the CrowsWing.
First, and actually before camping season started we added a couple of Fulton Drop Leg Jacks. We did this partially to stabilize the trailer while parked, but also to aid the hitching process during those odd times when the trucks hitch sits higher than the jockey wheel jack will lift the trailer.


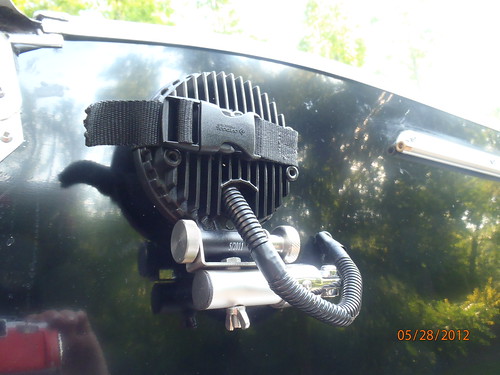
We weren't happy with our porch light mounts, which consisted of some Bimini hardware, aluminum tube, and a nylon strap to hold them during travel. They worked, but the mount was rickety and not as nice looking as it should have been. They worked as porch lights and backup lights for those night time arrivals to campsites.


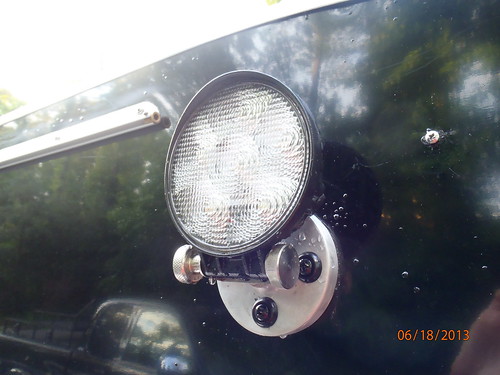
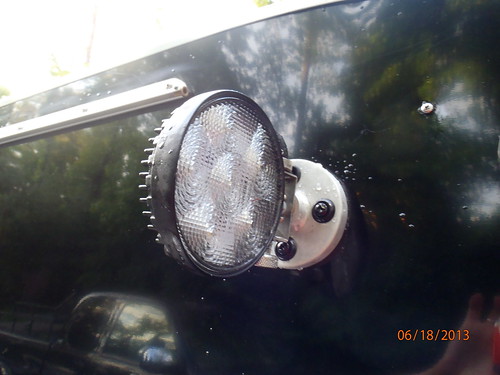
We used an aluminum pipe flange for the wall mount, and the light mounting bolt slips through a brass bearing in the flange. They still act as porch lights and backup lights, but now you can light up the sky or towards the front of the trailer. The light looks cleaner and swivels in all directions now.


First, and actually before camping season started we added a couple of Fulton Drop Leg Jacks. We did this partially to stabilize the trailer while parked, but also to aid the hitching process during those odd times when the trucks hitch sits higher than the jockey wheel jack will lift the trailer.


We weren't happy with our porch light mounts, which consisted of some Bimini hardware, aluminum tube, and a nylon strap to hold them during travel. They worked, but the mount was rickety and not as nice looking as it should have been. They worked as porch lights and backup lights for those night time arrivals to campsites.


We used an aluminum pipe flange for the wall mount, and the light mounting bolt slips through a brass bearing in the flange. They still act as porch lights and backup lights, but now you can light up the sky or towards the front of the trailer. The light looks cleaner and swivels in all directions now.


Last edited:
jim65wagon
Well-known member
Oh I almost forgot the cutting board. Beth actually did this last summer, but it tucks up so nicely above the oven we've forgotten to take photos of it. If you're using the stove it slides all the way out and mounts to the drawer below the stove for an instant work surface.

Our kitchen knives took up a lot of room in the drawer, and tended to be a little unruly during travel. Beth built a very cool knife block that holds the knives out of the way. It's a copy really, as a nice couple, Jim and Jamie, we met at a teardrop gathering had built one to put in their Camp Inn teardrop.

Moving the knives freed up space to put in some bamboo utensil organizers

Drawer dividers were next, to better organize the pots and pans, plates, cookie sheets, and some of the cooking utensils.

The griddle, which was big and heavy, and didn't fit well in the cookware drawer, got moved to behind the oven.

and finally, a removable paper towel holder.


Our kitchen knives took up a lot of room in the drawer, and tended to be a little unruly during travel. Beth built a very cool knife block that holds the knives out of the way. It's a copy really, as a nice couple, Jim and Jamie, we met at a teardrop gathering had built one to put in their Camp Inn teardrop.

Moving the knives freed up space to put in some bamboo utensil organizers

Drawer dividers were next, to better organize the pots and pans, plates, cookie sheets, and some of the cooking utensils.

The griddle, which was big and heavy, and didn't fit well in the cookware drawer, got moved to behind the oven.

and finally, a removable paper towel holder.

Last edited:
GroupSe7en
Adventurer
Reread the thread - again!
Nice trailer, but I have a question:
On the first post you show an enormous can of cranberries - where did you get it? ;o)
Love the trailer - keep posting pics.
Cheers,
Mark
Nice trailer, but I have a question:
On the first post you show an enormous can of cranberries - where did you get it? ;o)
Love the trailer - keep posting pics.
Cheers,
Mark
TheThom
Adventurer
We weren't happy with our porch light mounts, which consisted of some Bimini hardware, aluminum tube, and a nylon strap to hold them during travel. They worked, but the mount was rickety and not as nice looking as it should have been. They worked as porch lights and backup lights for those night time arrivals to campsites.
We used an aluminum pipe flange for the wall mount, and the light mounting bolt slips through a brass bearing in the flange. They still act as porch lights and backup lights, but now you can light up the sky or towards the front of the trailer. The light looks cleaner and swivels in all directions now.

Thanks for posting. I was going to copy your light idea. Literally, I have the lights sitting in the garage for when I rebuild my Pop up roof. What kind of brass bearing did you use? I can source a flange just fine, I'm just having trouble picturing how the bearing works. How did you make it watertight? Also, I can't see, do your wires run through the same hole or a different one?
Thanks for sharing.
jim65wagon
Well-known member
Here's the parts we used from McMaster Carr
[TABLE="width: 878"]
[TR]
[TH]Line[/TH]
[TH][/TH]
[TH]Product[/TH]
[TH="align: right"]Ordered[/TH]
[TH="align: right"]Shipped[/TH]
[TH="align: right"]Balance[/TH]
[TH="align: right"]Price[/TH]
[TH="align: right"]Total[/TH]
[/TR]
[TR]
[TD]1[/TD]
[TD]44705K543[/TD]
[TD]1/2 Pipe Size, 3-1/2" OD, Unthreaded Butt-Weld Flange[/TD]
[TD="align: right"]1Each[/TD]
[TD="align: right"]1[/TD]
[TD="align: right"]0[/TD]
[TD="align: right"]31.65Each[/TD]
[TD="align: right"]31.65[/TD]
[/TR]
[TR]
[TD]2[/TD]
[TD]6338K457[/TD]
[TD]SAE 841 Bronze Flanged-Sleeve Bearing, for 5/16" Shaft Diameter, 5/8" OD, 3/4" Length[/TD]
[TD="align: right"]2Each[/TD]
[TD="align: right"]2[/TD]
[TD="align: right"]0[/TD]
[TD="align: right"]4.99Each[/TD]
[TD="align: right"]9.98[/TD]
[/TR]
[TR]
[TD]3[/TD]
[TD]90298A585[/TD]
[TD]18-8 Stainless Steel Shoulder Screw, 5/16" Shoulder Diameter, 1-1/4" L Shoulder, 1/4"-20 Thread[/TD]
[TD="align: right"]2Each[/TD]
[TD="align: right"]2[/TD]
[TD="align: right"]0[/TD]
[TD="align: right"]3.22Each[/TD]
[TD="align: right"]6.44[/TD]
[/TR]
[TR]
[TD]4[/TD]
[TD]91831A029[/TD]
[TD]18-8 Stainless Steel Nylon-Insert Hex Locknut, 1/4"-20 Thread Size, 7/16" Width, 5/16" Height, Packs of 50[/TD]
[TD="align: right"]1Pack[/TD]
[TD="align: right"]1[/TD]
[TD="align: right"]0[/TD]
[TD="align: right"]5.01Per Pack[/TD]
[TD="align: right"]5.01[/TD]
[/TR]
[TR]
[TD]5[/TD]
[TD]7682A65[/TD]
[TD]1" W X 10 Yards Long, Black, All-Weather Self-Fusing Tape[/TD]
[TD="align: right"]1Roll[/TD]
[TD="align: right"]1[/TD]
[TD="align: right"]0[/TD]
[TD="align: right"]17.81Per Roll[/TD]
[TD="align: right"]17.81[/TD]
[/TR]
[/TABLE]
You can see the wire better here.

and from the old one.

The wire comes through the trailer wall in exactly the same place. The pipe flange has 4 bolts holes and we threaded the wiring through one of those bolt holes. The other three are for the screws that hold the flange to the wall.
The bearing is just a simple brass bearing that is press fit into the central hole in the flange. We had to heat the flange, and still had to force the bearing in. The light is actually bolted to the bearing with the shoulder bolt (not the one on the list though, we ended up finding another one), which allows the swivel motion. The only waterproofing needed is the wall where the wiring comes through and where the screws are used to hold the flange.
Beth is working on a sketchup cross section to give you a better idea of how it goes together.
[TABLE="width: 878"]
[TR]
[TH]Line[/TH]
[TH][/TH]
[TH]Product[/TH]
[TH="align: right"]Ordered[/TH]
[TH="align: right"]Shipped[/TH]
[TH="align: right"]Balance[/TH]
[TH="align: right"]Price[/TH]
[TH="align: right"]Total[/TH]
[/TR]
[TR]
[TD]1[/TD]
[TD]44705K543[/TD]
[TD]1/2 Pipe Size, 3-1/2" OD, Unthreaded Butt-Weld Flange[/TD]
[TD="align: right"]1Each[/TD]
[TD="align: right"]1[/TD]
[TD="align: right"]0[/TD]
[TD="align: right"]31.65Each[/TD]
[TD="align: right"]31.65[/TD]
[/TR]
[TR]
[TD]2[/TD]
[TD]6338K457[/TD]
[TD]SAE 841 Bronze Flanged-Sleeve Bearing, for 5/16" Shaft Diameter, 5/8" OD, 3/4" Length[/TD]
[TD="align: right"]2Each[/TD]
[TD="align: right"]2[/TD]
[TD="align: right"]0[/TD]
[TD="align: right"]4.99Each[/TD]
[TD="align: right"]9.98[/TD]
[/TR]
[TR]
[TD]3[/TD]
[TD]90298A585[/TD]
[TD]18-8 Stainless Steel Shoulder Screw, 5/16" Shoulder Diameter, 1-1/4" L Shoulder, 1/4"-20 Thread[/TD]
[TD="align: right"]2Each[/TD]
[TD="align: right"]2[/TD]
[TD="align: right"]0[/TD]
[TD="align: right"]3.22Each[/TD]
[TD="align: right"]6.44[/TD]
[/TR]
[TR]
[TD]4[/TD]
[TD]91831A029[/TD]
[TD]18-8 Stainless Steel Nylon-Insert Hex Locknut, 1/4"-20 Thread Size, 7/16" Width, 5/16" Height, Packs of 50[/TD]
[TD="align: right"]1Pack[/TD]
[TD="align: right"]1[/TD]
[TD="align: right"]0[/TD]
[TD="align: right"]5.01Per Pack[/TD]
[TD="align: right"]5.01[/TD]
[/TR]
[TR]
[TD]5[/TD]
[TD]7682A65[/TD]
[TD]1" W X 10 Yards Long, Black, All-Weather Self-Fusing Tape[/TD]
[TD="align: right"]1Roll[/TD]
[TD="align: right"]1[/TD]
[TD="align: right"]0[/TD]
[TD="align: right"]17.81Per Roll[/TD]
[TD="align: right"]17.81[/TD]
[/TR]
[/TABLE]
You can see the wire better here.

and from the old one.

The wire comes through the trailer wall in exactly the same place. The pipe flange has 4 bolts holes and we threaded the wiring through one of those bolt holes. The other three are for the screws that hold the flange to the wall.
The bearing is just a simple brass bearing that is press fit into the central hole in the flange. We had to heat the flange, and still had to force the bearing in. The light is actually bolted to the bearing with the shoulder bolt (not the one on the list though, we ended up finding another one), which allows the swivel motion. The only waterproofing needed is the wall where the wiring comes through and where the screws are used to hold the flange.
Beth is working on a sketchup cross section to give you a better idea of how it goes together.
jim65wagon
Well-known member
Similar threads
- Replies
- 2
- Views
- 649
- Replies
- 0
- Views
- 522
- Replies
- 0
- Views
- 1K
- Replies
- 8
- Views
- 2K

