The Dirt Sherpa Build

GCecchetto

Adventurer
Just another quick update; got the cushions back today and they now look like they belong in my camper. Much improved quality and attention to detail than the first time around.

The dinette side of the camper is now close to done. There is some misc trim to do still, but this is as far as I can go before out trip. We leave Saturday morning. Wish the cabover bed cushions were upholstered as well, it's miserable to operate the slide out portion of the bed, the foam sticks to the carpet like velcro. Once the foam is covered with the fabric, it will slide easily.

I dig the Mid Century Modern fabric I chose.
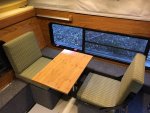
IMG_0944.jpg

A close up of the pattern. The colors are washed out in this photo.
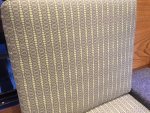
IMG_0945.jpg

All in all, I'm pleased with how this is coming together, and I think it's pretty unique as camper interiors go, which is what I wanted. Don't want the interior of mine to look like everyone else's.

Update on the rear tiedowns...camper still moves around. Guess I'm going to have to get some rubber sheet and make some spacers to fill the gap between the camper and each side of the tailgate opening.
 

Overdrive

Adventurer
^^ Me too.

GC, I really admire your work. What a beautiful truck and camper you have there.

Keep the posts coming!
 

GCecchetto

Adventurer
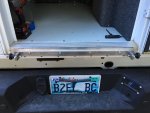
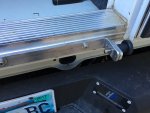
So....today's project was modifying my Glow Steps, they're mandatory now with the higher ride height. Normally I would do all of the fab and just have the shop I use do what little welding there is, but I have so much to get done in the next few evenings to be ready to leave Saturday that I decided to have them do the whole project. As usual, I'm not really happy with the quality of the work, but it's too late to worry about it now.

After the trip, I'll have the bracket powder coated white, but it has to go plain stainless on this trip.

IMG_0947.jpg

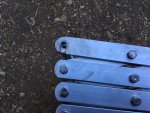
With the spring pins retracted (it isn't in this photo) and the slot milled in the side bracket of the Glow Steps, you can drop the steps onto the pins and the steps will hang without being held. When the spring pins are released they go into holes drilled in the aluminum rod and the steps are locked in. This is much easier than holding the steps while you insert the pins though and install the cotter pins. Tomorrow my add a step kit delivers, so I should have the height I need now.

IMG_0948.jpg

IMG_0949.jpg

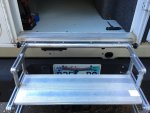
Steps in place and locked in.

IMG_0950.jpg
 

ericvs

Active member
This truck is so great! Keep up the good work. Just a thought, if you need any more custom sewing stuff done (cushions, new mattress, custom soft storage etc.) hit up Darcie at All The Good Things:
http://www.makethegoodthings.com/

She did some custom storage for my rig (post #33 of my thread), a full interior for a Westy and a 9 piece folding mattress for a Colorado Camper pop top van. Really nice stuff.

Good stuff, have fun on your trip.
 
Last edited:

GCecchetto

Adventurer
This truck is so great! Keep up the good work. Just a thought, if you need any more custom sewing stuff done (cushions, new mattress, custom soft storage etc.) hit up Darcie at All The Good Things:
http://www.makethegoodthings.com/

She did some custom storage for my rig (post #33 of my thread), a full interior for a Westy and a 9 piece folding mattress for a Colorado Camper pop top van. Really nice stuff.

Good stuff, have fun on your trip.

Thanks. I still need to have the cab over mattress cushions done, so I might give her a call.

Truck is performing beyond my expectations now with the suspension mods. Just finished the Lolo Motorway today. I would add some photos if I could figure out how with the iPhone app.
 

ratbiker

New member
Amazing work

Read this through too many times, very inspiring. I also recently purchased a 2016 cummins crew and have an older FWC ranger in it. Its a little narrow but whatever. Question, where did you get the rollover seat bracket? Also how is your thuren lift and airbags working out? Hoping to remodel the inside of my FWC and you've definately given me some great ideas.
 

Regcabguy

Oil eater.
Sooo...., I'll post better photos when I have time to take some, this is still a full court press to be ready to leave next Saturday. Thought I would post a couple progress photos though.

Camper is on. The attachment to the new rear bumper should hopefully solve the issue of the rear of the camper moving around in the bed. The stock bumper flexed a lot and would let the camper move around off road. The new bumper is much stiffer and the tiedowns are are angled to pull the camper into the bed. This thing's a beast, can't reach the roof latched anymore, have to open the doors and step up on the door sills, and the bumper in the rear. The airbags are working out better than I thought. I have 45 psi in them, and the travel seems the same as when they had 8 psi. Flexed the suspension around and everything seems to behave fine. A nice side benefit to having the airbags isolated, and so far outboard on the axle is that the truck stays very flat in the corners, but still ride really nice.

View attachment 355900

View attachment 355901

Here's a quick shot of the dinette. Need to pick up some new hardware to mount the other roll over hinge. Rushing to get all of this done has left me with a few things that aren't quite as nice as I would like them to be. Hopefully I'll stop obsessing about it, but It won't surprise me if I'm redoing some of this when I get back from my trip. The cushions are done for the second time, and I'm told I'll be happy with them this time. We'll see when i pick them up tomorrow.

View attachment 355902

The one thing that bugs me the most is how the camper sits in the bed of the truck. I don't know why Dodge designed these trucks with the bed being deeper at the rear, and I really wish the bed rails were taller like the Tundra the camper was built for. Having almost 4" clear over the bed rails, and having it taper down 3/4" at to the rear just looks like ****. I really need to come up with some structurally sound way of lifting the rear of the camper 3/4" to even out the reveal, and then some useful way of using the space. Thought about carrying shovels, but there isn't quite enough room. Also thought about traction mats, this is the most likely use, but they aren't long enough to fill the gap, and a slide in type mount will be tricky. Sooner or later I'll figure out something.

Concerning the bedrails,when I installed my Northstar on my '07 it looked like the bed itself was not level until I realized that the bedrails blend in with the cab lines if that makes sense. I didn't realize that the 4th gens were the same.
If your camper's on all the time 45psi seems pretty high. I wonder if some stiffer coils in the rear would be appropriate?
I've got leafs back there with Carli minipaks and only run my Carli LT bags @ 20psi.
Nice build bud!
 
Last edited:

chaingangster

Observer
Just read through all 39 pages. Almost forgot how much time has taken place from beginning to here... Your son was graduating 8th grade and a few pages later you're preparing for his 18th birthday! Great journey! My little ones are almost 3 and 5... I fear time will pass too quickly. Thanks for the story of your camper and truck progression. Threads like yours really stoke the desire for a truck camper of our own. Good day!
 

GCecchetto

Adventurer
Read this through too many times, very inspiring. I also recently purchased a 2016 cummins crew and have an older FWC ranger in it. Its a little narrow but whatever. Question, where did you get the rollover seat bracket? Also how is your thuren lift and airbags working out? Hoping to remodel the inside of my FWC and you've definately given me some great ideas.

Hello;

Sorry about the delay, turns out all my notification have been going to an old inactive email address. Roll over hinges were bought from FWC.
 

GCecchetto

Adventurer
Concerning the bedrails,when I installed my Northstar on my '07 it looked like the bed itself was not level until I realized that the bedrails blend in with the cab lines if that makes sense. I didn't realize that the 4th gens were the same.
If your camper's on all the time 45psi seems pretty high. I wonder if some stiffer coils in the rear would be appropriate?
I've got leafs back there with Carli minipaks and only run my Carli LT bags @ 20psi.
Nice build bud!

Truck has a Don Thuren long travel suspension in it, don't want stiffer coils. It's amazing how much traction it puts on the ground.
 

GCecchetto

Adventurer
Just read through all 39 pages. Almost forgot how much time has taken place from beginning to here... Your son was graduating 8th grade and a few pages later you're preparing for his 18th birthday! Great journey! My little ones are almost 3 and 5... I fear time will pass too quickly. Thanks for the story of your camper and truck progression. Threads like yours really stoke the desire for a truck camper of our own. Good day!

Thanks, it's pretty scary how long it's been, but I just haven't been terribly interested in working on it since I bought my Adv bike. Now my son has his own car and really isn't interested in overlanding with dad, so I fear the sherpa isn't going to see too much more travel time. If my son isn't coming along, I would much rather travel by motorcycle. I've actually been thinking about selling the sherpa:(
 

JMacs

Observer
Did you ever get the 1" taper figured out? Have you ever considered tapered roof insulation? They use it in commercial flat roof applications. The metal structure will be flat, then they add tapered insulation between the metal and the rubber membrane to get the water to run to the drains. I've never tried to buy it for personal use, but your local commercial roofer might have an extra piece or two.

Great looking project!
 

Forum statistics

Threads
188,029
Messages
2,901,368
Members
229,411
Latest member
IvaBru
Top