jeepdreamer
Expedition Leader
Bump
Something hopefully a lil more fun.")
Here is where I apply almost full blame towards Reece01 and his magnificent bumper design/build on his grand cherk project "S.H.T.F". His super clean and well executed bumper build gave my creative juices a jump start. If your reading this and haven't seen his build, Do so! Amazing!
And while both his and my Jeeps share the "no frame" design...and the general designs and construction share similarities...His is what I can only hope to come close to. With that in mind...Here is where mine has gotten to as of yesterday. My build is much slower and I'm partly working with less desirable tools. I should have followed his tactic and made the design and taken the rough shapes to be cut for me. But getting that done here in Germany would be somewhat difficult and would probably drive my cost beyond budget. So in a hard headed effort to move forward I broke out my poor little 4 1/2" angle grinder and a few PACKS of cut off wheels! This is going to be painful but its what I got. If my plasma cutter would magically start working...now would be a good time. But since its not wanting to play... this will be slow.
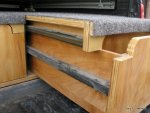
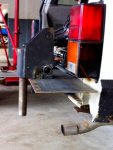
I started by opening the rear "frame" area up to expose the inside. I was a little surprised that they were fairly rust free, especially considering the condition of much of the rest of the Jeep! I then took the 2x4x 3/16s rectangle tubing I bought by mistake for the rockers and started laying them out for stringers (not sure what else to call them?) to fit inside the frame. The drivers side has the gas filler tube running right in the way and the passengers side has some odd bumps and plates of its own. That makes it not really a simple to slide in project but more a pure custom, cut to fit kinda deal.
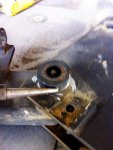
As you may notice in the pictures I actually have two sets of these made up. The idea was to build duplicates of the major parts so one could go on each Jeep. This only works to a point as the two XJs are different years with a mild body change between the years. I will still end up building both bumpers but I think the one pictured here will stay on the 91. It will be a learning curve and hopefully the second will be a little less...rough? There is a lot of work in just those 4 brackets that you have to look at to realize. I got a little lucky and my factory nut strips were still intact. These are a little notorious for disintegrating over time and since they do basically the same thing as the tubing, though FAR less stout, I was able to use them for references. The left one was to mark the right side and vice-versa. All cut outs made and holes drilled correctly in the maximum spots, nuts welded inside the tubing, and all ready to pull a house! Next step is the design and fleshing out of the bumper itself.
Something hopefully a lil more fun.
Here is where I apply almost full blame towards Reece01 and his magnificent bumper design/build on his grand cherk project "S.H.T.F". His super clean and well executed bumper build gave my creative juices a jump start. If your reading this and haven't seen his build, Do so! Amazing!
And while both his and my Jeeps share the "no frame" design...and the general designs and construction share similarities...His is what I can only hope to come close to. With that in mind...Here is where mine has gotten to as of yesterday. My build is much slower and I'm partly working with less desirable tools. I should have followed his tactic and made the design and taken the rough shapes to be cut for me. But getting that done here in Germany would be somewhat difficult and would probably drive my cost beyond budget. So in a hard headed effort to move forward I broke out my poor little 4 1/2" angle grinder and a few PACKS of cut off wheels! This is going to be painful but its what I got. If my plasma cutter would magically start working...now would be a good time. But since its not wanting to play... this will be slow.
I started by opening the rear "frame" area up to expose the inside. I was a little surprised that they were fairly rust free, especially considering the condition of much of the rest of the Jeep! I then took the 2x4x 3/16s rectangle tubing I bought by mistake for the rockers and started laying them out for stringers (not sure what else to call them?) to fit inside the frame. The drivers side has the gas filler tube running right in the way and the passengers side has some odd bumps and plates of its own. That makes it not really a simple to slide in project but more a pure custom, cut to fit kinda deal.
As you may notice in the pictures I actually have two sets of these made up. The idea was to build duplicates of the major parts so one could go on each Jeep. This only works to a point as the two XJs are different years with a mild body change between the years. I will still end up building both bumpers but I think the one pictured here will stay on the 91. It will be a learning curve and hopefully the second will be a little less...rough?
There is a lot of work in just those 4 brackets that you have to look at to realize. I got a little lucky and my factory nut strips were still intact. These are a little notorious for disintegrating over time and since they do basically the same thing as the tubing, though FAR less stout, I was able to use them for references. The left one was to mark the right side and vice-versa. All cut outs made and holes drilled correctly in the maximum spots, nuts welded inside the tubing, and all ready to pull a house! Next step is the design and fleshing out of the bumper itself.Attachments


Last edited:


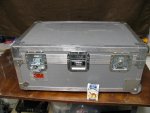
 Our tax dollars at waste. So I crawled in the dumpster and rescued it..


")