The Plan...

dieselcruiserhead

16 Years on ExPo. Whoa!!
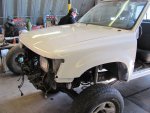
The paint decision I came up with was a big decision for me and I am incredibly pleased with the route I went with.

I was looking at a few options:

Option 1 - some Mexican guys I know who run a body shop. If I did all the prep and they did the masking, it would have been $600 with paint, and guaranteed. This was my best looking option.

Option 2 - paint it in my shop, the biggest issue was lack of adequate heating as you need to be able to get it warm... This would have worked but would have been tough and would have been a compromise.

Option 3 - Expensive time consuming paint job I couldn't afford time or $$ wise at this point.

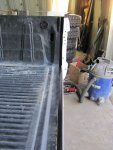
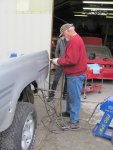
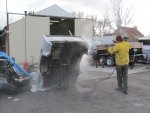
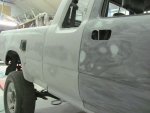
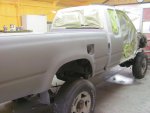
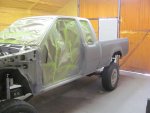
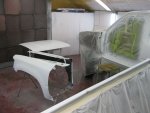
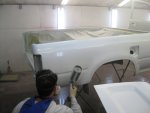
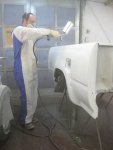
Option 4 - Use a paint booth and shop that belongs to a friend in Provo. Not only did he actually say yes, but he let me use it while he was gone, and has a friend who is a pro quality very good body guy who helped me for a couple $$ who sprayed it and assisted me in guiding me with all of the prep. He also does this sort of thing for few people so I am extremely thankful to him for this. I am about what I would have spent with the Mexican guys and I did all the prep and it was a doozie. I also put about 800 miles on the truck in the process driving back and fourth to Provo daily but it came out excellently...

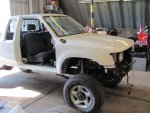
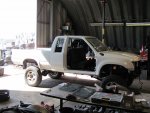
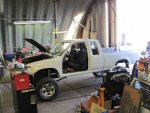
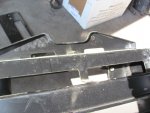
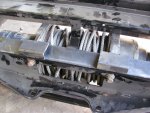
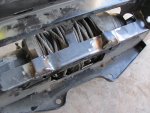
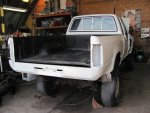
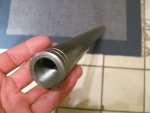
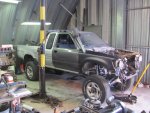
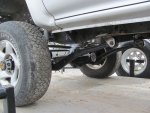
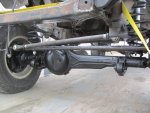
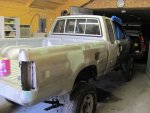
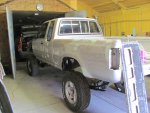
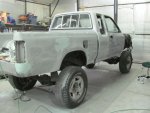
First I had to get it back to a rolling chassis. Old Man Emu springs from Cruiser Outfitters. I was super psyched about this as it meant my guessed height with the coils was right on the money. The photos are with 31s on 16" wheels, so they are small which is why it looks a little goofy...

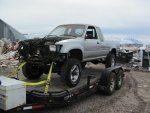
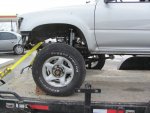
The photos loading the trailer show how I loaded it.. With a Bob Cat at the Recycle Center where my shop is.. :)

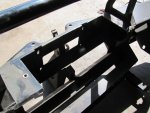
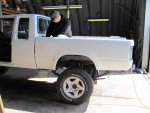
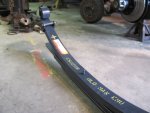
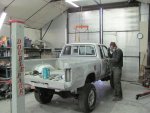
The pics with the truck on the trailer show final ride height of the truck which will be right on the money as well. Nice and tall but still relatively low... It also shows final ride height of the springs with the panhard and steering link (awesome)...

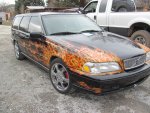
The last pics shows Scott Christiansen's car, the guy helping me with paint.. The Volvo with flames.. :) AKA, he knows what he is doing... :)
 

Attachments

  • CM_042.jpg
    CM_042.jpg
    90.9 KB · Views: 26
  • CM_043.jpg
    CM_043.jpg
    146.8 KB · Views: 55
  • CM_051.jpg
    CM_051.jpg
    115.9 KB · Views: 38
  • CM_053.jpg
    CM_053.jpg
    117 KB · Views: 59
  • CM_056.jpg
    CM_056.jpg
    118.4 KB · Views: 36
  • CM_057.jpg
    CM_057.jpg
    128.7 KB · Views: 55
  • CM_060.jpg
    CM_060.jpg
    135.1 KB · Views: 68
  • CM_064.jpg
    CM_064.jpg
    177.1 KB · Views: 113
Last edited:

dieselcruiserhead

16 Years on ExPo. Whoa!!
By later in the day we were already doing body work. Photos show...

Body work already happening, Scott on the passenger side. Richard, who's shop it is, helping on the driver's side. Richard is such a character that it is beyond words to describe him and the scene there. It's sort of like a clubhouse, all sorts of interesting guys stopping by all the time. He races mid 90s BMWs and all sorts of other vehicles. He has his own junkyard of BMWs and Volvos and you name it. Probably 40 cars, maybe half run... The White BMW is the color I was shooting for. A really white white, an "alpine white."

Using the steam cleaner to clean the body and hood area...

And finally one guy there runs an HHO (google it). Though it violates the laws of physics he claims it works.. Very complex assembly though with laser cut panels with rubber isolation. (Take a look at pics)...

Final pic is the steps that would take me **days** to get to - which he wrote on the side of the car, a goal.. :)

- Sand to 180 (entire car), including removing stripes/OEM graphics (major *****)
- Glaze (body filler)
- block sand, sand entire car to 320 grit
- spot prime before coat of primer

At some point I'll write a writeup of how to do bodywork as this will be helpful for people I think. Again, bodywork really sucks...
 

Attachments

  • DM_070.jpg
    DM_070.jpg
    119.5 KB · Views: 31
  • DM_069.jpg
    DM_069.jpg
    95.1 KB · Views: 31
  • DM_068.jpg
    DM_068.jpg
    94.5 KB · Views: 28
  • DM_077.jpg
    DM_077.jpg
    146.2 KB · Views: 29
  • DM_078.jpg
    DM_078.jpg
    109 KB · Views: 28
  • EM_015.jpg
    EM_015.jpg
    117.7 KB · Views: 39
  • EM_019.jpg
    EM_019.jpg
    143.9 KB · Views: 53
  • EM_003.jpg
    EM_003.jpg
    118.1 KB · Views: 71
  • EM_001.jpg
    EM_001.jpg
    148.5 KB · Views: 64
  • EM_014.jpg
    EM_014.jpg
    92.5 KB · Views: 59
Last edited:

dieselcruiserhead

16 Years on ExPo. Whoa!!
Filler and more and more sanding.. This was about a full day. Mix between block sanding and using the "DA" which is air powered orbital sanding... Also a major ***** because it happened to snow 8" that day and we had to move the truck from the paint area (no filler dust allowed) to another shop so not to contaminate the booth (within reason).

It looks like there is a lot of filler but this is actually all glaze (finish filler) for smooth application as new paint shows dings...
 

Attachments

  • FM_013.jpg
    FM_013.jpg
    113.4 KB · Views: 28
  • FM_015.jpg
    FM_015.jpg
    125.1 KB · Views: 22
  • FM_016.jpg
    FM_016.jpg
    114.5 KB · Views: 31
  • FM_032.jpg
    FM_032.jpg
    101.4 KB · Views: 414
  • FM_023.jpg
    FM_023.jpg
    87.1 KB · Views: 21
  • FM_020.jpg
    FM_020.jpg
    102.1 KB · Views: 128

dieselcruiserhead

16 Years on ExPo. Whoa!!
Finally ready for primer / spot primer. All days in the paint boot area (OK to sand primer here) heat had to be at least 75-80 degrees, and the weather outside was freakishly cold and awful after a great week...

I sprayed the first coat / spot primer over the bondo myself, which was awesome.. I'm a pretty good paint sprayer! Seriously, I feel I could possibly tackle a decent paint job now. This was base/clear and about $350 in reasonable quality material and I could spray this stuff I feel and do a decent job...

Spray primer, sand, spray again, etc etc.. I also never "wet sanded" before which was awesome and wet sanding quality primer rules... You have to lock in anywhere that had filler in particular, or bare metal, before your base coat or your sealer (which is basically thinned out primer) otherwise it shows up in your final paint job. It will show through the primer the next day but it this is good enough to be considered "locked in"... Even rattle can primer is OK for this...

One of the most time consuming aspects by far was removing everything.... And masking, seriously took forever...

Last pic shows getting everything ready for final paint... Again, hours, just to get it set up...
 

Attachments

  • GM_070.jpg
    GM_070.jpg
    111 KB · Views: 20
  • GM_071.jpg
    GM_071.jpg
    115.1 KB · Views: 683
  • GM_075.jpg
    GM_075.jpg
    89.5 KB · Views: 20
  • GM_080.jpg
    GM_080.jpg
    98.5 KB · Views: 21
  • GM_082.jpg
    GM_082.jpg
    116.3 KB · Views: 33
Last edited:

dieselcruiserhead

16 Years on ExPo. Whoa!!
Base coat sprayed..

And clear towards the end...

Here is a short video of Scott shooting the clear..
http://vimeo.com/10023365

I thought the technique would be difficult.. Also note his ************ IAWATA gun, about top of the line, which also helps...
 

Attachments

  • HM_003.jpg
    HM_003.jpg
    99.4 KB · Views: 16
  • HM_002.jpg
    HM_002.jpg
    94.2 KB · Views: 15
  • HM_001.jpg
    HM_001.jpg
    77.7 KB · Views: 19
  • HM_004.jpg
    HM_004.jpg
    97.6 KB · Views: 117
  • HM_005.jpg
    HM_005.jpg
    81 KB · Views: 14
  • HM_006.jpg
    HM_006.jpg
    73.1 KB · Views: 15
  • HM_009.jpg
    HM_009.jpg
    81.6 KB · Views: 15
  • HM_010.jpg
    HM_010.jpg
    72.8 KB · Views: 122
  • HM_012.jpg
    HM_012.jpg
    126.7 KB · Views: 22
Last edited:

dieselcruiserhead

16 Years on ExPo. Whoa!!
Final product -- super psyched...

Paint code was a fairly inexpensive Mazda Alpine White which is what Madza uses for their white 1995-2010 according to the paint shop. The Mazda white and the BMW white are identical but guess which costs more :rolleyes: 
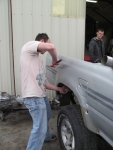
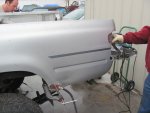
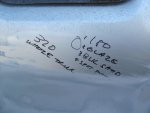
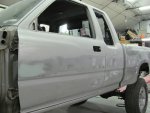
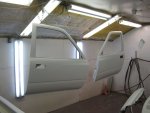
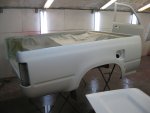
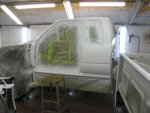
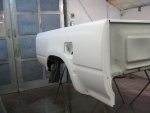
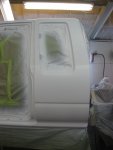
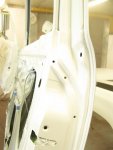
. Even with the cheaper paint color (they came up with this on their own at the store), I was about $350 alone in materials. I used Lesonal brand products, their 2-stage lower end and middle of the line with some blending between the two... A secret with Lesonal is their middle and top of the line (a brand called Sikkens), at least in clears, are literally identical. Lesonal is their mid-upper of a company called Azko Noble I believe. It competes with PPG and others but is a little more reasonable and you basically get a slightly poorer "warranty" which only applies from pro body shops regardless, so there is no warranty though I bought from a quality shop that would probably provide a warranty regardless. There is no actual time or UV on the paint but it looks great of course right now, as the photos show...

I used their Wanda line for the base and the sealer (bottom). I used their mid grade and high grade clears which are U-Tech and blended their regular clear with a matte clear to give it a somewhat low sheen versus your typical lot color. It really hides a lot particularly in terms of scratches...

Why white? Going back to the original Tacoma I didn't want an off white color like the inspiring Tacoma. I wanted a bright white based off an old FJ40 Land Cruiser I had that was also Alpine White, that I loved.. I also have some killer graphics coming that will look great with the white as well... Well, honestly it didn't cross my mind that I would be "expo white" until after I had selected the color as well.. I picked "expo white" totally by coincidence, LOL...


Particularly because of how we did the paint, at the end of the day I basically concluded I did the most durable paint humanly possible that should take a beating and really hold up well... :) Also the matte clear blend didn't beldn that well with the u-tech regular clear because it should have been thinned (opps I thought). At first the clear was a little gloppy and doesn't look like your standard clear.. the good news.. Even more clear, even more durable.. Awesome...
 

Attachments

  • IM_095.jpg
    IM_095.jpg
    132.2 KB · Views: 47
  • IM_094.jpg
    IM_094.jpg
    124.2 KB · Views: 35
  • IM_027.jpg
    IM_027.jpg
    135.3 KB · Views: 147
  • IM_096.jpg
    IM_096.jpg
    126.1 KB · Views: 140
  • IM_097.jpg
    IM_097.jpg
    126 KB · Views: 132
Last edited:

dieselcruiserhead

16 Years on ExPo. Whoa!!
Looks great A, keep it up man.

Thanks Jereme... Haven't gotten to your little goody yet...

This was a nice feeling...

attachment.php
 

dieselcruiserhead

16 Years on ExPo. Whoa!!
So all this took 7 days to get back into the shop....

I only have today since then which is basically modifying the new ARB bull bar for the M12000 Warn Winch I'll be running. I have the winch lying around and I can't bring myself to trade it for a smaller winch that would fit the bull bar. This took about a half day... I feel this went pretty well. Tomorrow I'll clean it up and finish welding and post some finished pics...

Photos show chronological order... I basically felt the front of the bar needed some of the OEM quality strength once I cut out that steel. The 90 degree angles of the steel keep it from flexing so this helps a lot. On the bottom there is a fat OEM strength design/gusset but again trimming for the big M12000 winch hurts its strength so I made this little caps to compensate for the loss in metal. It will look good expecially when the bull bar is powder coated.

First two photos show why you never lend a friend a winch. This was about brand new (had a couple summers on it, looked great) and was lying around so I lent it to a friend. He managed to make it look well worn, rusted, and it is also having a small wiring issue in the electrical box that I'll have to fix so it isn't even working right now. And the worst part was he hardly even used it. The nature of winches...
 

Attachments

  • JM_100.jpg
    JM_100.jpg
    135.3 KB · Views: 20
  • JM_104.jpg
    JM_104.jpg
    106.3 KB · Views: 16
  • JM_102.jpg
    JM_102.jpg
    119.2 KB · Views: 2,043
  • JM_005.jpg
    JM_005.jpg
    149.9 KB · Views: 2,042
  • JM_004.jpg
    JM_004.jpg
    103.1 KB · Views: 2,013
  • JM_001.jpg
    JM_001.jpg
    117.8 KB · Views: 2,041
  • JM_009.jpg
    JM_009.jpg
    150.7 KB · Views: 2,039
  • JM_016.jpg
    JM_016.jpg
    141.8 KB · Views: 13
  • JM_017.jpg
    JM_017.jpg
    141.2 KB · Views: 2,013
  • JM_020.jpg
    JM_020.jpg
    134.9 KB · Views: 2,020
Last edited:

dieselcruiserhead

16 Years on ExPo. Whoa!!
I didn't shoot the bed because I'm planning a spray in bed liner at some point. Because I'm not sure that I'll have the time I just put the drop in liner back in for now and get a spray in installed later.

My friend Steve Chen happens to be back in town and has been helping me out. Steve is the guy who left the truck with me a few years ago when he got the job in Vermont so he did a lot of work to it once upon a time. He is a motor head with about 6 nice Audis (A4s, A6 wagons, S4s), a '57 Chevy 210 (basically a Bel Air), and a Chevy Apache 2WD Fleetside pickup. So it was nice to have him see some of the changes. Today he did some cosmetic stuff to put the drop in liner back in and installed rear suspension bushings and cleaned up the OEM shackles. Steve is the man and it is just awesome to have him around...

So this is about how it sits currently...
 

Attachments

  • KM_091.jpg
    KM_091.jpg
    111.1 KB · Views: 589
  • KM_099.jpg
    KM_099.jpg
    103.6 KB · Views: 22
  • KM_024.jpg
    KM_024.jpg
    140.5 KB · Views: 18
  • KM_022.jpg
    KM_022.jpg
    113.4 KB · Views: 30
  • KM_014.jpg
    KM_014.jpg
    146.4 KB · Views: 28
Last edited:

dieselcruiserhead

16 Years on ExPo. Whoa!!
And more goodies have shown up this week...

Most notably.. 24HOURSOFNEVADA (Jereme Wormington) says last week, "hey Andre I have a H20/Methanol kit lying around, want it? It's basically brand new, I'll give it to you" (about $400 value??). It is a Snow Performance kit that has a computer that controls the methanol injection according to adjustable PSI. It is very heavy duty and performance oriented. The idea is this will allow the Mercedes to have V8 power on the highway when towing or as required. I'll adjust it so it comes on at about 5 psi and probably peaks at about 15 psi though it will be hard to reach that boost level with this engine I figure... Jereme will not take $$ even for shipping.. I see the US Postal Reciept, $19 or so... Unreal...

Second is a VegTherm inline Biodiesel or Vegetable Oil electric heater from Craig Reece at PlantDrive.com vegetable oil components. Craig drives a HDJ80 and a custom Defender 100 that is a work of art and owns this vegetable oil supply company that is arguably the highest quality on the market and is also coming on the Carbon Neutral Expedition. This will let me run high blends of biodiesel on the Carbon Neutral Expedition and will be later used for a vegetable oil conversion.

And finally the last piece of the steering puzzle, about 26" of ridiculously heavy duty drag link from www.4x4Labs.com - awesome.
 

Attachments

  • AM_002.jpg
    AM_002.jpg
    125 KB · Views: 13
  • AM_003.jpg
    AM_003.jpg
    103.5 KB · Views: 15
  • AM_004.jpg
    AM_004.jpg
    106.3 KB · Views: 13
  • AM_001.jpg
    AM_001.jpg
    135.9 KB · Views: 21
  • AM_006.jpg
    AM_006.jpg
    83.1 KB · Views: 16

dieselcruiserhead

16 Years on ExPo. Whoa!!
Lookin so damn good Dre. BTW, I literally live 2 mins right around the damn corner from Richards place. :(

-Ferg-

No way.. And I was there all week.. I thought you were up in SLC these days.. I keep seeing that spot of dirt where your old house once existed before they widened the highway.. :)

The good news is you really are about only 20-25 minutes away to the shop when you get a moment... :)
 
Last edited:

Forum statistics

Threads
188,451
Messages
2,905,114
Members
230,428
Latest member
jacob_lashell
Top