The Plan...

dieselcruiserhead

16 Years on ExPo. Whoa!!
Awesome.. I'll be there in the afternoon near 3:30-4 or so... thanks man.

Mike and his wife Juline who are great...

Kurt is referring to the ARB bumper and Simpson III roof top tent that have arrived for it.. The tires have also arrive, which are Treadwright MTs that are just **awesome**.
 

dieselcruiserhead

16 Years on ExPo. Whoa!!
Here are photos of the Ballistic Fabrication components and some of my custom tabs. I learned about Ballistic from Pirate4x4.com. When I started seeing these components a couple years ago this is what got me thinking about this whole conversion. This and the Tacoma I posted. I didn't want to source a 70 series non USA axle like the Tacoma though and I love the ruggedness of this parts. All of the Ballistic Fab stuff would be about $350 or so with correct ordering. I ordered about $50 too much stuff that I will not need.

This photos (posted earlier in the thread) shows how I trimmed the lower coil buckets/shock mounts for the 80 series springs which have a tapering at the bottom.
attachment.php


I ended up not needing to do this because I moved the top of the coil bucket inward about .5" and this let me re-place the lower bucket inward that additional .5" inches. The bucket at the top shows the upper piece moved inwards .5", while the lower one is set to how it was designed. I was glad I tacked these at first...
attachment.php


This is how bad it was before I moved them in:
attachment.php


For the upper end mounts I used these tabs from ballistic. The top piece was 3" strap I had and used a lot of for this suspension. With the grind I was able to get massive penetration/very strong so I have no worries about these at all.
attachment.php


Burned in on both the inside and out:
attachment.php


Here is the 3" strap I used to make the pieces for the radius arm mounts to the axles. Ballistic doesn't sell (that I am aware of) a good tab that otherwise works. I used a smaller holesaw than needed mostly because this is what I had (my 3.25" hole saw went dull) but ground it open very easily...
attachment.php


There are more pictures attached than what I have posted so make sure you look at the attachments.
 

Attachments

  • SM_028.jpg
    SM_028.jpg
    360 KB · Views: 3,907
  • TM_051.jpg
    TM_051.jpg
    499.4 KB · Views: 3,953
  • TM_034.jpg
    TM_034.jpg
    615.9 KB · Views: 672
  • TM_040.jpg
    TM_040.jpg
    479.5 KB · Views: 4,400
  • TM_041.jpg
    TM_041.jpg
    420.5 KB · Views: 4,406
  • TM_047.jpg
    TM_047.jpg
    816 KB · Views: 4,626
  • TM_043.jpg
    TM_043.jpg
    468.9 KB · Views: 4,353
Last edited:

dieselcruiserhead

16 Years on ExPo. Whoa!!
Close up again of the Ballistic parts. These are laser cut/weld togther yourself. They save a lot of time but again the overall project still takes a lot of time regardless.

Here are the frame plates from 4x4 Labs. It takes some effort to bend them to fit the frame. I used an old vice I have tack welded to the frame, nothing else would work...
attachment.php


They are laser cut to have the holes in the right place. Using the power steering box bolts is a great way to secure them:
attachment.php


And the correct technique for removing a pitman arm.. You **have** to use a puller. Get one from autozone or checker under their tool loan program. You then crank it tight and use a big hammer that you hit the puller and this gets the arm off... I needed to switch it to the pitman arm that came with the 4x4Labs steering components that use a ream for a GM 1 ton tie rod end.
attachment.php
 

Attachments

  • SM_031.jpg
    SM_031.jpg
    349.9 KB · Views: 3,966
  • SM_030.jpg
    SM_030.jpg
    471.9 KB · Views: 4,031
  • SM_034.jpg
    SM_034.jpg
    442 KB · Views: 4,153
  • SM_035.jpg
    SM_035.jpg
    406.4 KB · Views: 4,722
  • SM_039.jpg
    SM_039.jpg
    352.7 KB · Views: 4,750
  • SM_042.jpg
    SM_042.jpg
    412 KB · Views: 616
Last edited:

dieselcruiserhead

16 Years on ExPo. Whoa!!
And here are close ups of all of the tabs installed. This is before the panhard mount was welded on but gives a good idea of everything...

In general I have some apprehension about this mod for the typical expedition commmunity person but if done right it basically uses almost all off the self parts except for the axle housing that is custom and some of the steering components but with enough beefiness there should be no issues whatsoever I believe even international. The consumables and replaceables are all off the shelf. I am curious to see how it will do, which is about the same as a stock 80 series Land Cruiser. Let me know if anyone has questions!
 

Attachments

  • SM_073.jpg
    SM_073.jpg
    379.7 KB · Views: 4,850
  • SM_067.jpg
    SM_067.jpg
    387 KB · Views: 35
  • SM_059.jpg
    SM_059.jpg
    372.1 KB · Views: 3,751
  • SM_074.jpg
    SM_074.jpg
    376.8 KB · Views: 3,668
  • SM_081.jpg
    SM_081.jpg
    312.5 KB · Views: 3,674
  • SM_085.jpg
    SM_085.jpg
    374.3 KB · Views: 3,688

CYi5

Explorer
attachment.php


This looks beautiful, can't wait to see it finished. The custom axle housing refers to the extra mounts you welded on? Otherwise it's a stock 80 series axle?
 

dieselcruiserhead

16 Years on ExPo. Whoa!!
The axle is a 1988-1990 FJ62 but is basically interchangeable with a 1980-1990 60 series Land Cruiser including brakes and all other components. So ever breaking something in or on the axle would be as easy as finding a 60 series donor. The radius arms are 80 series, the tie rod ends are off the shelf 1-ton General Motors that are also so heavy duty I do not anticipate having to replace them any time in the next 10 years. The coil springs are stock FJ80 (as if right now assuming they will work well, which I think they should).

The axle, the panhard bar, and the steering linkages are the only things custom. They are also all ridiculously heavy duty for that reason (I do not ever want to have to replace them).

The FJ62 axle has a couple nice features. It is "trussed" so it is less likely to bend. They added this in 1988 and continue this through today. It also has 4.10 axle gearing instead of 3.73 from a FJ60, but uses a fine spline pinion unlike the FJ40 differentials (that are also interchangable) which were coarse spline through about 1978. And it also has some other small benefits like a rotated pinion towards the transfer case and some little "air scoops" that direct air towards the brakes that are also found only on later Land Cruisers. It is a great axle.

The only way I would be 'screwed' is if I somehow bent the axle housing which could probably only happen via a major accident. I doubt I could ever bend this particular axle via being off-road.
 
Last edited:

cruiseroutfit

Well-known member
...The only way I would be 'screwed' is if I somehow bent the axle housing which could probably only happen via a major accident. I doubt I could ever bend this particular axle via being off-road.

Unfortunately they do bend from severe off-road use, not completely common but not uncommon either. I had to replace my housing a couple of years back because it was bent, did Paul Weisses recently too. That is one of the major upgrades of the 62 housing, trussed as you noted. That said under a much lighter rig like your truck I don't think it would ever be an issue.
 

dieselcruiserhead

16 Years on ExPo. Whoa!!
I remember that.. One more reason I chose to use the FJ62 axle...

Some manufacturers offer some weld on components for Toyota axles to prevent bending. I think it will be very hard for me to ever bend this FJ62 axle personally.
 

dieselcruiserhead

16 Years on ExPo. Whoa!!
Last set of pics...

This shows the panhard on the axle side. Again I decided to not use dual heims for better general ride comfort so I will use a bushing. Otherwise the suspension will be compete then other than placing the shocks.

You can see how tight it was to get the heim in place. It was also very difficult to setup after an hour or two of messing around until I figured out to use the wires to hang it and place it that way. If you look at the upper picture there is a solid 5" of uptravel before interference and you can see the links are parrallel (which is crucial for getting rid of bump steer).

I hope this all helps...
 

Attachments

  • SM_116.jpg
    SM_116.jpg
    341.2 KB · Views: 3,601
  • SM_122.jpg
    SM_122.jpg
    352.3 KB · Views: 3,579
  • SM_124.jpg
    SM_124.jpg
    339.5 KB · Views: 3,560
  • DM_130.jpg
    DM_130.jpg
    375.2 KB · Views: 3,470
  • DM_140.jpg
    DM_140.jpg
    324 KB · Views: 31
  • DM_148.jpg
    DM_148.jpg
    344.6 KB · Views: 3,513
  • DM_150.jpg
    DM_150.jpg
    384.5 KB · Views: 3,509
  • DM_164.jpg
    DM_164.jpg
    391 KB · Views: 3,489
  • EM_139.jpg
    EM_139.jpg
    387.3 KB · Views: 3,530
  • EM_142.jpg
    EM_142.jpg
    378.7 KB · Views: 3,517
Last edited:

Gone2Baja

Adventurer
I just read through the entire post, pretty damn interesting! You have put together some really good ideas.
I'll be looking forward to future posts.
 

teotwaki

Excelsior!
Heck, I was happy at being able to install my pre-built ARB locker/3rd member.
This is truly amazing thought, planning and fab work Andre!
 

dieselcruiserhead

16 Years on ExPo. Whoa!!
It goes against the concept of a lot of what "Expedition" means, or at least to me. I was largely influenced by some builders like Kurt Williams and Daryl Noorda who owned Cruiser Outfitters through about 2002 who built some custom vehicles that were very heavy duty and most of which are still running with no issues whatsoever, very heavy duty, very well thought out, few custom parts from obscure suppliers, etc. For this build and in general the parts I try to use are generally off the shelf and take a 'custom' approach but using parts that can be found anywhere or might even be *more* common than the original Toyota part. Including international. And it also takes an attention to detail when building that really takes a lot of time to put into it. Anyone can do this stuff if they have the time (and they liked legos as a kid .. :) ). I could hardly change my oil maybe 10-12 years ago.. :)

I am teaching a class at Overland Expo about biodiesel & diesel conversions and also build of vintage vehicles. In this case it's technology though the mid 90s, so not that vintage, but still takes the same approach as anything. If anyone makes it there and wants to pick my brains about any of this please do! We are doing an expedition all off road to the Overland Expo and almost all on alternative fuels - 900 miles .. :) This is the vehicle I will be bringing (assuming I'm able to get it 100% done on time -- which is a big concern for me currently). My adapter has finally shipped and and hopefully the transmission will be arriving shortly as well. These are my two largest hangups.
 

digitalferg

Adventurer
Anyone can do this stuff if they have the time (and they liked legos as a kid .. :) ).

I *still* loooooove legos... :)

Looks like it turned out great Dre. Nice job. Your attention to detail is awesome. Everything you've said on it has re-enforced that the radius arm setup is the way I will go. It will still be a while before I even start gathering parts, but I am stoked. Can't wait to see and ride in this sucker. I like how you said somewhere in one of these threads that it "is just a front suspension" and that its not that dissimilar to the 80 series front.

I def hear you (and Kurt cause he won't stop telling me... :D ) that the IFS (especially on the later trucks/4runners) is a pretty solid setup for expedition/desert-cruzing, but, like you, i just like the "simplicity" of a solid axle front. Don't need it to be a crazy-flexing rock-crawling setup, just needs to be SOLID (pun intended).

Anyway, nice job bangin it out. Look forward to seeing/hearing how the engine/tranny/tcase portion works out.

-Ferg-
 

cruiseroutfit

Well-known member
It goes against the concept of a lot of what "Expedition" means, or at least to me. I was largely influenced by some builders like Kurt Williams and Daryl Noorda who owned Cruiser Outfitters through about 2002 who built some custom vehicles that were very heavy duty and most of which are still running with no issues whatsoever, very heavy duty, very well thought out, few custom parts from obscure suppliers, etc...

Thanks Dre, that means alot. I know Darrell would be really happy to hear that too. He was by all means ahead of his time with this whole market, much of that thinking was past on to me during my tenure working for him.

...and Kurt cause he won't stop telling me...

And I never will, but that's just because I want the Ferg out on one of our big trips, you own me a couple by my count. :D

Maybe I'm a little skewed as I see it everyday but I can promise you guys the use is far funner than the build. I just mean to say as much fun as I have building my rigs, I have ten times more fun roaming aimlessly in the Swell with a finished project. Sure I could tear it apart and make it bigger/better but if it does the trick don't change it.

Also I have to note Andre by all means has above average fab skills, tools, space and time. Look at how much he gets done in a week. Try doing that after hours with a steeper learning curve and it could take months if not years to complete a build of this caliber. Don't fall victim to the burnout.
 

dieselcruiserhead

16 Years on ExPo. Whoa!!
Don't fall victim to the burnout.

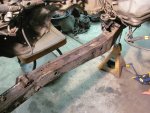
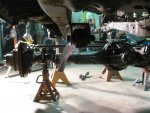
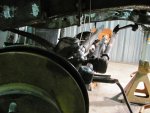
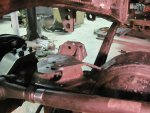
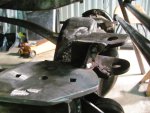
And I completely 100% agree with this. I think I mentioned it but I have about 40-50 hours into this front suspension alone. I also needed some additional parts so I am pushing about 6-8 or so trips to SLC alone for this truck build, for all the little things. Ken Dahlberg also comes up to the shop every couple days from Orem / Provo and is also regularly shuttling me parts which has been 
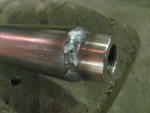
really helpful. The small things on the conversion ($25 in bolts for the front end alone -- I kid you not), shocks, etc all consume so much..

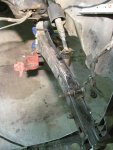
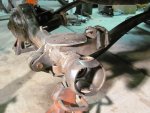
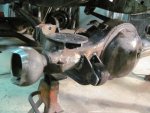
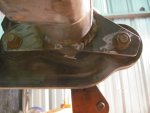
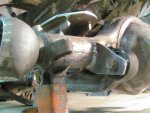
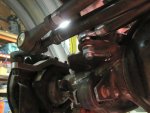
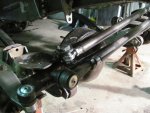
I would day.. If I had a Tacoma or a later 4 Runner (such as yours Ferg!) with the coil overs I would just run them and leave it be. I am 100% positive of this. It is just the steering, the weak front diff and CV joints, and other factors of the '94 and earlier trucks ('95 and earlier pickups) that make this a bummer.. I always felt I was "polishing a turd" if I were putting work into the original IFS. But I really think the Tacoma / Gen 3 4Runner suspension is pretty good.

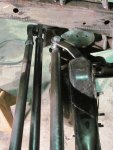
That said if you had the $$ and someone made an axle housing with the tabs all already attached it might be worth it. But remember how live axle feels, even on a 80 series it is pretty 'planky' to an extent especially on the road.

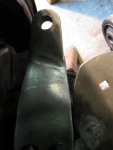
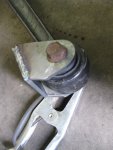
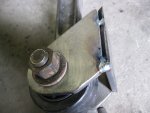
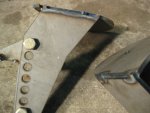
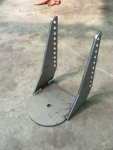
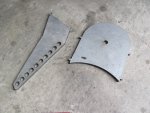
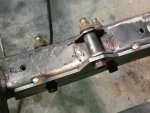
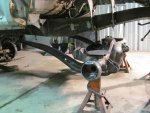
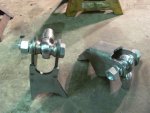
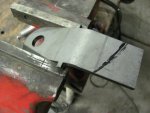
OR, if you used an 80 series front axle and rotated the radius arm mounts on the axle upwards a hair (they are designed for a pretty low frame) or used Old Man Emu caster bushings bare minimum, then I think you might be OK or I might recommend it. It would then only take the couple days this conversion deserves rather than the 40-50 hours it took me because I had to figure everything out from scratch...

Did I mention I have a cold and made myself sick from banging this out all week? :) I managed to only stop in Sunday briefly. Carrie was also out of town for the weekend so I was really planning to get a lot done on the truck this weekend...
 
Last edited:

Forum statistics

Threads
188,452
Messages
2,905,140
Members
230,428
Latest member
jacob_lashell
Top