The Plan...

24HOURSOFNEVADA

Expedition Leader
Wow, that would be awesome Jereme! As far as I can tell it looks like it has an adjustment knob for when it kicks in, correct? It looks like the differences between the gas and diesel is maybe just a badge difference as far as I can tell?


No worries man. Yes it has the knob to adjust it, I'll call you in the afternoon tomorrow to get the details.
 

dieselcruiserhead

16 Years on ExPo. Whoa!!
Correct this is approx ride height + about 1-2" I figure. The photos are a little off because it is from above the axle. The coil bucket is actually level...

Caster is at 4 degrees and improves with compression and lift reduction which I anticipate. Again super psyched. Also a FJ60 width axle or wider is pretty much mandatory as well for a few reasons...
 
Last edited:

dieselcruiserhead

16 Years on ExPo. Whoa!!
Correct the knuckle basically runs into the spot where spring bucket needs to be placed due to the width of the frame. It could be 'fudged' on perhaps a mini truck axle with the same length short side but it would still be difficult. My first placement of the buckets was right at the factory knuckle weld but I had concerns about the tires hitting the spring under flex. So I moved the top portion of the upper coil bucket about .5" and also moved the lower part inwards as well. I am now very happy with the placement. It is difficult setting up the coils. I know 3 or 4 link would be more difficult but it is time consuming. Also as everyone and Dave Connors and yourself suggested going with coil overs would have saved a lot of time but again not what I was looking for in this app at least.
 

digitalferg

Adventurer
Lookin good Dre! Thanks for the teaser pics. We like pics. :D

Damn. I need to stop on up there asap. I really really want to do this on my 4runner.... i may have to hire you to help me with it. ;) You'd rather work on junk than go wheel it right....? :p

-Ferg-
 

ntsqd

Heretic Car Camper
I've been looking into this type of front suspension long term (too many pots in the air right now... ). I much prefer coil-overs for the ease of adjusting the spring rates and their good damping. Hadn't considered that their small packaging would be that much of a bonus. I could easily clear a set using the stock lower Mini truck mounts and the All-Pro hoops. What I do not like about the c/o's are the spherical bearing mounts, they're too small to live very long - even with Seals-it washers installed. With 7100's I've had good results in replacing those SB's with normal urethane shock bushings, but with the extra loading of the springs I'm doubting that is a long-lived option.
 

dieselcruiserhead

16 Years on ExPo. Whoa!!
Agreed, basically all coilovers I found seemed like they needed a rebuild or maintenance every couple years and with this setup the biggest thing I wanted was 1. No aftermarket parts other than weld-on, nothing that could leave me crippled in the middle of nowhere because some part from some obscure manufacturer broke.. and 2. a sort of set it and forget it mentality hence the coil springs...
 

dieselcruiserhead

16 Years on ExPo. Whoa!!
Lookin good Dre! Thanks for the teaser pics. We like pics. :D

Damn. I need to stop on up there asap. I really really want to do this on my 4runner.... i may have to hire you to help me with it. ;) You'd rather work on junk than go wheel it right....? :p

-Ferg-

Ferg definitely call me any time if you want to come up.. I am there most of today through about 6PM and Saturday/Sunday probably unless I take a day off and go skiing..
 

dieselcruiserhead

16 Years on ExPo. Whoa!!
OK so I finally got the suspension pretty much done. At the advice of Luke Porter at 4x4labs.com he suggested I use a bushing on one end of the panhard instead of the two heims I had planned, otherwise it will "feel harsh" and lots of transmission of road noise etc to the frame/passengers, so I bought a bushing but stupidly left it at Summit Machine in Draper Utah (which is awesome) just after I bought it but I'll pick it up tomorrow when I'm back in the area...

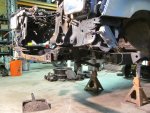
Again this is on the '91 pickup extra cab. I am super psyched with how it turned out. I wasn't able to get it as low as I thought I would be able to (as of right now, we'll see what happens when the truck is loaded and how the springs behave). I can easily control height of the coils with the adjustable height buckets. I set it at approximate height of about 4" of lift and with my frame that does not have accommodations/design for a live axle, unlike a 40 or 60, I was able to max out at 5" of uptravel before metal/metal contact. I cannot say for sure but I anticipate about the same with a 40/60 that it will take some lift but not tons...

Specs:

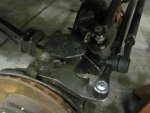
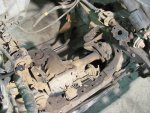
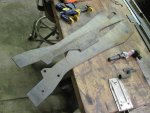
GM 1 ton tie rod ends and linkage from 4x4Labs. Luke bent the arms in a spring under type method but because the TREs come in from the top (and are huge) they are still pretty tall. I asked him to take this approach rather than traditional hi-steer and he nailed it perfectly...

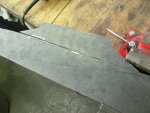
I used all of the ballistic fab parts listed at the beginning of the thread. I intended to use .120 wall (1/8") DOM for the panhard and the drag link (because I didn't know how long I would need so I didn't get one of these from Luke) and bought GM TRE adapters from Ballistic and 3/4" heims with the matching rod ends for these as well. After I did this I found out 1/8th wall is too skimpy, it would work for the drag link but is probably too thin for the panhard even though I set it up so I would probably have no bending issues because it is so flat with about 9 degrees of angle. So instead I went to Summit Machine and they sold me some 1/4" wall for about $11 a foot (I only needed 3'). I will use the .120 wall for the drag link now but have already ordered the right one that is about 1/4 wall from Luke though its also overkill and probably unneeded..

In all I'm pretty psyched with especially how it's turned out.. I have never had a 80 series and messed with its front axle, just wheeled with them and particularly in the rear was always impressed with the flex so I didn't realize how little they flex up front and why some folks have done 3 links & such... This said lots of people have said "don't worry it will flex a lot better than you think" which I think is awesome... This said I think it will work really well for the intended use of the truck but it took so long to set it up even with the radius arms (way longer than I had anticipated getting all the angles right) that if I were to do it again I would just link it 3 or 4 link it and call it quits.. So in that regard Kurt and others were right because they said this. That said it would be tough to set up a decent 3 or 4 link without hte engine because the clearances are so tiht. But the cost difference and honestly the time difference would be so minimal that 3 or 4 link would probably be superior.

This said it is still a nice, durable match to my Old Man Emu rear springs from Cruiser Outfitters and I still think it is a good front suspension and again will match the setup well. I like how durable it appears to be and how it will handle on the road just like a OEM 80 series... And with a locker it will wheel well. I am planning on using the original length shocks that comes with OME in the rear (8") and 10" shocks in the front because the mounts are outboarded from their location in the rear so it will need a little more travel. I will probably set it to 4 or 4.5 inches of uptravel (I'm not sure if this will be too much with the coils) and about 6" of droop or so... Which I know the radius arms will have trouble reaching I believe...

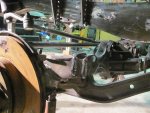
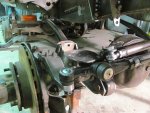
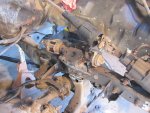
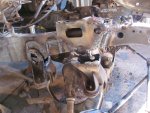
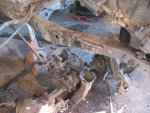
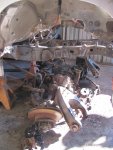
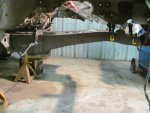
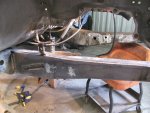
Placement of the panhard was the most difficult aspect of it all besides the time consuming aspects but this is also because I set all of this up from scratch. It is fairly close to the pumpkin and until I figured out its final location it was the leading cause of interference with the frame and at one point I was looking at 3" of uptravel because of it. I think a "kit" would still do pretty well and relocating the axle is very easy -- basically as difficult as moving the upper links at the end of the radius arms. So that is nice...
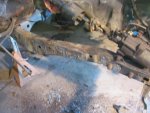
Here are photos.. :)
 

Attachments

  • SM_113.jpg
    SM_113.jpg
    528.3 KB · Views: 119
  • SM_153.jpg
    SM_153.jpg
    524.2 KB · Views: 5,331
  • SM_168.jpg
    SM_168.jpg
    429.7 KB · Views: 3,703
Last edited:

dieselcruiserhead

16 Years on ExPo. Whoa!!
Here is the detailed documentation of the suspension build... Again I would call it about a 4.5 or higher out of 5 bananas on the fabrication/vehicle modification scale and it takes signficant time. I estimate I am at least 40-50 hours into it so you need to figure if its worth it. Because there is no kit you will need to take the time to figure everything out yourself as well though these posts should help.

I do not have time on the suspension so I can't identify what is good or bad. I think/know it will handle better than a leaf spring suspension and may be lower than most of them. But again it will still be tall at about a 4" lift I estimate. I cannot say it would be worth it versus just doing a 3 or 4 link as I just mentioned...

First cutting off the IFS. Torch is definitely the way to go versus a plasma. It took me less than 2 hours to torch off the old suspension and about a full day to completely clean it up.

It is exciting to cut all the suspension off so I took a lot of pics...
 

Attachments

  • SM_016.jpg
    SM_016.jpg
    434.6 KB · Views: 40
  • SM_018.jpg
    SM_018.jpg
    443.3 KB · Views: 32
  • SM_021.jpg
    SM_021.jpg
    441.9 KB · Views: 38
  • SM_026.jpg
    SM_026.jpg
    509.1 KB · Views: 30
  • SM_024.jpg
    SM_024.jpg
    445.8 KB · Views: 38
  • SM_030.jpg
    SM_030.jpg
    505.1 KB · Views: 51
  • SM_032.jpg
    SM_032.jpg
    358.4 KB · Views: 34
  • SM_037.jpg
    SM_037.jpg
    452.8 KB · Views: 47

cruiseroutfit

Well-known member
Mike's meaning Summit Machine? Sure, my pleasure...

Yup, Mike = the owner and its his place :D

Its a 17mm that Scott P. took down there for him to make a drag link, been a few months but he should remember. Thanks!

The truck with your bumper is scheduled to arrive between 7am and noon fwiw.
 

dieselcruiserhead

16 Years on ExPo. Whoa!!
Here are pics of putting it together. The first was I started with a set of IFS frame solid axle swap plates also from 4x4 Labs. This is because I was worried about flex or distortion of the frame from the new coil buckets so better to be safe than sorry. This took about a 1/2 day at least to get these on, bent in (see the photo of the driver's side -- they need to be bent in, hence all the clamps). I would consider these mandatory for this conversion.
 

Attachments

  • SM_001.jpg
    SM_001.jpg
    411.3 KB · Views: 4,224
  • SM_004.jpg
    SM_004.jpg
    372.2 KB · Views: 4,194
  • SM_006.jpg
    SM_006.jpg
    356.7 KB · Views: 62
  • SM_011.jpg
    SM_011.jpg
    393.1 KB · Views: 4,200

Forum statistics

Threads
188,453
Messages
2,905,162
Members
230,428
Latest member
jacob_lashell
Top