Poorboyota26
Adventurer
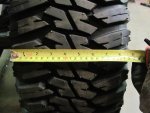
Thanks for the info on the tires! I've been thinking about them for a while now and it seems that there are more and more of them out there these days (economy will do that) and it's time for tires on the Tacoma so...
") )
)Thanks for the info on the tires! I've been thinking about them for a while now and it seems that there are more and more of them out there these days (economy will do that) and it's time for tires on the Tacoma so...