The TARDIS - A Four Wheel Camper Build

Overland Hadley

on a journey
Made and installed the shims on the aluminum bars that support the jerry can holders. Much happier now.


img0782fj.jpg


img0783fc.jpg


Stood on the one mount and it held just fine. Because the jerry can mounts can now double as a step, I am reconsidering the layout of folding steps on the back of the camper.

I now consider the jerry can holders finished. :ylsmoke:
 

MontanaBBQ

Observer
Does anybody have any recommendations on an aluminum roof top cargo basket?

I am looking for something lightweight and low profile, as it will only be used for lightweight items in a couple of drybags.

Thanks.

I've had good luck with a Yakima Basket Case for 15+ years. It's not aluminum, but only 15lbs per their website. Much lower profile and less beefy than their LoadWarrior/Megawarrior type baskets. It's really nothing more than a grid of heavy wire mesh with a rubberized coating on it. The size is approx 26" x 40" x 2" - perfect for a couple of large dry bags. It attaches easily to round bars with the Yakima snap around things. Can be had new for $80-90 online.

My other thought would be to make one - maybe make some 90deg bends on a stick 2" aluminum angle to form a square frame. Create a bottom with a sheet of smooth aluminum or some sort of metal mesh(?). I'm sure it could be bolted or riveted together and attached to the round bars using the same Yakima snap arounds. Not sure what the finished weight might be... After seeing all of your nice work in this thread, I'm sure you could build something awesome with little effort.

Please keep the pictures coming.
Thanks,
Doug B.
 

Overland Hadley

on a journey
I've had good luck with a Yakima Basket Case for 15+ years. It's not aluminum, but only 15lbs per their website. Much lower profile and less beefy than their LoadWarrior/Megawarrior type baskets. It's really nothing more than a grid of heavy wire mesh with a rubberized coating on it. The size is approx 26" x 40" x 2" - perfect for a couple of large dry bags. It attaches easily to round bars with the Yakima snap around things. Can be had new for $80-90 online.

My other thought would be to make one - maybe make some 90deg bends on a stick 2" aluminum angle to form a square frame. Create a bottom with a sheet of smooth aluminum or some sort of metal mesh(?). I'm sure it could be bolted or riveted together and attached to the round bars using the same Yakima snap arounds. Not sure what the finished weight might be... After seeing all of your nice work in this thread, I'm sure you could build something awesome with little effort.

Please keep the pictures coming.
Thanks,
Doug B.

Hi Doug,

I had not considered the BasketCase, but it does look like it would fit my needs. It is still a little heavier than I would like, but it is almost a third lighter than the big baskets. Hmmm.... Thanks for the idea.

When I was not having much luck finding one to buy, I started designing what I could build myself. I have designed a basket of sorts, more of just a flat platform made with aluminum ribs. Thing I like about my design is that being totally flat I can put boat saddles on and not remove the basket. Given the main reason for the roof rack is to carry kayaks or canoes, being able to carry them without removing the basket is a plus.

I wish I could weld aluminum, then I could go crazy and weld up the king of aluminum baskets. Probably best that I can't.

Thanks for the kind words about my work on this camper. More photos coming....
 

herm

Adventurer
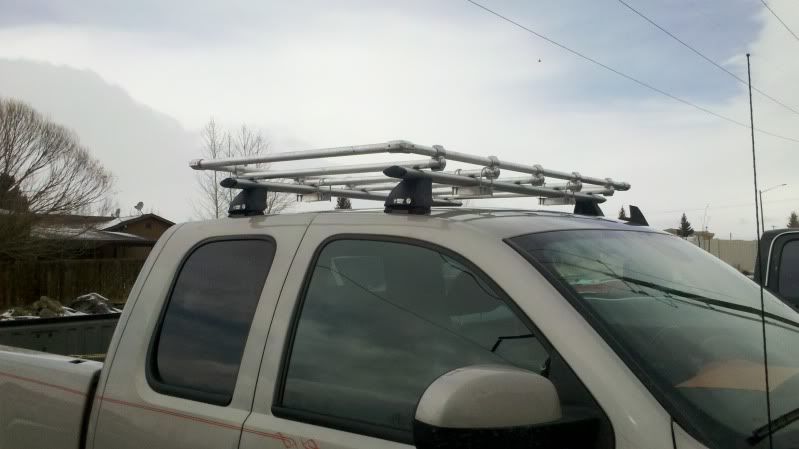
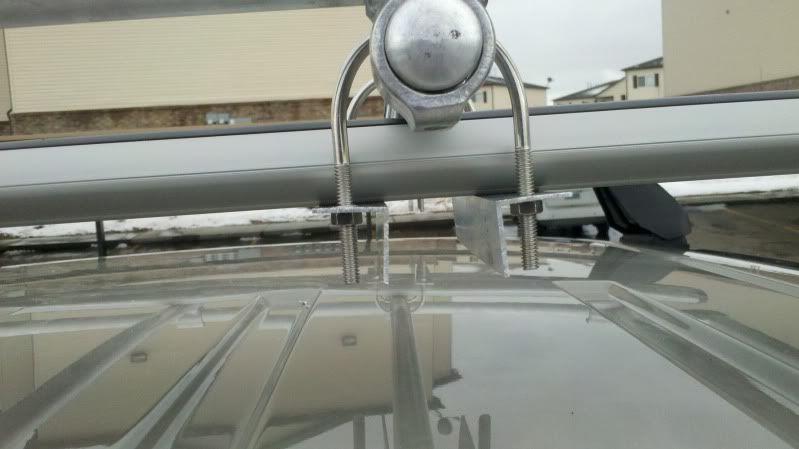
i built my roof basket/platform with al tubing and cast fittings.

2011-03-03_14-14-09_440-1.jpg


2011-03-03_14-13-45_361-1.jpg


the material is from mcmaster.

it works very well for my tool boxes, scepter cans, and maxtrax. I have also used it for my canoe. The only change form the pictures is replacing the nuts on the U bolts with nylocks.

T slot would make a very cool platform or rack also. No welding. just use some loktite or nylock nuts. I have not had any of the set screws in mine come loose with some low strength loktite. I may increase the density of the cross bars and use channel instead of angle for the mounting also.

http://www.mcmaster.com/#structural-framing/=i2f3a2
 

SLO_F-250

Explorer
Made and installed the shims on the aluminum bars that support the jerry can holders. Much happier now.


img0783fc.jpg


Stood on the one mount and it held just fine. Because the jerry can mounts can now double as a step, I am reconsidering the layout of folding steps on the back of the camper.

I now consider the jerry can holders finished. :ylsmoke:

Great Idea Overland! Im going to have to use something very similar for my setup. Great build and thanks for documenting it so well! :victory:
 

Overland Hadley

on a journey
I did work on the foot-pump today....

Mounted the Whale foot pump. I am happy with how it works and feels, but time will tell how handy it is to have it mounted up off the floor. It is nice to have it out of the way and there is no chance of bumping toes on it. Everything is a compromise.

img0802io.jpg


The mounting bolts on the underside of the camper, all stainless hardware.

img0801g.jpg
 

Redline

Likes to Drive and Ride
Nice idea, I'd would like to do something similar to haul extra fuel. I assume the jack brackets and structure behind can take that dynamic load?

I was also thinking it would be nice if the location of the foot/roof steps on the rear of many FWCs could be used for an AT can holder to carry fuel/water.

James


Here is how I mounted the AT holders to the jack brackets. I wanted to leave the factory screws in the brackets alone, and I also want to have access to them to be able to check them periodically. So I drilled holes large enough that I can still get a socket on to tighten them if needed.

img0691xr.jpg


img0692xt.jpg
snip....
 

Forum statistics

Threads
188,061
Messages
2,901,739
Members
229,411
Latest member
IvaBru
Top