Total Composites flatbed build

andy_b

Well-known member
OK, so just a hitch mount rack? I’m familiar with the 1Up racks, have one myself. Its just that the photos (which were from quite a distance, so couldn’t really tell) looked like the bikes were pretty elevated, more so than from a typical hitch mount. I guess not.

So where’s your fab guy? I’m looking for one right now.

I think they look elevated because of how high they start, lol. Also, even though there are only two bikes on there, the rack is a 3 bike rack to clear the spare, which makes it higher than a standard double 1Up rack.

Check your messages.
 

simple

Adventurer
Fully loaded with 3 people, 2 dogs, enough water and gear ~4,000lbs. Truck needs replacing. IDK how anyhow thinks this type of camper would work on a 350/3500 truck.
Thanks.
For comparing apples to apples with a production unit like a Northern Lite sportsman 8-11 that has a dry weight of 2560lbs, What do you think the dry weight of yours is?

Also what material is the white spacer between your box and flatbed?
 

andy_b

Well-known member
Thanks.
For comparing apples to apples with a production unit like a Northern Lite sportsman 8-11 that has a dry weight of 2560lbs, What do you think the dry weight of yours is?

Also what material is the white spacer between your box and flatbed?

The spacer is that purple rigid foam stuff from HD or similar. It is wrapped in vinyl and white duct tape lol. Works great thus far.

Probably about the same, although that is a wild guess.
 

ITTOG

Well-known member
Great build and thanks for sharing.

How long is the cabover section? It looks longer than the flatbed portion.
 

andy_b

Well-known member
@andy_b thanks for posting this tread. It's always interesting to read of and see solutions to people's individual wants and needs. The build out looks really good !

Re the split pump - just spit balling here - could the interior unit be mounted upside down ? So the plumbing is at the top and perhaps an enclosing bulkhead or cowling might then be less intrusive to the dinette area.

Curious the reason you can't use a rigid elbow to go through the wall (I don't much about air cons)

Re your comment:

Are you feeling the weight or the height ? 4K has been done to death on 1 tons so I'm thinking it might be the height. What might be your upgraded chassis if you had your choice ?

Thanks, I agree it is nice to see how other ppl solve their problems. That was part of the reason I post in real time - I like being able to provide some insight into the stuff I'm using.

Actually, the truck rides fine. I have custom leafs front/rear from Alcan spring as well as ADS 2.5 shocks - the ride is really well controlled for a truck that is just leaf sprung (eg - no links). There are no upper cabinets and the solar array is relatively light so the center of gravity remains lowish.

I have a hydro-assist ram so that really limits the effect of wind on the big side-walls. If I were running the stock damper instead and original steering, it would probably be more noticeable. But, I've also upgraded the steering box and power steering pump (20+ year old truck and all) so those also contribute to the minimal impact of the box on the handling.

Regarding the rigid elbow and pipe - that is not a bad idea at all. I wanted to limit the risk of cracking and thought that hard lines for the lineset itself would be a bad idea. The air-handler needs to be mounted as is. Now that I think about it, it may work ok because both the compressor and air-handler are installed on the same panel and *should* move in tandem. Unfortunately, I've kind of committed to this setup with hoses so here we are.

Regarding chassis - 550/5500. IDK what I would do about the substantial difference in box width and track width on my current setup. In theory, a modern SRW 350/3500 may have enough weight capacity, but it would likely be at 100% GVWR most of the time. For a single traveler, a 350/3500 would work but once you start adding passengers and their "needs," it all falls apart.
 
Last edited:

andy_b

Well-known member
Great build and thanks for sharing.

How long is the cabover section? It looks longer than the flatbed portion.
Thanks for the nice words.

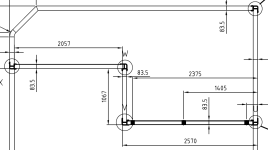
LOL almost. A queen-sized bed gets long in the north-south orientation.

Screen Shot 2024-01-03 at 4.36.46 PM.png

Dimensions in millimeters.
 
Last edited:

ITTOG

Well-known member
It must have been the angle of the first pic.

Sent from my Pixel 7 Pro using Tapatalk
 

calameda

Member
Hey, how did you end up mounting your flatbed to the frame? So much discussion about this early in this thread. did you stick with the 4 corner springs or go in another direction?
 

andy_b

Well-known member
Hey, how did you end up mounting your flatbed to the frame? So much discussion about this early in this thread. did you stick with the 4 corner springs or go in another direction?
See post #3. Since then, I've added a carbon composite filler (eg - wood) to the voids between the frame and flatbed at the suggestion of fellow Expo'ers. Approx 23,000 miles with this setup; 13,000 with the camper installed. A lack of failure is not a sign of success, but it is a start.
 

simple

Adventurer
See post #3. Since then, I've added a carbon composite filler (eg - wood) to the voids between the frame and flatbed at the suggestion of fellow Expo'ers. Approx 23,000 miles with this setup; 13,000 with the camper installed. A lack of failure is not a sign of success, but it is a start.
With the camper mounted and loaded, when you flex the suspension, what are you seeing for movement at the spring mounts? Gaps between your filler strips and flatbed?
 

andy_b

Well-known member
With the camper mounted and loaded, when you flex the suspension, what are you seeing for movement at the spring mounts? Gaps between your filler strips and flatbed?

Honestly, hardly anything although I haven't paid very close attention nor sought out opportunities. My fabricator no longer has their forklift, either. Sorry.
 

WanderingBison

Active member
Plumbing


For the toilet, I used a Wrappon. For a brief period, Ok 4WD sold only the mechanism itself. This was cheaper and saved me the hassle of buying a Trekker only to disassemble it and build a new housing. They do not seem to offer that anymore.

…l.


First, great build and it’s awesome that you are sharing!

Weird question, but would you have more photos of the Wrappon mechanism?

I’m trying to understand what you bought, and what would have to be removed from a Trekker.

Are the “components” you bought just limited to the mechanism that receives the waste, seal and cut the bag and that you mounted inside a frame, and you provided the seat, etc?

I’m particularly curious to figure out the dimensions of the mechanism, the space need for the mechanism itself and what needs room below it.

I really like how contained everything seems and how you were able to build your own toilet using the Wrappon system.

Thanks in advance!


Sent from my iPad using Tapatalk
 

andy_b

Well-known member
First, great build and it’s awesome that you are sharing!

Weird question, but would you have more photos of the Wrappon mechanism?

I’m trying to understand what you bought, and what would have to be removed from a Trekker.

Are the “components” you bought just limited to the mechanism that receives the waste, seal and cut the bag and that you mounted inside a frame, and you provided the seat, etc?

I’m particularly curious to figure out the dimensions of the mechanism, the space need for the mechanism itself and what needs room below it.

I really like how contained everything seems and how you were able to build your own toilet using the Wrappon system.

Thanks in advance!


Sent from my iPad using Tapatalk
Thanks for the compliment. Maybe because it was the first part I built out of 80/20 but the framework for the Wrappon took a lot more effort than I thought, lol!

I can try to get some pics of the mechanism later and measurements later.

At one time, Ok4WD sold just the part that holds and seals the bags and I built a toilet around it. The don't seem to list it anymore. They sell something similar called the PF-1 which is much cheaper than the Trekker - the main difference seems to be that you have to hold the sealing system closed manually in the PF-1 versus the automated setup in the Trekker. I avoided that system as it leaves too much responsibility in the hands of the end-user.

The mechanism itself needs hardly any space at all - more will be needed to accommodate the human using it. The manufacturer doesn't list minimum clearances or anything. I left the area as open as possible just in case there was an "accident." Likewise, keeping the space clear minimized the chance that the gift bag may be opened prematurely when taking it out.

Overall, it has been great and one of our favorite conveniences of having a camper. For folks who aren't going to be off-grid for months at at time, its convenience may outweigh the cost. It is certainly easier to package than any other system.
 

WanderingBison

Active member
Thanks for the compliment. Maybe because it was the first part I built out of 80/20 but the framework for the Wrappon took a lot more effort than I thought, lol!

I can try to get some pics of the mechanism later and measurements later.

At one time, Ok4WD sold just the part that holds and seals the bags and I built a toilet around it. The don't seem to list it anymore. They sell something similar called the PF-1 which is much cheaper than the Trekker - the main difference seems to be that you have to hold the sealing system closed manually in the PF-1 versus the automated setup in the Trekker. I avoided that system as it leaves too much responsibility in the hands of the end-user.

The mechanism itself needs hardly any space at all - more will be needed to accommodate the human using it. The manufacturer doesn't list minimum clearances or anything. I left the area as open as possible just in case there was an "accident." Likewise, keeping the space clear minimized the chance that the gift bag may be opened prematurely when taking it out.

Overall, it has been great and one of our favorite conveniences of having a camper. For folks who aren't going to be off-grid for months at at time, its convenience may outweigh the cost. It is certainly easier to package than any other system.

"...too much responsibility in the hands of the end-user." :ROFLMAO:

I would really appreciate any extra photos or dimensions.

I would also appreciate it if you had and could share any part number, etc. so I can try to locate that setup. Of course, I could just buy a Trekker if there isn't much difference in price and disassemble it.

I'm trying to see if I can combine the Wrappon mechanism and a Trello urine diverter seat to replace my Nature Heads 🤔 and get the best of both worlds.

Thanks again!
 

Quattro

New member
Electrical

I am surprised that few people here mention the folks at Explorist.Life but they made wiring super simple. They make line drawings for various sized systems complete with super detailed shopping lists. I bought almost everything from either them or Current Connected. Along with Will Prowse’s website and forum, DIY Solar, the electrical system was probably the easiest system to install and get working.

There are 800w of SunPower flexible solar panels on the roof:
View attachment 813101


View attachment 813102
In order to make servicing easier, the panels themselves are mounted on some track. I put small battens (visible as the purple center stripe) underneath the panels to help limit how much flapping they experience in the wind. There is now a length of aluminum angle at the leading edge of the roof to act as a deflector.

Using the drawings from Explorist as a guide, I used Eve cells from Current Connected and Victron components to build a 7300KwH system. TBH, the batteries took a lot more time than expected, mainly because I had to build an enclosure and consider how to hold everything in place. I did the DIY route out of curiosity and to save as much weight as possible. Next time, I would strongly consider using SOK or similar.

View attachment 813108
View attachment 813111
You can see in the pics I’m using an Orion DC-DC charger. Others have mentioned that they get super hot and throttle down their output as a result. This has been our experience as well. I was not aware this was a thing prior to install, otherwise I would have worked harder to add cooling. Anyhow, this isn’t an issue at all in the summer, but in the winter, even in low-latitude places, solar production is pretty limited so the Orion helps. The newer 50a version seems like a good upgrade.

The solar wiring runs through this chase:
View attachment 813110
We use an sPod as our DC distribution - this is so great and makes installs so easy. The major drawback is cost but I’d use it again. The only issue here is that by installing the touch panels so low, they get bumped easily. That is a little annoying.

For lighting, we didn’t want anything in the ceiling (and since it was already built, I couldn’t access the chases in the roof). I used LED strip lights and MiBoxer controllers from Super Bright LEDs. The strips are installed in channels VHB’d to the upper walls. These channels are made for LED strip lighting and come with diffuser lenses to improve the output. I’d recommend looking on Amazon rather than Super Bright for the channel.
View attachment 813112
On

View attachment 813113
Off
Are those 230Ah cells? What’s the capacity of your DIY battery?
 

Forum statistics

Threads
188,006
Messages
2,901,016
Members
229,320
Latest member
SMBRoamer
Top