"TrailTop" modular trailer topper building components

jscherb

Expedition Leader
Anxious to see what you come up with Jeff. I've thought about trying to make a canvas military truck type canopy for a pickup truck. Australians have a wide selection of these, the coolest looking on trayback (flatbed) Land Cruisers.


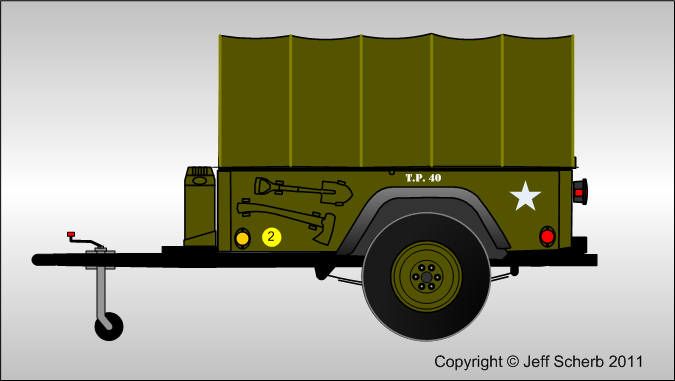
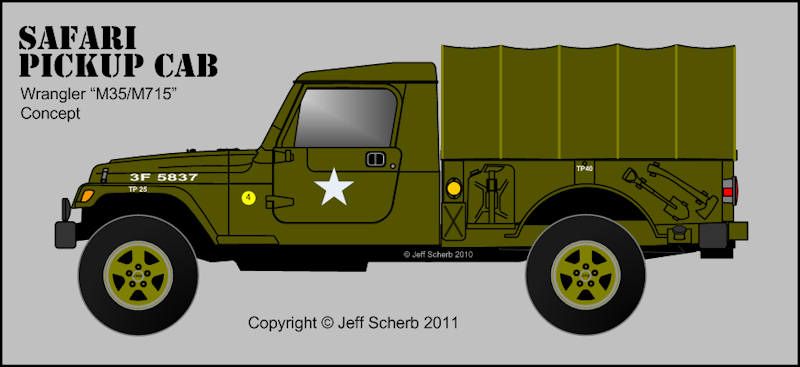
Over the past few years/projects I've done quite a few fabric designs, including military style truck bed covers, some are pictured below. In 2011 when I was working on the prototype for the half-top version of the Safari Cab, I posted this:

M715Safari_zps8872051c.jpg


Also in 2011 when I was working on the prototype for the Dinoot Jeep-tub trailer kit I posted this:

MilitaryDinoot_zpsafd84c73.jpg


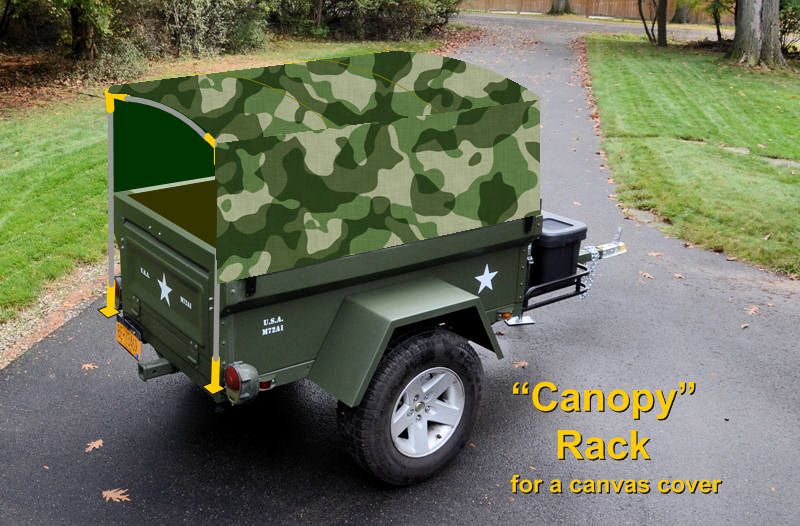
And more recently, I did a writeup on making a cover framework from canopy parts like you'd use for a backyard canopy, here's one of the concept drawings from that writeup:

CanopyRack3_zpsfcb701c6.jpg


Now that I've got the sewing machine, I can finally implement some of of my fabric concepts. My first project will be a simple one for a military-style trailer, I'm working on a concept drawing for it now, will post it soon in my military trailer thread (http://www.expeditionportal.com/for...lass-M416-M100-Military-style-Trailer-Tub-Kit). It's an idea I haven't posted before.
 

jscherb

Expedition Leader
Now that I've got a sewing machine and I'm getting comfortable using it (at least on practice scraps of fabric), I'm working on the details of some TrailTop poptop and clamshell concepts.

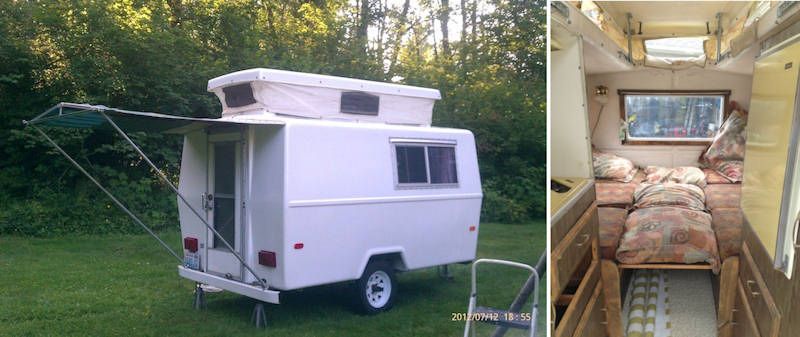
I found some photos of a 1972 "Compact Jr." trailer; it had a pop-up roof:

CompactJR3_zps20ed489a.jpg


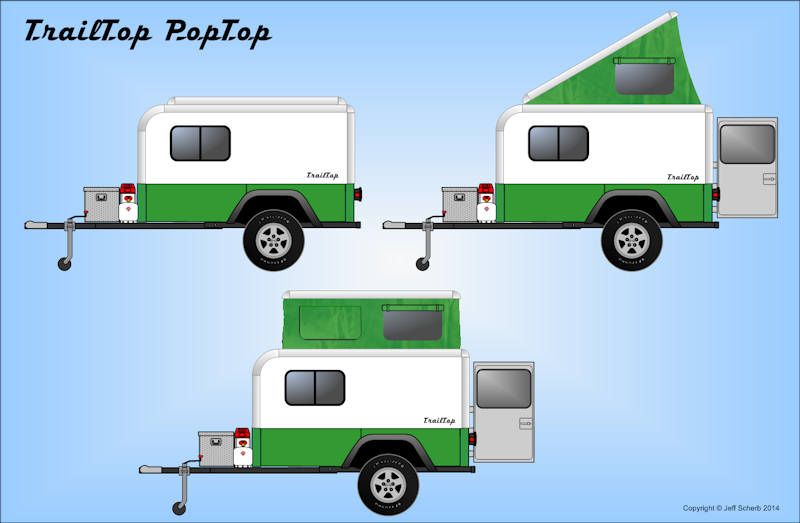
Those photos supplied some of the inspiration for the drawings below. Using TrailTop parts to frame the top of the pop-up, here are some pop-top ideas:

TrailTopPopTop1_zps10d7bd61.jpg


These are based on a Jeep-tub trailer and have a barn-door in the Jeep-tub tailgate opening in the back, but that's only because that's what I've got in the workshop right now. Of course a TrailTop doesn't require a Jeep-tub base, so these concepts apply to pretty much any camper that has a large enough flat roof for a decent sized pop-up (even if the camper isn't based on TrailTop parts).

The vertical pop-up offers 6' of headroom as drawn; the tilt-up offers about 7' at the high end.

The top frame of the popup is made from ordinary TrailTop straight pieces and 90-degree corners. The fill panel would be 1/4" plywood. The popup would be slightly narrower and slightly shorter than the flat part of the top of the main camper shell so it would have a flat surface to seal against when it's closed.

The mechanism for the tilt-up would be pretty simple - hinges at one end and gas struts at the other. For the vertical pop-up, there are several types of mechanism used by the commercial examples of clamshell RTT's like the Maggiolina, so a mechanism like one of those could be used.
 

jscherb

Expedition Leader
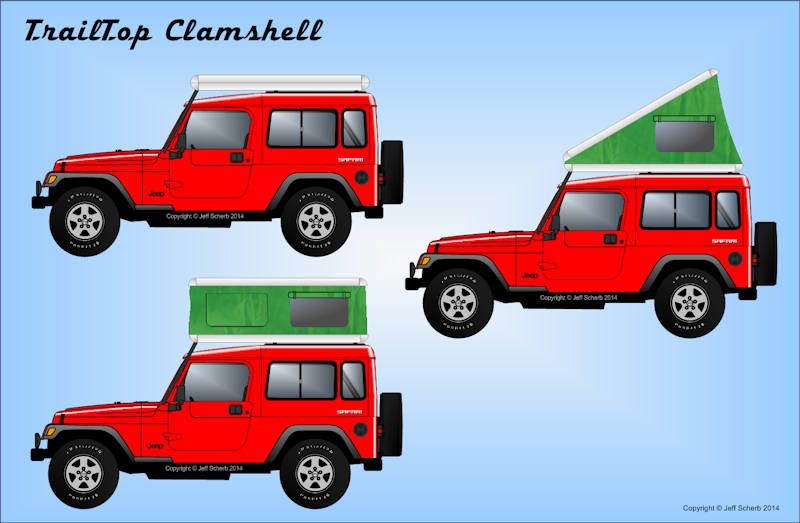
These clamshell ideas are exactly the same size as the pop-ups on the full campers in the previous post. Since the camper concepts I drew are based on a Jeep-tub trailer, they're the same width as the Jeep, and the length as drawn is correct to work on either the camper or the Jeep, which in this case is a 2004-2006 Wrangler Unlimited with one of my Safari Cab hardtops on it.

TrailTopClamshell1_zps7a05e308.jpg


Because the dimensions are the same, the exact same fabric pieces are used in both the poptop camper and the RTT clamshell. The only real difference between them is that the RTT clamshell has a bottom half, which is the same as the top frame, except upside down, and probably thicker plywood and a little more structure since it has to support the weight of two people. Mechanisms could be the same as the camper poptops
 

madZJ

Observer
Your last post of the Unlimited with the Safari Top is close to what I have been dreaming of since I started following your designs. Skip the extra tent on top and incorporate the Clamshell right into the Safari Top itself.
 

jscherb

Expedition Leader
I've posted a few materials/methods for TrailTop side panels earlier in this thread, and here's another variation. This is what I'll probably do on the proof-of-concept build.

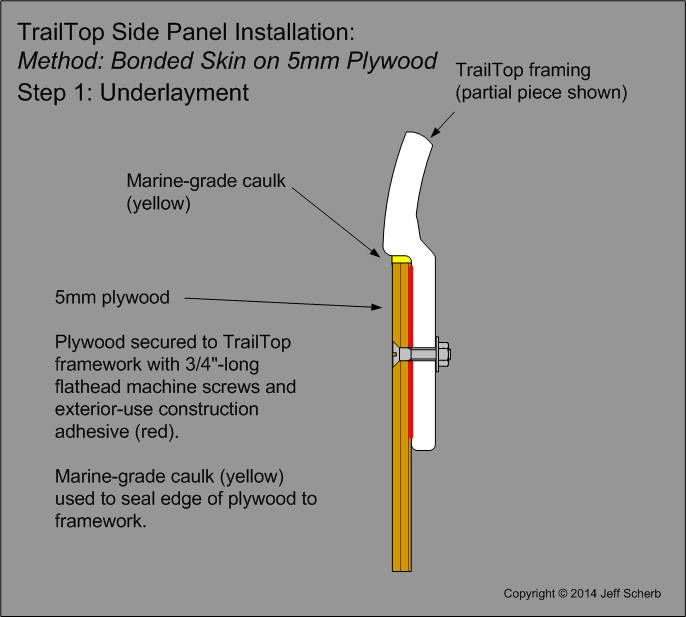
1. I'll start with 5mm underlayment plywood. It's about $15 per 4x8 sheet. I'll attach it to the TrailTop framework with a combination of outdoor-use construction adhesive and flathead machine screws. Once the plywood is in place, I'll seal the joint between the plywood and the TrailTop framework with a marine-grade caulk.

PanelLam1_zps1ea68431.jpg


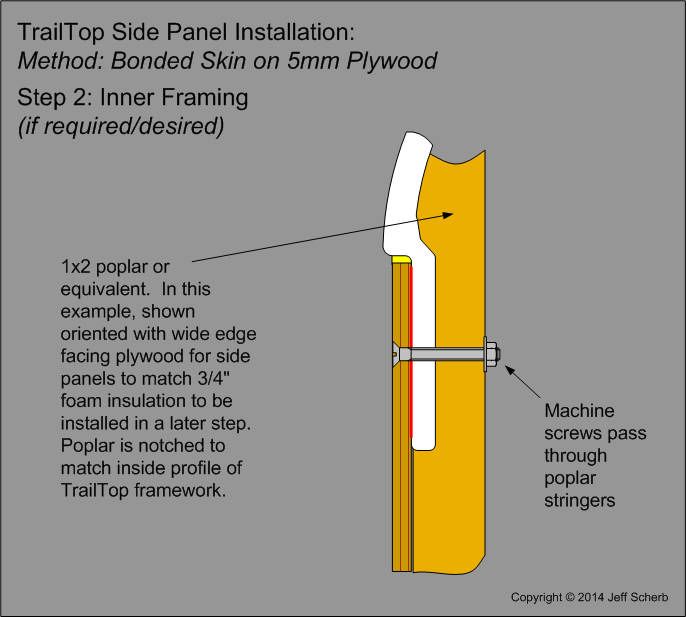
2. I'll probably reinforce the side panels with 1x2 poplar stringers, glued to the back of the plywood and bolted through the framework. The drawing shows the bolt protruding through the stringer on the back side, but I'll probably use shorter bolts that don't come through and drill a hole into which the nut will go, which keeps the bolt/nut below flush on the inside of the stringer. The stringers will be notched at the end near the TrailTop framing so they fit nicely against both the plywood and the framing.

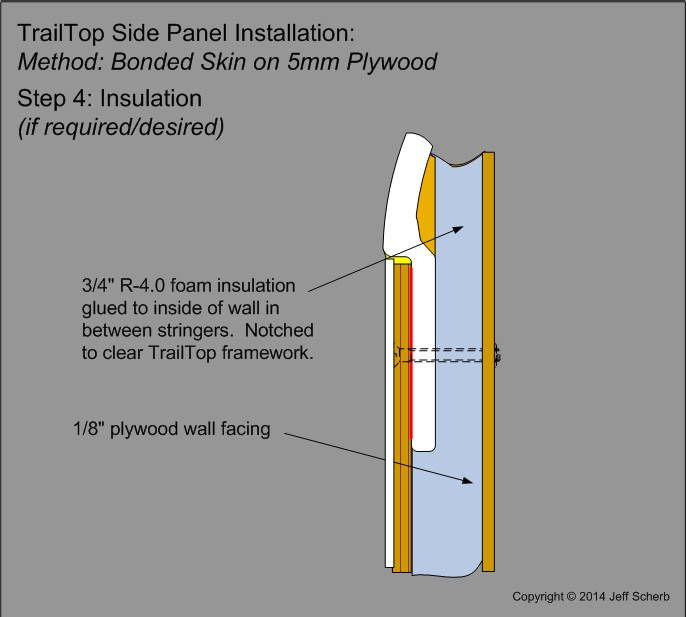
I'll probably set the 1x2 stringers wide-side facing the plywood, which means they'll stick out 3/4" on the inside, which is perfect for insetting 3/4" foam insulation available at a home center.

PanelLam2_zpsb6141aa0.jpg


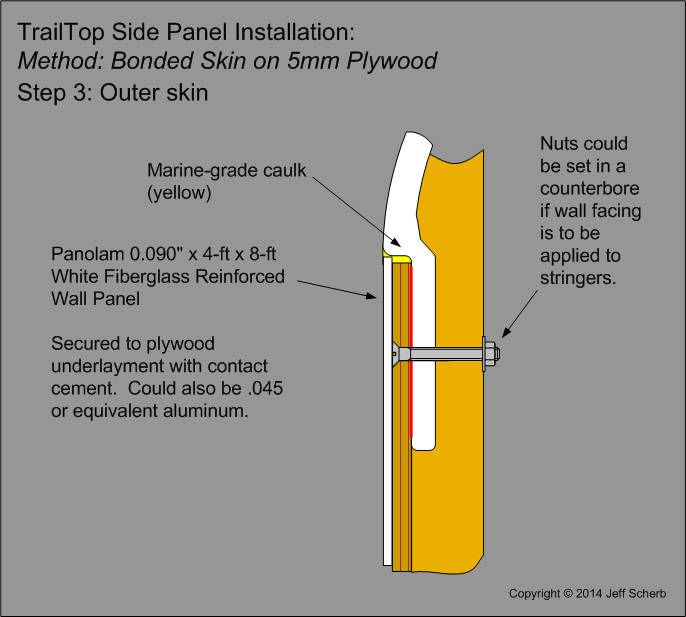
3. I'll laminate 0.090" FRP sheet to the outside of the plywood using contact cement. FRP is also available at most home centers. Once that's in place, I'll caulk the joint between that and the TrailTop framework as well. The double calking will make a more weathertight joint than if a single application had been done.

Laminating the FRP to the plywood after the plywood has been glued/bolted to the TrailTop framework means that the bolt heads in the plywood will be covered by the FRP - there will be no bolts visible on the outside of the finished camper shell.

PanelLam3_zps8493031a.jpg


4. I'll inset 3/4" foam insulation between the stringers, and glue it to the plywood. Once that's in place, a 1/8" plywood skin can be added to the interior to finish it off with a nice appearance.

PanelLam4_zpsbdf6b8e1.jpg


I plan to build the roof so that it will support loads like a cargo basket or a roof-top tent. I'll likely set the 1x2 framing narrow-side towards the plywood, so they provide more strength for loads on the roof. I'll double up two stringers (resulting in 2x2) in two places to support the mounting hole pattern for roof-top tents.

This side panel/roof method will be plenty strong enough for the camper shell to endure off-road abuse, and it will provide a full fiberglass exterior with no visible fasteners.

Photos and more details to come when I get to this stage of the construction.
 

mdmead

Adventurer
You mention using FRP sheets over the plywood, bonded with contact cement. I understand FRP panels expand and contract based on temps. Will the expansion/contraction rates between the materials be a problem and cause them to separate over time?

Overall, this whole concept is just too cool and I'm dreaming of several different projects based on these parts!
 

jscherb

Expedition Leader
You mention using FRP sheets over the plywood, bonded with contact cement. I understand FRP panels expand and contract based on temps. Will the expansion/contraction rates between the materials be a problem and cause them to separate over time?

The thermal expansion of fiberglass is small enough that it won't prevent the successful use of FRP sheets in this application. Expansion rates are dependent on the ratio of 'glass to resin, but I wouldn't expect a variation of more than 0.010" over an 8' length of FRP sheet at different temperatures. Properly bonded to the plywood with contact cement and properly sealed at the edges with a urethane or polyurethane marine-grade caulk, everything will work fine.

Overall, this whole concept is just too cool and I'm dreaming of several different projects based on these parts!

Thanks!
 

jscherb

Expedition Leader
Are these components for sale yet? I love the trail drop with the pop top. I need room to sleep 4.
At the moment this is still one of my hobby design projects. I don't know yet if there would be enough demand for it to make it worthwhile to make it a commercial product.
 

jscherb

Expedition Leader
Now that I've got a heavy-duty sewing machine and I've learned enough about how to use it to do some basic sewing, I'm going to be dangerous... I saw a camper yesterday that had a flip-down front extension and thought "I could sew that!"

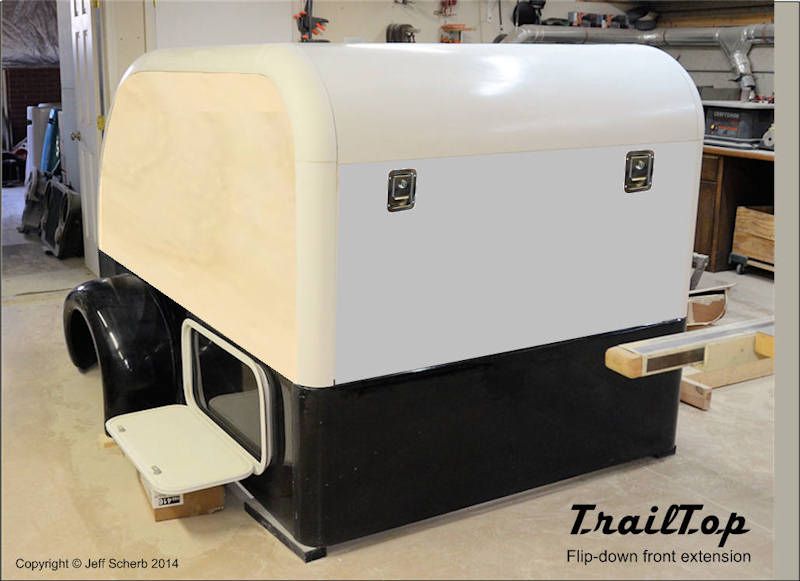
So I had to draw one. The front panel of the proof-of-concept build could be latched and hinged:

FlipDownFront2_zpsb217be10.jpg


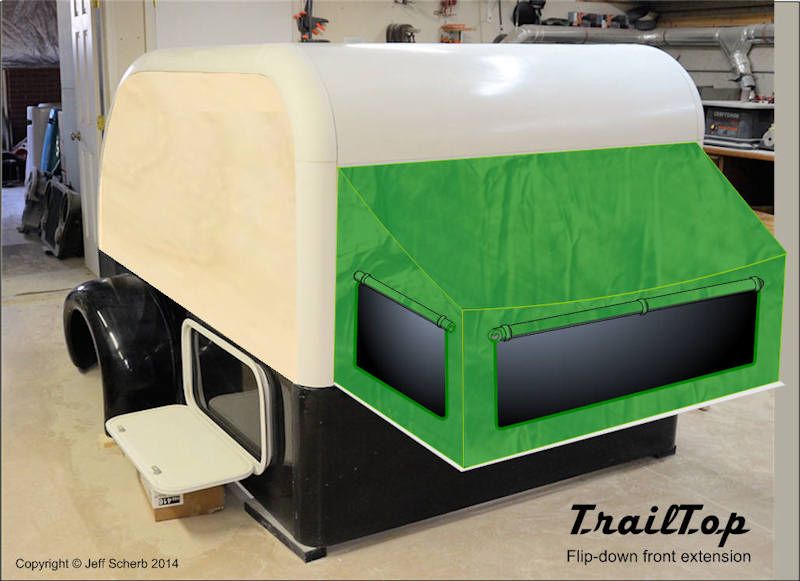
And a folding enclosure made for it:

FlipDownFront1_zpsded68622.jpg


Probably this flip-down doesn't really make sense at this size and height on this size trailer, but if the sleeping platform was the same height it could extend the space for sleeping. Or, it could be a child's bunk, they could sleep sideways (a 4' or less child on this size trailer :)).

If you weren't building on a Jeep tub, the flip-down could go at any height. On the Jeep tub at this height it would clear any stuff you carried on the tongue.
 
Last edited:

Ace Brown

Retired Ol’ Fart
My experience with any openings on the front of a trailer will get water intrusion. Water is being blasted against the front of the trailer at 60-70 mph when traveling. Now a flip down bunk on the side I like.


2008 FJ Cruiser expedition ready and off-road trailer with RTT.
 

skersfan

Supporting Sponsor
Almost every toy hauler you see, has stopped putting windows, opening in the front. Regular RV trailers are moving away it seems, off road with the twisting, banging and all make it very easy for the front to develop leaks.

I have one on my trailer, due to the window tinter cutting the rubber grommet. It took me almost a year to find the problem. I am removing the whole front and doing away with the window. It would normally only leak on the freeway. Nothing worse than a leaking trailer.
 

jscherb

Expedition Leader
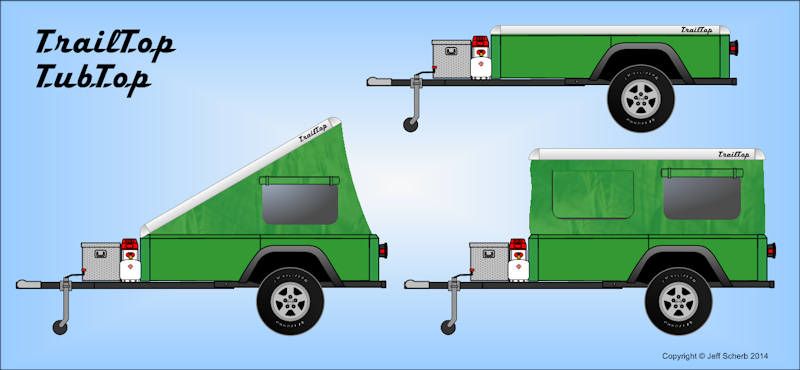
So far I've posted two uses for the modular canvas kits - the clamshell roof-top tent and the pop-top on a TrailTop camper (or any other camper for that matter). Here's another set of ideas, the same canvas could be used with a simple hard cover for a Jeep tub/Dinoot trailer. It should be possible to make the canvas so that it's easily removable so the trailer could also be used with the hard cover for cargo, but without the canvas.
TrailTopTubTop1_zps0f0703e8.jpg
 

jscherb

Expedition Leader
So, have you made anymore progress on the trailtop camper yet?

I've been away for 9 days on an unplanned trip, just got back Monday night. I'm back at work on the project now.

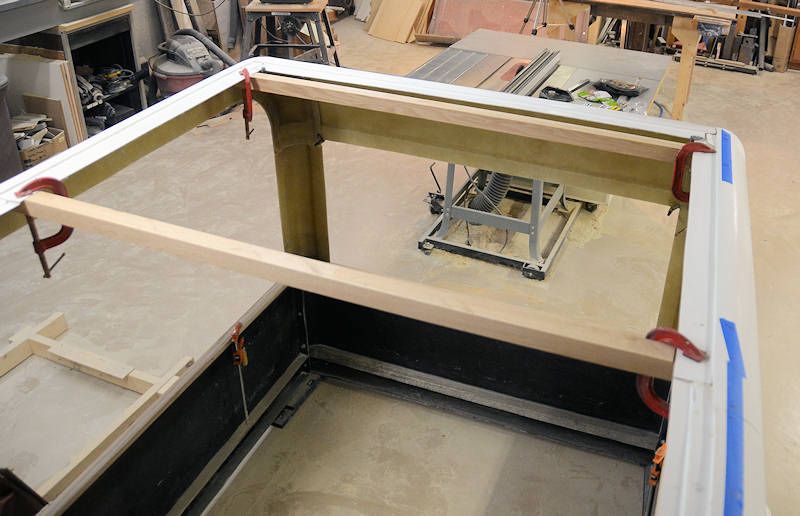
I'm getting ready to assemble the rear hatch now; in preparation for that yesterday I started to put a few ribs in the roof - one of them will be used to mount the hinge for the hatch.

In the photo below are two ribs that will serve as mounting points for a roof top tent or cargo rack basket. They're just clamped in place in this photo, but today I'll get them bolted in place. I've spaced these ribs 32" apart because that's a common distance for the holes for mounting roof top tents. Since this is a proof-of-concept build, one of the things I want to test is the ability to mount a roof top tent on the TrailTop shell. While most people wouldn't likely mount an RTT on a teardrop shape, this one will serve the proof-of-concept test anyway.

RibFit4_zps6674ca3e.jpg


More photos to come all this week as I get the hatch assembled and mounted.
 

Forum statistics

Threads
186,813
Messages
2,889,579
Members
227,160
Latest member
roamingraven
Top