Trestle 2022 Ram 3500 Cab/Chassis Build Thread

Trestle

Active member
@Trestle I'm waiting on the identical bumper from Expo 1. After reviewing your post I'm thinking that I made a mistake getting the factory powdercoat as your light mounting solution looks like it will be super clean. Eager to see what lights you end up with and how it all looks, I'll probably just find a clamp option for the time being.

It's a real bummer reading about the FWC issues.
UglyViking - To be fair, I am not having issues to date with the FWC I purchased used and mounted on this truck. Their engineer could not provide confirmation that it would be OK on a tray similar to what they use, which is Norweld, primarily because Norweld does not make trays for cab/chassis trucks. He just doesn't have the data. There are certainly things that I like and dislike about their product that I have, but no failures to report thus far. It is, for us, a temporary solution as we want to go the hard sided camper direction over time.

I think your best bet on the bumper is to get the clamps that go around the tubes since you already have things powder coated. If you decide to do a grind/weld, PM me and I'll dig up where I found the light tabs. I think it was Ruffstuff specialties, but it may have been another fabrication parts vendor such as Barnes 4wd or other. Depending upon the actual powder that they used, some of the companies provide matching rattle can options specifically for doing touch ups, etc. Expedition One may be able to provide that info to you, as I bet they have a standard spec.
 

UglyViking

Well-known member
Thanks for the info, it's good to hear. As you stated, I think for the time being clamps will be more than enough for me. I wish I thought of what you did prior to my order, but I believe my bumper is already off to coating, so I'll leave with it and if I find that I need to recoat or fix it up in the future that may be a time where I look into the tabs.
 

Darwin

Explorer
So I asked the question. I also asked if it would be a good idea to spring mount the forward two of four total mounting points? Will see what they say. I've had it in my mind that I may want to add springs to the two forward mounts specifically to accommodate flex, but I haven't really flexed anything yet.
If the back end of the frame will twist more than directly behind the cab. I would think you would want to hard mount behind the cab instead, and flex mount at the back.
 

Trestle

Active member
If the back end of the frame will twist more than directly behind the cab. I would think you would want to hard mount behind the cab instead, and flex mount at the back.

Darwin - The rear (bike/gear) rack is attached to both the camper at the camper jacks, and the frame at the tray. It does have some isolation for flex, but not much. If one end has to lift, it has to be the end not attached to the frame via the rear rack.
 

Trestle

Active member
2" Lift Setup

On hand:
  • Thuren 2.25" front springs
  • Thuren HD track bar
  • Thuren rear bump stops
  • Sumo Spring front bump stops (via Thuren)
  • Fox ATS steering damper (via Thuren)
  • Bilstein front shocks (temporary use until custom valved Fox show up)
  • PMF 2" rear spring block (temporary use until custom rear leafs show up)
  • Self fabricated 2" rear bump stop spacers
  • Rear shock tabs with 1.75" offset (to be welded onto existing shock tabs to temporarily use the factory rear shocks until the custom valved Fox show up)
  • 5x AEV Salta wheels

Ordered pending fulfillment:
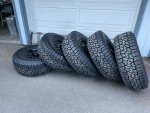
  • Falken now has an E rated 37 12.50 17 option in the Wildpeak AT3W and their new RT. Discount tire special ordered 5x Wildpeak AT3Ws in E rating for me. We live in an area that snows, and the AT3W has the triple peak snowflake rating. I've used this tire with excellent results in the snow and dry track before. We have had 138.5 inches of snow year to date, so it makes sense for us to choose these over the admittedly nicer looking RT from the same manufacturer. Sound, mileage, and wear are all factors as well.
  • Replacement rear leaf springs with a 2" lift, and higher load capacity based upon projected weights. (as it turns out it's the same company Earth Cruiser uses for their 3500 cab/chassis camper builds)
  • Fox 2.5" front and rear shocks with externally adjustable high and low speed compression. Custom valved/tuned for the weight of the vehicle in daily mode with compression all the say open. Then increase high/low speed compression valving as weights change due to swings in payload. Remember this rig carries up to 74 gallons of diesel and 58.5 gallons of water, so large weight swings will occur.
Researching/pending order:
  • AEV pro cal vs. Alpha OBD setup - AEV is turn key for changing tire sizes, but Alpha at maybe $20 more give a lot more options beyond that for diagnostics, and other things normally done at the dealer...leaning toward the Alpha setup for now.

The plan is to install what I have, get the tires/wheels sorted, then add rear springs/rear shocks/front shocks once these items arrive. I may not have to weld the rear shock mount as the rear shocks are in stock, and I don't plan to lift this thing until my return trip from Moab. Springs are 5 weeks out plus delivery/etc. Front shocks could be available in a month or in 10 months.

Plenty of other items to sort out prior to the lift, but this is where we are at as of today.
 

RAM5500 CAMPERTHING

OG Portal Member #183
2" Lift Setup

On hand:
  • Thuren 2.25" front springs
  • Thuren HD track bar
  • Thuren rear bump stops
  • Sumo Spring front bump stops (via Thuren)
  • Fox ATS steering damper (via Thuren)
  • Bilstein front shocks (temporary use until custom valved Fox show up)
  • PMF 2" rear spring block (temporary use until custom rear leafs show up)
  • Self fabricated 2" rear bump stop spacers
  • Rear shock tabs with 1.75" offset (to be welded onto existing shock tabs to temporarily use the factory rear shocks until the custom valved Fox show up)
  • 5x AEV Salta wheels

Ordered pending fulfillment:
  • Falken now has an E rated 37 12.50 17 option in the Wildpeak AT3W and their new RT. Discount tire special ordered 5x Wildpeak AT3Ws in E rating for me. We live in an area that snows, and the AT3W has the triple peak snowflake rating. I've used this tire with excellent results in the snow and dry track before. We have had 138.5 inches of snow year to date, so it makes sense for us to choose these over the admittedly nicer looking RT from the same manufacturer. Sound, mileage, and wear are all factors as well.
  • Replacement rear leaf springs with a 2" lift, and higher load capacity based upon projected weights. (as it turns out it's the same company Earth Cruiser uses for their 3500 cab/chassis camper builds)
  • Fox 2.5" front and rear shocks with externally adjustable high and low speed compression. Custom valved/tuned for the weight of the vehicle in daily mode with compression all the say open. Then increase high/low speed compression valving as weights change due to swings in payload. Remember this rig carries up to 74 gallons of diesel and 58.5 gallons of water, so large weight swings will occur.
Researching/pending order:
  • AEV pro cal vs. Alpha OBD setup - AEV is turn key for changing tire sizes, but Alpha at maybe $20 more give a lot more options beyond that for diagnostics, and other things normally done at the dealer...leaning toward the Alpha setup for now.

The plan is to install what I have, get the tires/wheels sorted, then add rear springs/rear shocks/front shocks once these items arrive. I may not have to weld the rear shock mount as the rear shocks are in stock, and I don't plan to lift this thing until my return trip from Moab. Springs are 5 weeks out plus delivery/etc. Front shocks could be available in a month or in 10 months.

Plenty of other items to sort out prior to the lift, but this is where we are at as of today.

Have you ACTUALLY found someone using the Fox 2.5s in the rear of a 3500 cab and chassis and have photos of them fitting?

Take a REALLY close look at the rear shocks and how they attach to the frame and how the frame is notched for them.

The CC frames are quite a bit different regarding rear shocks than the regular pic ups.

I had mine custom made to clear everything, and it wasnt easy.

I want 3.0s, but they simply wouldnt fit in the frame notch.

Also, take a REAL close look at the top bolt that holds the shock in, it has a shoulder on it, necks down for the rubber stock bushing, and then the diameter increases again for the threads.

The bolts simply wont work for nice aftermarket shocks using the metal sleeves, or there will be too much slop.

Youll need to source new bolts on you get the shocks and get an exact measurement of the ID
 
Last edited:

kmacafee

Adventurer
Rear Bike/Gear Rack

Goals for the rear rack are to:
  • Hold two mountain bikes...they must not stick out above the roof or past the side walls when driving, and be as high up as possible to reduce the likelihood of damage in a rear end collision. I've been rear ended three separate times in previous vehicles (mostly slow speed in city traffic), and one was a hit and run.
  • Hold some maxxtrax.
  • Not obstruct access to the rear drawer, or require moving something out of the way for access.
  • Not obstruct any of the lights or markers.
  • Hold some external portable storage, in this case a trasharoo that we already have.
  • Possibly hold the second of two FWC propane tanks, up high to reduce the likelihood of being hit if rear ended.
  • Have some support so that the weight is partially distributed onto the flatbed, and some isolation to allow minimal flex/some vibration dampening.
  • Least stick out possible when bikes are mounted, yet not require loosening the stem and turning bars.
  • Some provision for a cellular booster antenna.
With that in mind we started with the camper corner jacks as the camper connection point, much like the aluminum rack FWC sells. There is a 1/4" thick piece or rubber between the camper side and the rack side to allow minimal flex and some vibration dampening.

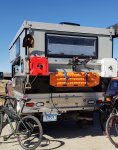
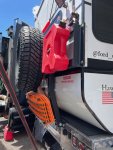
At the bottom I sourced some rubber isolated engine mounts fabricator brackets from Ruff Specialties. The proceeded to hole saw and weld square tubing to them for the lower supports. This bracket is attached to the tray. Some additional tabs from Ruff Specialties fabricator parts were added for the bike tray supports. A few tabs added on for holding maxxtrax, and other assorted functions. This is what it looked like at that point.
View attachment 772085View attachment 772086

Then bike horizontal supports were fabricated, along with measurements for the 1-up bike trays until the two bikes could be as close to the camper as possible, yet avoid banging on the camper as there is some movement in the system.
View attachment 772090

We wanted an easy fold/latch in the stowed and carrying positions, so some handles were ordered from Amazon then added in. To drop the trays down, you pull the top handle out for release, and pull the bottom handle out to allow the trays to settle in the carry position where they lock in place. To stow them you only pull the lower handle, and they will automatically click into the locked/stowed position. In practice it works amazingly well.
View attachment 772091

We added tabs up top to hold the folding antenna for the cell booster, and a single quick fist to hold it when stowed. We added some heavy diagonal round tubing, which adds some lateral bracing, but is really there for a place that one can secure a cable. The tube diameter is too large for most bolt cutters, so they would have to cut the lock or cable to get the bikes. The plan is to cover them so that they are less visible, and thought to be a beater or commuter vs. something more valuable. Time will tell how that plays out, and there is of course insurance if it doesn't.

Painted for now, with maxxtrax added. Four 1/2-13 all thread sections to secure the maxxtrax, one uses the HiLift jack lockable threaded handle to help keep them secure.
View attachment 772089

This bike rides close to the camper when it is just one bike, and if two, this bike is further out. My bars are wider than the wife's, so with two there is a bit more clearance between her bar and the camper.
View attachment 772087

Just in case, we ordered this coozie set from Amazon. One can slipped into one bottle version. Since we both use the wider Ergon grips, the zipper works to hold the two nested coozies on, and it provides padding so the bars don't damage the campers spring lift piston while bouncing down a rough road or hitting a g-out.
View attachment 772088

All in all it works well. It is easy to load, unload, stow the tray, etc. Access to the maxxtrax is easy, nothing blocks the slide out drawer (you do have to duck under the bikes for unlocking/unlatching the drawer though) or any of the lights. I plan to make a propane tank bracket to fit on the upper left side for when we do bigger trips and want the second tank on hand.

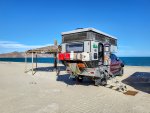
Great thread. I have a Bundutec flatbed on an aluminum tray and had an identical idea for the bikes. However, the builder suggested that having the bikes weight extended that far back put a lot of stress on the jack brackets, especially when they move when driving. Those jack brackets fastened to the camper frame are designed to handle vertical (up/down) stresses and not horizontal stress by extending them away from the camper. I used the angled area to mount a Quickpitch table/Maxtrax mount and my homemade rack can accommodate bikes, fuel and propane containers by simply bolting on different mounts. I can still open the rear window (unless bikes are on it) and access the rear flatbed drawer. To Mount bikes, I had a hitchmount carrier that I cut up and bolt the carrier part to the rack. Tens of thousands of miles later, a lot of it off road and never a problem.

Here are some pics to show the end result.

Cheers

20221117_130246_2.jpg20190208_111450.jpg
 

Trestle

Active member
Have you ACTUALLY found someone using the Fox 2.5s in the rear of a 3500 cab and chassis and have photos of them fitting?

Take a REALLY close look at the rear shocks and how they attach to the frame and how the frame is notched for them.

The CC frames are quite a bit different regarding rear shocks than the regular pic ups.

I had mine custom made to clear everything, and it wasnt easy.

I want 3.0s, but they simply wouldnt fit in the frame notch.

Also, take a REAL close look at the top bolt that holds the shock in, it has a shoulder on it, necks down for the rubber stock bushing, and then the diameter increases again for the threads.

The bolts simply wont work for nice aftermarket shocks using the metal sleeves, or there will be too much slop.

Youll need to source new bolts on you get the shocks and get an exact measurement of the ID

Camperthing - The only rear shocks I have ever seen on the Cab Chassis is the stock ones. No one claims to make something to fit...at all. The AEV lift requires cutting and raising the lower shock mounts, then reusing the rear stock shocks. No thanks.

The Fox 2.5s are for a different platform, with the correct measurements once a 2" rear lift is added and eyelet types. They are not even from the Stallantis family, but from a GM fitment. If I have to cut/weld bolts/lower shock mounts, that is easy peasy. Not a concern for me. My understanding is that I may have to reinforce some of the shock mounts anyway...on the front mind you...but you get the idea.
 

Trestle

Active member
Great thread. I have a Bundutec flatbed on an aluminum tray and had an identical idea for the bikes. However, the builder suggested that having the bikes weight extended that far back put a lot of stress on the jack brackets, especially when they move when driving. Those jack brackets fastened to the camper frame are designed to handle vertical (up/down) stresses and not horizontal stress by extending them away from the camper. I used the angled area to mount a Quickpitch table/Maxtrax mount and my homemade rack can accommodate bikes, fuel and propane containers by simply bolting on different mounts. I can still open the rear window (unless bikes are on it) and access the rear flatbed drawer. To Mount bikes, I had a hitchmount carrier that I cut up and bolt the carrier part to the rack. Tens of thousands of miles later, a lot of it off road and never a problem.

Here are some pics to show the end result.

Cheers

Kmacafee - Nice setup.

I am not really sure how your setup differs in stress to the rear jack brackets less than mine. Both extend and hand bikes horizontally aft the rear jack brackets, and should stress it in a similar manner. Yours holds the bikes hanging by the top tube, mine by the wheels. My setup has some support going down to the tray to take the weight off of the camper and the jack brackets. This should help relieve some of the torsion, and is intentionally added to do so. I've seen items that four wheel camper would not advise hung off of the rear racks both with and without support tied into the truck frame or frame mounted tray.

Here is a pic of a setup I took from last year's Expo West, where they mounted large wheel/tire (37") via a similar method. It has a similar structure tied into the tray.
ford fwc tire mounted jack setup.jpg

This one is just a tire hanging off the camper jacks on a rack with no under support. I took this in Moab a year or two ago, and think this is way past long term safe for my comfort level.
ram fwc rear rack tire unsupported.jpg

Xoverland using the frame instead of tray as a support combined with the camper jacks for a large wheel/tire.
Screenshot 2023-04-11 at 1.38.01 PM.png

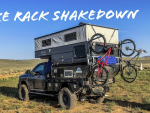
Overland 1.0 bikes cantelevered out using the hang vs. carry method with the same rack's I am using to hold the bikes. No additional support tied into the tray or truck frame.
Screenshot 2023-04-11 at 1.40.07 PM.png

The trax and trasharoo weight next to nothing. Probably the only other item on the back with any significant weight would be the propane tank. It's maybe 15-20 lbs when full. Unlike yours, the rear windows do not open on the FWC. That would be a nice upgrade for sure.
 
Last edited:

Trestle

Active member
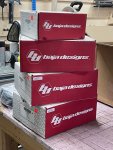
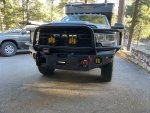
Bumper mounted lighting

Ordered up some lights from Baja Design. They said 4-6 week lead times. These showed up in less than a week with no backorders.

Christmas comes early.
Baja 1.jpg

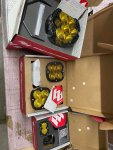
That's a lot of amber going on there.
Baja 2.jpg

I had a set of squadron sports in the combo pattern on our last Sprinter. Plenty of light, so much so that they would drown out both our high and low beams. This time I wanted to try the warmer color spectrum that the Amber provides. It cuts down some of the light output, but let's be honest...there is way more than we'll ever need for the speeds that we travel at...so easier on the old eyes is better. Less reflection in fog and more likely dust with the amber...or so that's how my eyes perceive it anyway.

Installation was slow. I ordered the up fitter wire kit for the LP6. They went in without any issues other than needing to be a contortionist at times for routing wires, etc. The standard wiring kit for the XL Sport and S2 Sport included with the lights had relays/switches/etc. I wired everything up to the up fitter switches, and only the LP6s worked. A little research indicated that they make a simplified wiring setup for the XL and S2 for an up fitter scenario. No need to buy that, just edit the more complicated wiring harnesses they packaged with the lights.

So I cut out a lot of the wiring that took a long time to route, and went directly to the up fitter switches which are rated for more amperage than these lights require. Booyah, everything works as it is supposed to. All in all it could have taken 3 hours, instead it took 5 chasing my tail with the extra wiring/rewiring.

Why did we choose this combo?
  • Great previous experience with BajaDesign's products.
  • We like the aesthetics of their lights...vanity.
  • We wanted the brightness of the LP series, which is one of several reasons we ordered the bumper raw to add our own light tabs.
  • The LP6 Pro puts out more light than the LP8 Sport, in a smaller package. Less reduction in cooling in the grill area above the bumper which may or may not be needed.
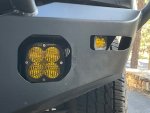
  • XL Sport - we initially wanted to put their new SAE fog lights in the fog pockets, but they looked way too small in the larger hole...more vanity I guess.
  • S2 Sport - we have used ditch lights mounted to the A pillars, and do not like that setup for multiple reasons when actually living with it. The S2s clear the slot, and can be mounted turned out to provide side lighting. In truth, these are probably the most important lights when looking for a camp site after dark. I would have purchased the white lenses here, but the wife wanted amber so there you have it.
XL Sport in wide pattern to serve as fog lights (not on the highway unless NO-ONE is around though).
Baja fog pocket.jpg

S2 Sports aimed sideways to find camp or side roads at night.
Baja turn pocket.jpg

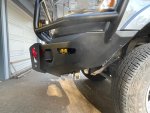
The combined setup.
Baja front.jpg

It is interesting that the LP6 can be wired for full on, or low/high options. Not shown are the zip tie tabs we welded into the backside of the tubes for a nice clean wiring install for the LP6s. Much better than zip ties all the way around each bar, and super sano.

There are six up fitter switches in the cab.
  • 1 now powers the fogs
  • 2 now powers the side lights
  • 3 now powers low beam on the LP6s
  • 4 can be added to 3 to go from low to high, or turned on by itself for high from the start

No night shots yet. Have been busy, but will get a chance to test them this Wednesday night. Curious how we like the amber, and how they perform.
 
Last edited:

Trestle

Active member
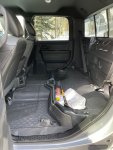
Rear Seat Delete V1

We ordered the Ram without a rear seat, but ended up with one when we took posession of a near identical truck. Earlier post captures the details of all that.

Pulling the seat was as easy as a few bolts, some compressed air tools, and some large impact sockets.
Rear seat delete 1.jpg

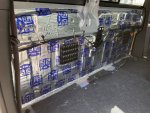
After pulling the carpeted trim, we rolled in some Fatmat sound deadener that we had on hand from another project. This should reduce some of the sound transmission, though it is already a very quiet experience when driving.
Rear Seat Delete  - Fatmat.jpg

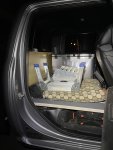
What you don't see here is a steel frame welded up to create both the horizontal and vertical platforms for mounting baltic birch ply onto. 4x very large bolts through the floor (that used to hold the seats down), and another 3x bolts up top where child seat tether anchors used to be. Stout. Then added a lower section using some baltic birch with formica already on it from another project. This is the temporary setup until we know exactly how we want this...hence V1. Then add some non-baltic birch for a backer.

Finally add in some anchors for the second fridge (the other is very small inside the camper), and to lash items to the back such as camp chairs or tables.

Grip tape in gray shown on the entrance so the dog has good purchase when using the stool to jump in/out. He's getting a bit older, so a slip/fall is something we're trying to reduce. Then plop his bed on top for a large dedicated space during travel. Note the stool and camper steps don't ride in there during travel. It's just where I put them at the end of the day while cleaning up the mess in the driveway.
Rear Seat Delete 2.jpg

V2 will likely have some refinements. I'm sure there will be more, but in mind right now we have:
  • Matched finishes instead of white formica and UV birch finish as it is now.
  • A drawer/storage box added in, which will likely elevate the dog platform a bit but provide much needed storage on longer trips.
  • Some hatches to allow access to the smaller existing under seat storage.
  • maybe side panels...we shall see...right now the footwell space is a great place to store multiple sets of shoes.
Off to Moab for a bit of remote work during the day, and play in the evenings/weekends starts mid week. This was a hasty build to get ready for the trip.
 
Last edited:

kmacafee

Adventurer
Kmacafee - Nice setup.

I am not really sure how your setup differs in stress to the rear jack brackets less than mine. Both extend and hand bikes horizontally aft the rear jack brackets, and should stress it in a similar manner. Yours holds the bikes hanging by the top tube, mine by the wheels. My setup has some support going down to the tray to take the weight off of the camper and the jack brackets. This should help relieve some of the torsion, and is intentionally added to do so. I've seen items that four wheel camper would not advise hung off of the rear racks both with and without support tied into the truck frame or frame mounted tray.

Here is a pic of a setup I took from last year's Expo West, where they mounted large wheel/tire (37") via a similar method. It has a similar structure tied into the tray.
View attachment 773238

This one is just a tire hanging off the camper jacks on a rack with no under support. I took this in Moab a year or two ago, and think this is way past long term safe for my comfort level.
View attachment 773239

Xoverland using the frame instead of tray as a support combined with the camper jacks for a large wheel/tire.
View attachment 773240

Overland 1.0 bikes cantelevered out using the hang vs. carry method with the same rack's I am using to hold the bikes. No additional support tied into the tray or truck frame.
View attachment 773241

The trax and trasharoo weight next to nothing. Probably the only other item on the back with any significant weight would be the propane tank. It's maybe 15-20 lbs when full. Unlike yours, the rear windows do not open on the FWC. That would be a nice upgrade for sure.
I’m not an engineer but my bikes sit much closer to the rear of the camper than yours do so I would assume the horizontal stresses would be less. If it works, it works but my main concern would be off road if those bikes move a lot causing stress on the Jack brackets. I do tighten the Jack bracket bolts regularly as they do come loose.

cheers
 

RAM5500 CAMPERTHING

OG Portal Member #183
Camperthing - The only rear shocks I have ever seen on the Cab Chassis is the stock ones. No one claims to make something to fit...at all. The AEV lift requires cutting and raising the lower shock mounts, then reusing the rear stock shocks. No thanks.

The Fox 2.5s are for a different platform, with the correct measurements once a 2" rear lift is added and eyelet types. They are not even from the Stallantis family, but from a GM fitment. If I have to cut/weld bolts/lower shock mounts, that is easy peasy. Not a concern for me. My understanding is that I may have to reinforce some of the shock mounts anyway...on the front mind you...but you get the idea.

Not what i meant, and hard to explain, but look at where the shock goes down through the frame notch
 

Trestle

Active member
I’m not an engineer but my bikes sit much closer to the rear of the camper than yours do so I would assume the horizontal stresses would be less. If it works, it works but my main concern would be off road if those bikes move a lot causing stress on the Jack brackets. I do tighten the Jack bracket bolts regularly as they do come loose.

cheers
OK I see what you are saying. I have in my back pocket one option if I think the stresses are more than wanted. I can redo the two horizontal pieces to allow the trays closer, then turn the bars on the bikes to they can sit closer. I don't want to do that as it is a PITA every time you use the bike, but it's not out of the question.

I do think the vertical supports tied into the frame help a ton.

The bolts use unlock nuts, so they shouldn't back out. The screws mounting the jack corners into the camper, I'm not so sure about. That is where I will spend most of my attention...along with any signs of stress along the side skins of the camper. That is where you can notice deformation fairly early on.

Thanks.
 

Trestle

Active member
Not what i meant, and hard to explain, but look at where the shock goes down through the frame notch

I just took another look to see what you're talking about. There is a fair amount of clearance for the shock body at the notch for a larger diameter shock body. The piggyback portion of the shock will have to be mounted in the lower shock mount direction though. There is no room to have both the shock body and reservoir on the notch end.

If I have to provide more shock body clearance at the notch, and I have to modify the upper bolt due to diameter issues, I can space it another half inch inboard of the frame at the same time I re-weld a new upper shock mount. The lower tab on the axle has plenty of room to be laterally re-welded as well so as not to bind the shock up laterally due to being on different planes. Only moving the top could create that issue. Hopefully we don't need to go there, but it's all solvable with a bit of time on my part.

I'll let you know how it plays out in about three weeks or so. Tires are sitting in the garage, all temporary (and some permanent) lift parts are ready. The rear shocks are being tuned now and due in any day. We're traveling for the rest of this week and next so it will have to wait until we get back.

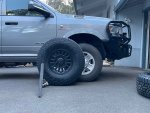
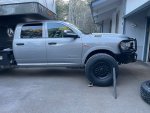
Dropped the wheels off, then picked these up from Discount Tire last night. Parallax makes them look relatively bigger than they are (they are closer to the camera and not on the same plane as the truck), but they are some beefy wagon wheels compared to anything I've used in the past. The first E rated Falken 37s that they have sold. It turns out they bought out Tire Rack, and were able to get them earlier with a special order than they would have been able to if waiting to have them entered into their inventory normally.
Falken 1.jpg
Falken 2.jpg
Falken 3.jpg
 
Last edited:

Forum statistics

Threads
187,103
Messages
2,890,919
Members
227,794
Latest member
coast runner
Top