Unimogadventures - Our build and travel thread

pairospam

Observer
Great job, Iain!

Many of us know how fantastic it feels when you start the engine for the first time, at the first attempt (I hope), after all that work.

I can understand your feelings regarding Ianc's comment, but remember the old wise words:"Never say never again".

Greetings from San Felipe.


Pairoa
 

Iain_U1250

Explorer
That sounds like a great idea, next July will be too soon, need to do another trip around Australia next year but 2017 sounds
good, all going well we should be starting our world trip then, :)


Do you want to meet me and Sarah (daughter) in Mongolia next July? Or somewhere summer 2017?

Charlie
 

Iain_U1250

Explorer
Who knows Pairoa, but there are other cars I think I might have a go a building first, this mog has to last at least 15 years for us :)

Great job, Iain!

Many of us know how fantastic it feels when you start the engine for the first time, at the first attempt (I hope), after all that work.

I can understand your feelings regarding Ianc's comment, but remember the old wise words:"Never say never again".

Greetings from San Felipe.


Pairoa
 

Iain_U1250

Explorer
I had the engine running for about half and hour today, got it up to operating temperature, and it behaved itself, keeping all the oil and water on the inside.
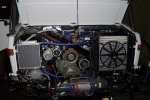
_DSC7036.jpg

I have fitted silcon hoses throughout the cooling system, the only ones that are not are the upper and lower main radiator hoses, the OEM rubber is pretty thick and I have two spares for each hose as well. The silcon hose is rated up to +177 deg C, so should survived in the engine bay for a long time. The ceramic coating I had done works quite well. The EGT gauge was reading 110 deg consistanly but I could touch hold my hand on the manifold, whereas I could just touch the bare exhaust pipe further down. I had the coasting on the exhaust manifold, turbo housing, dump pipe and the exhaust brake, so hopefully that will reduce the heat in the engine bay as well.
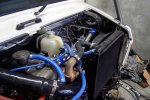
_DSC7032.jpg

There are a lot more pipes in my system than standard, mainly due to the water cooler turbo, the Webasto heater, and the rear heaters/calorifier-hot water system.


My primary alternator (OEM 55A) one packed up after just a few minutes of running. I was just going to rebuild it as it seemed fairly decent, but on taking it apart, the windings had corroded quite badly, probably from standing so long, so I had to get another one, only 12V one available was a 90A Bosch one, so together with the 120A on for the house batteries, I have 210A - it doesn't hurt having lots of spare capacity. I had to cut the "ear" off, do give it clearance from the radiator.
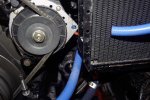
_DSC7030.jpg


I am thinking of fitting one of these - Sterling Regulator to the second alternator to charge up the house batteries to 100% capacity. Alternatively if I do decided to change over to Lithium house batteries, then I will fit one of their Alternator to Battery chargers - Sterling Pro Alt C AB12130 I will only decide which way after a few months on the road

The house batteries will normally not be connected to starting battery, I fitted a Blue Sea Systems Magnetic Latch relay, and can control the connection between the two systems from the dash. I found out that if I had both alternators running in parallel, then only one would actually be charging, the other would be "lazy" just idling along due to the way the regulators on each alternator work. The one with the slightly higher voltage would do all the work. This way I can get both alternators to work, and still be able to connect the house to the starting battery together if necessary.

_DSC7037.jpg


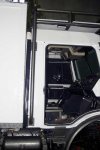
This is the big experiment - the big bag attached to the back of the cab is full of sound insulation. It is attached with quite a few strips of velcro, just in case I ever need to remove it. It's job is to prevent the noise from the gearbox from coming up into the cab through the rather large crawl through we have.
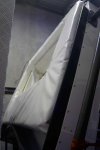
_DSC7007.jpg

When the cab is down, it fills the gap between the camper and the cab completely, with only a bit of pressure. I can still move the cab relative to the camper by hand, but it is not as wobbly as before. I'm hoping it will stay in place. The heavy mudguard rubber is there to protect the bag which is made from 1mm reinforced truck side sail material.
_DSC7039.jpg

We will see if it works on the road, hopefully in the very near future :)
 

Vegard_S

Adventurer
Great reading and impressive work as usual! This thread has come to be a quite big inspiration resource for the buildt I am about to tackle my self:)

One question though; Do you have some pictures from the process of extending/lifting the roof in the cabin? I am curious about how you made the cut out in the old roof/ what parts you kept/replaced of the origional roof to keep the structional stiffnes/rigidness to the cabin. I'm asking because I am planing a simmilar (but not identical extension:)) to my own camperbuild.
At the moment am considering if I should cut away all of the existing roof and make the extension so rigid that it will stop the rest of the cabin body from flexing. Or if I should keep as much as possible of the double plate/beam construction of the original roof, so that the stiffness of the cabin is maintaned, and rather make the extension to the roof as lightweight as possible without structural strength to hold the body in shape.

My goal is that i in the end will have a roof extension similar to this one from Unicat, with height enough to stand upright and room enough for a overhead dashbord above the windshield):

https://www.google.no/search?q=Bruc...38Dwpy&biw=1366&bih=667#imgrc=bd2vunBEYSrSCM:

BTW Ian: Best of luck with the final touch up's; I'm looking forward to seeing pictures of your truck in the Australian outback!:sombrero:
 

Iain_U1250

Explorer
The only thing I cut away was where the original "sunroof" was, I kept the surrounding frame - I would not be replacing that unless you have a lot of fabrication experience, it is a pretty complicated double skin affair . I replaced the bit of reinforcing that went across the roof with the two cross members which are in the overhead console.

More details here: http://unimog-adventure.blogspot.com.au/2009_08_01_archive.html towards the bottom of the page
 
Last edited:

Vegard_S

Adventurer
Great reading and impressive work as usual! This thread has come to be a quite big inspiration resource for the buildt I am about to tackle my self:)

One question though; Do you have some pictures from the process of extending/lifting the roof in the cabin? I am curious about how you made the cut out in the old roof/ what parts you kept/replaced of the origional roof to keep the structional stiffnes/rigidness to the cabin. I'm asking because I am planing a simmilar (but not identical extension:)) to my own camperbuild.
At the moment am considering if I should cut away all of the existing roof and make the extension so rigid that it will stop the rest of the cabin body from flexing. Or if I should keep as much as possible of the double plate/beam construction of the original roof, so that the stiffness of the cabin is maintaned, and rather make the extension to the roof as lightweight as possible without structural strength to hold the body in shape.

My goal is that i in the end will have a roof extension similar to this one from Unicat, with height enough to stand upright and room enough for a overhead dashbord above the windshield):

https://www.google.no/search?q=Bruc...38Dwpy&biw=1366&bih=667#imgrc=bd2vunBEYSrSCM:

BTW Ian: Best of luck with the final touch up's; I'm looking forward to seeing pictures of your truck in the Australian outback!:sombrero:

Great info Ian, thanx! I agree withyou about not cutting away the surrounding frame, think I'll makeacutout simmilar to what you did and then attach my extension by welding and bolting it to the remaining parts of the roof. I have made some consept drawings of how I am planning to do it. I'll try to update my build thread in the very near future with more information and pictures.
 

Iain_U1250

Explorer
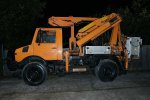
In July 2009, a big orange "thing" arrived at my house, and ex-Railcorp Unimog U1250 complete with crane, cherry picker and rail gear. It was used to repair the overhead lines down in Sydney.

Unimog---Day-one----5-2.jpg

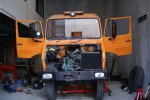
We found an industrial unit and after selling the crane ad cherry picker, we moved it into the shed parked my in the shed.


Unimog-front-2.jpg

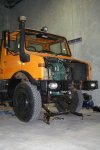
Since then it has been trapped inside.

PICT1418.jpg


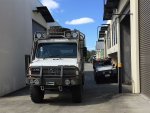
Today I took took out the shed.


vlcsnap-2015-10-31-15h29m24s733.jpg


IMG_0351.jpg

It certainly goes well :)


Last edited:

Forum statistics

Threads
188,180
Messages
2,903,463
Members
229,665
Latest member
SANelson
Top