where_the_heffalump_roams 917 AF

Joe917

Explorer
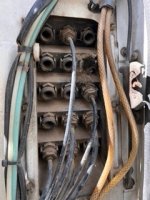
the small red cable goes through the fuse holder top of picture then on to the Sterling B to B charger
The only Camper connection to the truck electrical system is the connection to the B2B.
Solar,generator, house loads etc. all go through the house batteries. Even the 12v power supplies and the radio in the cab are supplies from the house batteries (probably the spot lights too)
 
I checked the two kill switches. The top one is empty. It looks like the bottom one is being used for grounding only and not a kill switch.

I pulled the smaller, B2B cable for good measure and ran the same test. No change in draw. There are some inline fuses in the dash, but I think they are all 12v and ran to the house batteries. But I'm going to pull the dash covers and have a look to be sure.The other thing is the 24v cab a/c compressor, that is tied to a toggle switch. I'm not sure if uses a circuit that goes through the OEM fuse box.

I did drive the truck today in hopes of getting a gas cap. I thought I might have a lead over at a Volvo Truck parts dealer, but that didn't pan out. Called around a bit more and got nothing but dead ends. I ended up going to Lowes... Not my proudest moment.
IMG_8389.jpeg
Hoping that gas cap from the UK arrives soon and actually fits.
 
Last edited:

Joe917

Explorer
I checked the two kill switches. The top one is empty. It looks like the bottom one is being used for grounding only and not a kill switch.

I pulled the smaller, B2B cable for good measure and ran the same test. No change in draw. There are some inline fuses in the dash, but I think they are all 12v and ran to the house batteries. But I'm going to pull the dash covers and have a look to be sure.The other thing is the 24v cab a/c compressor, that is tied to a toggle switch. I'm not sure if uses a circuit that goes through the OEM fuse box.

I did drive the truck today in hopes of getting a gas cap. I thought I might have a lead over at a Volvo Truck parts dealer, but that didn't pan out. Called around a bit more and got nothing but dead ends. I ended up going to Lowes... Not my proudest moment.
View attachment 810355
Hoping that gas cap from the UK arrives soon and actually fits.
It's a good thing you have a 2000km range!
 
So I had a learning moment today....
We checked the lower kill switch... It kills the power to truck circuit. This is a HUGE relief for me and buys me some time to try to track this parasitic draw. I didn't think a kill switch would be tied grounds versus positives. But it works!
Thanks a million Joe!
 
Last edited:
I also want to start gathering parts for other repairs. The parking brake does not engage until enough air is dumped from the system. The parking brake lever/valve was previously replaced and made no difference. It looks like this "manifold" was previously sealed at one point and air escapes from here when the parking brake lever is activated. I'm wondering if this is a potential source of problem? I'm not sure what that part is called, so I don't know how to search for a replacement. Ideally, I'd like to have everything on hand for when I have my air lines repaired that were damaged when my engine cradle gave.

image002.jpeg
 

joeblack5

Active member
It looks like that amp meter is hooked up backwards and the reading is negative, so actually that current is going into the battery, I assume you see your solar current charging your battery.

If you left your fan on and did not have a lot of solar charging your batteries would be dead in a couple of days.

Batteries in series like that have to be matched or flooded. Overcharging flooded batteries does cause gassing but it is required to equalize the cells and be sure that all are charges the same amount.. AGM and gells cannot do that quick. So when they become unbalanced for whatever reason you need a much longer time to equalize them.

Looks to me that you need to invest in some tools and some knowledge to keep custom vehicles like this on the road. Imagine this happening in the middle of nowhere.

You got to get or re- engineer the diagram schematics of the fuse box so that you know what is unfused and what each fuse actually does.. that in itself could easily be a 20h time commitment.
Then with your meter on amp as you have in the picture you can take each fuse out and see what the current in that circuit is.

You should be able to see some draw from your electric clock and maybe some back electronics from fridge , webasto and radio memories and what have not.

But really you have to invest the time to know this truck , any truck. Those main shutoffs are there for a reason.
You can risk leaving them on if you what is going on.

Good luck ,
Johan
 

Joe917

Explorer
The truck circuits are truck only. No webasto, radio,fridge electric clock🤣🤣🤣🤣🤣
The only draws on the truck batteries should be lights, heater fans, air con, starter, wipers, sensors(4X4 locks)
 

Neil

Observer
My 1017 has a huge cable operated solenoid cut off . Its a Mercedes original part. It is about the size of a shoe box.

All positive and all negative cables go through it and both are shut off.

My chassis isn't ground.

However, one small circuit remains live and this is the clock on the tacho.

Over time this will drain my batteries slowly.

Neil
 
My understanding, through some guidance of electricians is that I was basically reading the currents. The meter hooked up in the picture basically bridged the grounding point and measured current going through the system. So how the leads were used did not matter. Someone please correct me if I'm wrong here.

The OEM fuse box is labeled (not shown the pics). Each fuse was pulled one by one while the voltmeter was hooked up in the same way and monitored for changes. The batteries were purchased on the same morning and are identical.
The dash is pretty basic, there is no clock. As far as I know, no fan was left on and nothing should have been drawing a current. However I'm still going through the system and performing multiple re-checks.
 
Last edited:

Joe917

Explorer
The tachometer is the commercial Tack that keeps track of driver hours. There may be a clock involved but I doubt it has any significant draw.
 

joeblack5

Active member
My understanding, through some guidance of electricians is that I was basically reading the currents. The meter hooked up in the picture basically bridged the grounding point and measured current going through the system. So how the leads were used did not matter. Someone please correct me if I'm wrong here.

The OEM fuse box is labeled (not shown the pics). Each fuse was pulled one by one while the voltmeter was hooked up in the same way and monitored for changes. The batteries were purchased on the same morning and are identical.
The dash is pretty basic, there is no clock. As far as I know, no fan was left on and nothing should have been drawing a current. However I'm still going through the system and performing multiple re-checks.
You hooked it up ok but you have to realize that current can flow on two directions, Into the battery, ( charging) and out of the battery( discharging).

The mines sign in front of your display tells that. But if you hook up the meter backwards then the sign reverses.

You are doing ok with measuring in series with the battery ( current) . If the flow thru the meter goes from + (red)to (black) - then there will be no minus sign on the display.

Anyhow, good luck.
Johan
 
The past month as been full of midl up and downs and adaptive changes.
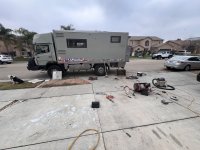
Big thanks to Nate for letting me post up outside his house where he spent 2 days helping me try to sort of the generator issues. We started off with a volt meter. But somehow ended with reciprocating saws and cuts off wheels.
IMG_8531.jpeg
There was significant corrosion, rust, nesting, and all kinds of build up in the generator box. It took some work just to be able to get it out and access the wiring. The generator was later dropped of at a small engine shop where they did some maintain and repairs. There frame the holds up is rusted will need to be replaced by a fabricator. After leaving nate's house, I was driving in heavy rains and 10 minutes from a friend's house in NorCal. And the passenger window stopped working. The next day I tracked it down to a failed relay that was replaced. I'm still trying to track down the parasitic draw from the 24v side of things. It seems to be intermittent at times, which is frustrating.
Later, I met up in Tahoe with a buddy for some winter shredding. That was also met with challenges from weekend crowds, early season like coverage with a lot of terrain exposure. I must have been tempting fate as we disced helmet use. Took a digger into a rock and suffered a small scalp laceration. Got off the mountain, cleaned it, numbed it up, threw in the very minimal amount of sutures due to my impatience, and not being able to see the wound without an odd angles from mirrors. But I was back on the mountain within an hour and riding again (with a helmet)... Tobi also visited Tahoe and we were able to hit some breweries.
IMG_8576.jpegImage.jpegImage 4.jpeg

Afterwards, another week was spent in a rural ER covering some shifts before we made our way back to the PNW to chase to the snow storms.
IMG_8699.jpegIMG_8700.jpegIMG_8713.jpeg
But, after arriving and getting settled in at Steven's Pass. The Webasto heater failed again... So late at night, we drove over to Seattle in fear that the engine wouldn't start in freezing temps. We parked outside of Sure Marine Service and met the guys in the shop the following morning. Talk about feeling like a kid in a candy shop! They stock a lot of really cool ********! After talking to one of the techs, he had me pull the unit so we could bench test it. A few minutes later, he had found the combustion chamber was ******** and the glow plug wasn't working at spec. This is a great example of how it's often cheaper to buy it right the first time. This was a used/rebuilt unit I bought off of eBay for about $300. Walked in the shop just before 9 AM, had a repair, and reinstalled it by 11 AM. That was great service! We returned to Steven's pass, but unfortunately, at around midnight the heater would not kick on at all. Tried doing a few resets and couldn't get it to start. So we drove back to Seattle. The following morning, I checked voltage and the unit was getting 12.9-13.2 volts. Reset it again and it fired up.... It could be a mother board issue, but that felt like a voltage issue. We will see where it goes as I'm currently trying to do a PNW loop for snowboarding for the next month or so.

While at the shop, I these units also caught my eye: https://www.suremarineservice.com/Heat/Fan-Heaters/
Anyone have experience with these? My habitat uses 2 radiators heat the leaving space. There is an additional, small radiator that heats and side hatch that stores some tools and spares. I'm thinking the plumbing there could be utilized for a unit like that and the blown air routed to the inside of the habitat. That would utilize a current system that doesn't provide heat and help with recovery when the temps drop.
 
Last edited:

Forum statistics

Threads
188,323
Messages
2,905,426
Members
229,959
Latest member
bdpkauai
Top