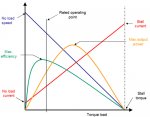
For those of us that are more visual, I find this graph basically summarizes what I'm illustrating at a high level:

The x-axis is torque, which is linear to a winch's line pull. It starts at freewheel, and ends at stall. For safety, most manufacturers rate their max pull well before actual motor stall.
The two curves I'm focusing on is power (orange), and efficiency (green).
Unless you're hypermiling a winch, we probably don't want be at peak efficiency, as it'll be too slow. Throughout my study, I'm trying to pinpoint the max power of each Warn winch model, so we can do the most amount of work, and still be decent on power usage.
What I'm trying to avoid is the right half of the scale, where the line pull numbers look impressive, but current (power consumption) goes through the roof and you're not doing any useful work. This is the ComeUp Blazer at 8000 lbs, where it's more like a space heater than winch.
Every winch behaves differently. The Blazer, due to tall gearing, appears to put out max power at 2000 lbs line pull. The 8274, running the 4.6hp Bosch, puts out max power at 4000 lbs line pull. The 9.5XP, with a monster 6hp Bosch, puts out max power at 8000 lbs.
If you want the most speedy recovery, then aim for those spots by using combinations of snatch blocks. If you need to conserve power, then aim a little lower, as we know max efficiency occurs. AGAIN, WHEN CONDITIONS ALLOW. Don't do this if it's unsafe, reach is too long, you're too tired, you're in a hurry, you got an 8000amp alternator, etc...


