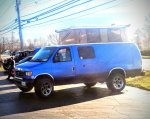
YOLANDA...My Turbine Princess build 03 7.3 E350 pop top 4x4

wanderer-rrorc

Explorer
Do you have more details on the leaf pack change? I have been thinking about doing the same thing for a while but have not gotten around to looking into it.
Easy to do.. I got a set of junkyard f350 leafs and cut the eyes off it..pulled my old pack apart and slapped these in.

I didn't unbolt the 350 pack I just took the grinder and rounded the edges off the hex bolt untill it would fit inside the leaf pin hole.

4 in total lift from where it was.

Sent from my VS987 using Tapatalk
 

wanderer-rrorc

Explorer
First pic since she got lifted wrapped and DUBS..i love Yolanda

Done quite a bit since my last update I just put two new batteries in it.

Added a Rockwood 10 inch powered sub for the Boom.

Trimmed my door side front fenders so they no longer rub with the 33 inch dubs.

Added some more patches today from mil-spec Monkey. Com.

The next couple days are going to be upgrading my refrigerator 12 volt socket plug that is partially melted.

Upgrading the previous LED dash lights to JDM LED dash lights the other ones didn't make it eight months before they all burned out.

Also my original start battery is going to get added to the house battery and increase my capacity from 110 to 200 amp hours

506696506697506698506699
8dd692b36fca23691ca97e0db9720e5e.jpg
c5c178075b04b5d61b21daab6919ae70.jpg
075a321678cd1fae1699f82ad00361dc.jpg
dcb2d2b1406c4ab98139efea20e875c2.jpg
50c00cd7cefae34973de9c233a4eaea0.jpg
 
Last edited:

wanderer-rrorc

Explorer
Dude, those are some funny stickers and patches!
Oh, the Yolanda's' looking good.
The only sticker on the outside is the "tip of the spork" one and 3 transformer logos..

Someone asked for interior pics so I'm gonna do a walk thru today!!

Got a lot of fun things from trips to share!!

Sent from my VS987 using Tapatalk
 

wanderer-rrorc

Explorer
I had a member on a page ask for some interior photos of Yolanda. All 4 captains chair a spin and the middles not only lay flat but flip down into tables. The driver side bench is my toolbox and battery box. Passenger side is a double box shell with access hatches thru both to get the bedding and hammocks out. The top slides over to fill in the isle. Then the camp mattresses lay long ways over top of the refrigerator and my other camping pelican cases to make a California Queen bed without having to unpack anything.

Camp tables/potty-shower shelter, spare awning poles and axe are tucked behind the fridge. Fold down tables in both doors..skylight for star gazing (it also comes out once you open it)
63b13237f8ae9eee141fdca725c032fc.jpg
0a5897f4ee24ff3a582e392e0081c5b4.jpg
91cf85384dea9b59a1c858f13fa9715b.jpg
c93d800633c3968791d324a2ad78eeab.jpg
c3969cf19bd86cbce304da3945f9b97a.jpg
1b899f2811f4dbfd716cb0794425ded0.jpg
993c46adfcb6f77f449999e2bc0c1901.jpg
bc5719099a028cbff519976a86a95798.jpg
32ac39df800e9ab64a22f441df1365d2.jpg


Sent from my VS987 using Tapatalk
 

wanderer-rrorc

Explorer
I forgot to mention every seat has its own dual 2.1 amp USB charging port..so 12 devices can be plugged it at once.

Sent from my VS987 using Tapatalk
 

wanderer-rrorc

Explorer
Spent the weekend camping at Mohican state park here in Ohio..

Somehow in the year since I got the pop top installed the kids never went camping in the van!!! How did that happen?????

All 4 of us inside on a perfect 50* night slept PERFECT!!

Finnaly got some photos with the new wheels/wrap and the top popped and awning deployed..the cross country marathon folks gave me plenty of Nice Van!! comments and asked if they could swing by for lunch!

16b11e7afbe1d61e3524628c3ebe87f9.jpg
229b5649427c46742b4723953bfa264f.jpg
4780f4bbf6b8ee9eb96f6389bb24c0c3.jpg
b50ec115b7a496b509deb49550232a24.jpg
3575ff2df8239efa7764459cc56f8955.jpg
c22ed7580c97b408980bbab27492536a.jpg
0a6eb533da94bc729ed779e8418dd5a7.jpg


Sent from my VS987 using Tapatalk
 

wanderer-rrorc

Explorer
Been a busy 2 days...the wrap was looking awful..so I peeled it..(it started cracking when the temps dropped this winter). Ordered cobra blue metallic 2 stage gonna shoot just th8e base and then matte sealer over it..same colors when done..doing body work and took 4 hours to peel the vinyl wrap..and 3 hours to get the adhesive off..ended up finding that paint and adhesive stripper worked good but then had to go back over with acetone to clean her all up..dang that's a lot of metal!!

Body work started tonight..rust isn't too bad..not going for show quality..just don't wanna be too scruffy for clients homes.
1e532eb0567c37d1460f4e7d42015231.jpg
72cf7adaa69607932d1de4d6fdc043bc.jpg
6fcd48aa8bf6f0488522b9909e616258.jpg
721bed98dd9c91bcf5e166063c939a55.jpg
2db2df4b41d334422f0972ab4953b750.jpg
4725046bb27f2fc8ece63b66a426a55e.jpg
d3599fb7547f67e5c7111a4761405e7f.jpg
dfb7b5766dd5ef255a413470c879144e.jpg
bc84f3868662a80df0b9333a0c9db912.jpg


Sent from my VS987 using Tapatalk
 
  • Like
Reactions: WVI

wanderer-rrorc

Explorer
Got my $20 power door locks finally installed in the van!! Only had it since November...gotta get 15ft of double wire to get the back door on the setup...didnt come with 400ft of wireing!! Lol

Auto unlocks all the doors when the driver door unlocks. And the remote has a slick little slide cover.

Gonna be weird to have power locks again!!

Pretty easy install..about 2 hours..
9f2aade195e59ae0c93ea71093e6bb3e.jpg
ca15eac3fe7957b256b870409cc29090.jpg


Sent from my VS987 using Tapatalk
 

wanderer-rrorc

Explorer
3 afternoons of prep. 2 early mornings..good weather early and hot later to help cure the paint...shes back together and looks GREAT!! matte finish is exactly what I wanted!! Look how close I got to the wrap color blue!!
dca559c9a343da2c98d1128877a24cc7.jpg
5ad603e9dc7213cd45e46a4be9f693bf.jpg
5adc57516235e3eeb2c1ea067f82be68.jpg
f9b72c539c5314e1e360083f8f0643b5.jpg
e02c5142efe4df856b2db1870f2acf56.jpg
79539f5b1b603ad4ef118c486151a9bb.jpg
3d91d6290a045b9911f5a6725a0c3668.jpg
5d7e78b29b194214df70ded09a4cbf4c.jpg
ba9e61b32e1f63a672d7005ff9fc6246.jpg


Sent from my VS987 using Tapatalk
 

wanderer-rrorc

Explorer
New stickers arrived and I think the metallic silver grey turned out pretty nice!! (I debated on bronze or tan but decided a grey tone fit better)

Today I'm gonna swap out the front sway bar sockets for urethane bushings...yesterdays 2 hour fight resulted in a fail and reinstall of the work stock rubbers..but YouTube showed me a trick!

Also picked up another rack to convert into a flip up style to use when camping as a firewood rack on the front! $20 why not.
75439c41507f9ed092235996ec017adb.jpg
514b6dac03ef425a8118bf8321af4eb3.jpg
366edcffee42dfef50959b4564d931c1.jpg
6333669eb4429038b57e4ccd57dab5d3.jpg
172f39e6a95a8db3ad978ee7386e03e1.jpg
4d25f5193b1912d167502a380d71726f.jpg
b6751b9a93f1639998aa4e6f77ebb7f2.jpg
2fe4e7aa4bab142c14dc2703f6e1da48.jpg


Sent from my VS987 using Tapatalk
 

wanderer-rrorc

Explorer
Whats your trick on the sway bar bushings? Mine are in serious need of replacement!
Ah!!!!!

Listen close grasshopper..

Long bolt and washers...one pretty big washer that won't pull thru the 1 1/2in bushing hole.

Put the bolt in from the back with the thread sticking forward.

Put the bushing over it and then add a smaller washer that will cover the face (3/4in around.)

Then spray the bushing with wd40 and tighten the bolt..it will pull the bushing in..i used my impact.

Then greased the inside hole..and ended up using ratchet straps and a spudbar to push the sway bar into the new bushings.

Hour job start to finish!

Video that gave me the idea.


Sent from my VS987 using Tapatalk
 

Forum statistics

Threads
188,163
Messages
2,902,930
Members
229,582
Latest member
JSKepler
Top