2005 Chevy Colorado Build Up

External GPS antenna

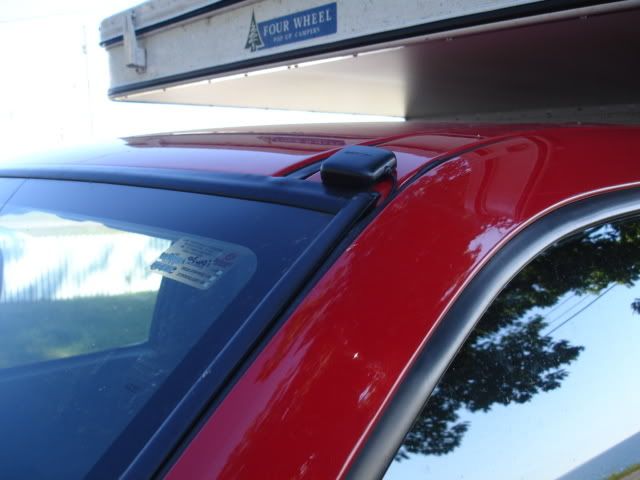
I picked up an external GPS antenna to help get better reception on narrow tree covered roads. In most situations the built in antenna was working just fine but there were those occasions when I would loose the signal. Cloud cover would also contribute to loss of signal.

I put the Antenna in the same spot I have the XM antenna but on the drivers side. I ran the wire behind the dash in the same way I have the power cord set up.

Model GA 25MCX Came with 8 feet of cable
gps001.jpg


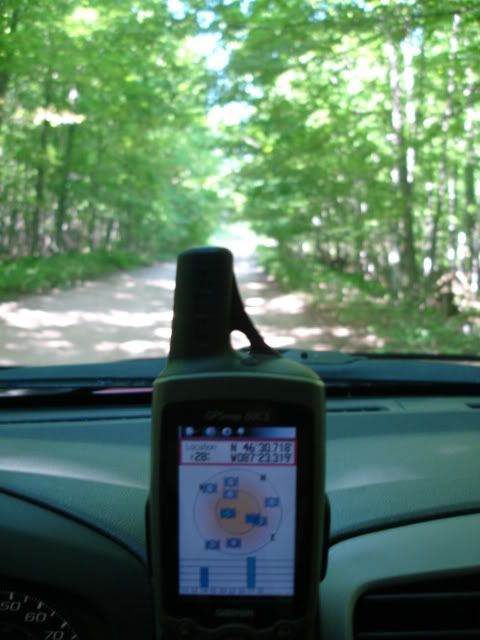
Tree covered road without external antenna plugged in.
gps005.jpg


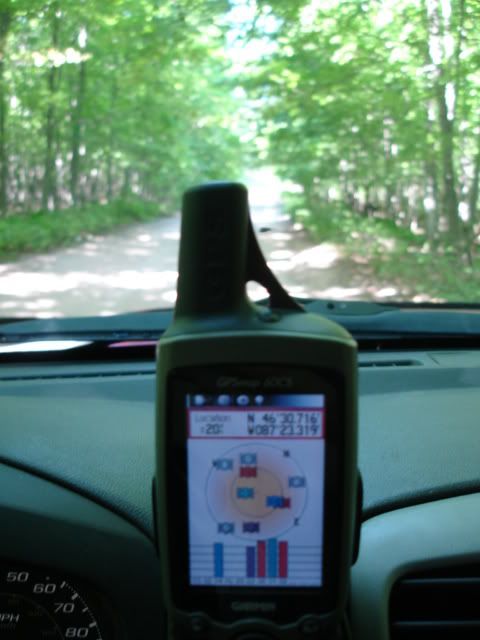
Same place with external antenna plugged in
gps009.jpg
 
Last edited:

ChrisInVT

Adventurer
You've got a bunch of work done to that thing.

I'm going to keep following this, as our trucks share a similar platform.
 

Prybry

Adventurer
So how did the bags fair on the UP trip?

Northern Explorer said:
I decided on the Firestone air bags over the Airlift air bags because I like how the firestone air bags sit centered on the leaf pack (and centered on the axle). The Airlift brand places the airbags a couple of inches behind the center of the leaf pack. My one concern with the Firestone airbag placement is that the jounce stops are completely removed. Hopefully they are tough enough in the event that bottoming out occurs. I’m sure that there are thousands of both style of airbags on the market and my concerns are unwarranted.

Took 5 hours. Yes, I’m the slowest mechanic on earth.

The first thing that needed to be done was to remove the “locating tabs” on the flat side of the Lock-N-Lift spacers. One set (one set = two spacers) of Lock-N-Lift spacers adds 2 inches to the length of the air bag system for vehicles with 2 inches of lift over stock. The tabs that need to be removed are only used if 2 or 3 kits are put together for vehicles with 4 or 6 inches of lift. The instructions say to use a hammer to knock off the tabs but I felt that a small saw would give me a smother finish.

with tabs
Airliftandled010.jpg


tabs removed
Airliftandled008.jpg


Showing the inside surface that gets locked to the inside surface of a second spacer.
Airliftandled006.jpg


I did need to make one run to the hardware store. A new longer bolt was required to attach the air bag to the lower bracket. The bolt that came with the air bag kit wasn’t long enough to fit through the thickness of the Lock-N-Lift spacer and the bolt that came with the Lock-N-Lift spacer didn’t have the right shaped head to be used with the lower bracket of the air bag kit. The closest thing I could find to what I needed is called a plow bolt. 3/8 inch x 1 ¼ inch did the trick.

Left: Bolt that came with air bag kit
Middle: Bolt that came with spacer kit
Right: Plow bolt
Airliftandled011.jpg


Showing how new bolt sits in bottom bracket
Airliftandled014.jpg


Showing how it looked stock. The jounce bumper needs to be removed.
Airliftandled015.jpg


Assembly completed
Airliftandled016.jpg


Now all I needed to do was run the air lines. I positioned the Schrader valves in the location of the license plate bolt holes.
Airliftandled024.jpg


30 psi raised the back end up 1 ½ inches to get it back to the height is was at before the camper was put on. I used my mountain bike shock pump to fill up the air bags. 350 pumps each to get to 30 psi. I will probably use my compressor next time.

The stability has improved significantly. Enough so that I will be able to leave the anti sway bar off.

Thanks to kcowyo for his insight on this project.

I'm looking to fix the rear sag on my Power Wagon using Airlift air bags...
Just wondering how your setup held up on the trails we went on during the UP trip... had I known about this thread before the trip I'd have gotten a better look during the trip.
Ran a search on air bags and your build up came up!

I'm worried about over extending the bags during full droop... the PW has 10.9" of axle travel in the rear. The bags according to AirLift can handle 9.5" of extension, so by adding a 2" spacer (same ones you used) I'm hoping to make it work.

One other question, when you used the spacers did you need longer mounting bolts? I'm assuming you did.

thanks,
 
Prybry said:
I'm looking to fix the rear sag on my Power Wagon using Airlift air bags...
Just wondering how your setup held up on the trails we went on during the UP trip... had I known about this thread before the trip I'd have gotten a better look during the trip.
Ran a search on air bags and your build up came up!

I'm worried about over extending the bags during full droop... the PW has 10.9" of axle travel in the rear. The bags according to AirLift can handle 9.5" of extension, so by adding a 2" spacer (same ones you used) I'm hoping to make it work.

One other question, when you used the spacers did you need longer mounting bolts? I'm assuming you did.

thanks,


My setup worked out great. I’ve been really happy with it. It only takes 30 psi to lift the back end up to where it was before the camper was put on. Without the air bags I noticed some minor porpoising at highway speeds if the bumps in the road were at just the right frequency.

I usually run about 45 psi on the road to keep the feel stiff and then off road I lower the psi to about 30 to allow more compression of the airbags and subsequently more travel in the rear. That’s my theory anyway. Kcowyo runs more pressure off road then he does on road so who knows. Whatever works for you I guess.

I’m not sure how the Airlift setup is on a Power Wagon. I choose the Firestone brand because I like how the airbags sit centered on the leaf spring.

The two-inch spacer should take care of any concerns you have with overextending the bags with your truck.

I did need to buy new bolts (plow bolts in picture) but they aren’t as long as you might think. The way the spacers snap together allows you to put nuts on the inside of the spacer (that will make more sense when you get your kit).

You wouldn’t have been able to see my setup anyway. Taking off the tire is the only way to really see it.
 

Prybry

Adventurer
Air lift looks centered on axle...

Northern Explorer said:
My setup worked out great. I’ve been really happy with it. It only takes 30 psi to lift the back end up to where it was before the camper was put on. Without the air bags I noticed some minor porpoising at highway speeds if the bumps in the road were at just the right frequency.

I usually run about 45 psi on the road to keep the feel stiff and then off road I lower the psi to about 30 to allow more compression of the airbags and subsequently more travel in the rear. That’s my theory anyway. Kcowyo runs more pressure off road then he does on road so who knows. Whatever works for you I guess.

I’m not sure how the Airlift setup is on a Power Wagon. I choose the Firestone brand because I like how the airbags sit centered on the leaf spring.

The two-inch spacer should take care of any concerns you have with overextending the bags with your truck.

I did need to buy new bolts (plow bolts in picture) but they aren’t as long as you might think. The way the spacers snap together allows you to put nuts on the inside of the spacer (that will make more sense when you get your kit).

You wouldn’t have been able to see my setup anyway. Taking off the tire is the only way to really see it.

Based on the instructions I down loaded the bag ends up centered over the axle just like the firestone system. I'm now wondering if it would be better to put a spacer above and below rather than both on one end of the bags? What did the instructions for the spacer say about mounting?

As for axle travel... any idea how much range your setup has? I know the Firestone system says not to lift the truck by the frame to avoid damage to the bags... the Airlift says it's OK to lift the truck that way if the bags are deflated and then only for a short duration... I'm hoping the few seconds my axle is twisted up on the trail will be OK.

One thought I had was running the air line between the bags and using a single line to fill both bags... this would allow the air to move back and forth between the bags when the axel is twisted. Probably wouldn't flow fast enough to let the bags match the trail though. That seems like it would take a much larger air line. Not sure how this would carry the camper... on level road I'm sure it would be fine but it might cause sway on a curve... inducing body roll as the load transfered to the outside. Might be a wild ride.

Maybe an in dash control is a better answer... it would get a workout on the type of trails we were on.
 

opie

Explorer
Prybry said:
Based on the instructions I down loaded the bag ends up centered over the axle just like the firestone system. I'm now wondering if it would be better to put a spacer above and below rather than both on one end of the bags? What did the instructions for the spacer say about mounting?

As for axle travel... any idea how much range your setup has? I know the Firestone system says not to lift the truck by the frame to avoid damage to the bags... the Airlift says it's OK to lift the truck that way if the bags are deflated and then only for a short duration... I'm hoping the few seconds my axle is twisted up on the trail will be OK.

One thought I had was running the air line between the bags and using a single line to fill both bags... this would allow the air to move back and forth between the bags when the axel is twisted. Probably wouldn't flow fast enough to let the bags match the trail though. That seems like it would take a much larger air line. Not sure how this would carry the camper... on level road I'm sure it would be fine but it might cause sway on a curve... inducing body roll as the load transfered to the outside. Might be a wild ride.

Maybe an in dash control is a better answer... it would get a workout on the type of trails we were on.

THought on connecting the bags with 1 line.

Throw a valve in your connecting line. Open it for offroad and close it for onroad. Just need to make sure its open when you are adjusting psi in the bags.
 

Prybry

Adventurer
Interesting thoughts on line between bags...

opie said:
THought on connecting the bags with 1 line.

Throw a valve in your connecting line. Open it for offroad and close it for onroad. Just need to make sure its open when you are adjusting psi in the bags.

Thinking about it is starting to make my head hurt...

If the axle is pressed up on one side by the trail, the opposite (unloaded) bag would see a increase in pressure and thus try to press that side down rather than fall by gravity (droop) so now the extension of the pressurized bag comes into question...

Does a airbag have more extension fully deflated or fully inflated?
My guess is that the low pressure bag will stretch more than the high pressure stiffend one.

This is starting to sound like I'm moving in the opposite direction...

Guess I will put them on as intended and see what happens...
 

opie

Explorer
Prybry said:
Thinking about it is starting to make my head hurt...

If the axle is pressed up on one side by the trail, the opposite (unloaded) bag would see a increase in pressure and thus try to press that side down rather than fall by gravity (droop) so now the extension of the pressurized bag comes into question...

Does a airbag have more extension fully deflated or fully inflated?
My guess is that the low pressure bag will stretch more than the high pressure stiffend one.

This is starting to sound like I'm moving in the opposite direction...

Guess I will put them on as intended and see what happens...

DISCLAIMER! Im by no means an engineer!!

I think you would have to worry about the pressure moving from one to another in such a manner as to cause a problem if you were relying solely on the bags for your suspension. You still have the leaves so I dont think youll see the abrupt, major psi swings you are thinking about.
 
Prybry said:
Based on the instructions I down loaded the bag ends up centered over the axle just like the firestone system. I'm now wondering if it would be better to put a spacer above and below rather than both on one end of the bags? What did the instructions for the spacer say about mounting?

As for axle travel... any idea how much range your setup has? I know the Firestone system says not to lift the truck by the frame to avoid damage to the bags... the Airlift says it's OK to lift the truck that way if the bags are deflated and then only for a short duration... I'm hoping the few seconds my axle is twisted up on the trail will be OK.

One thought I had was running the air line between the bags and using a single line to fill both bags... this would allow the air to move back and forth between the bags when the axel is twisted. Probably wouldn't flow fast enough to let the bags match the trail though. That seems like it would take a much larger air line. Not sure how this would carry the camper... on level road I'm sure it would be fine but it might cause sway on a curve... inducing body roll as the load transfered to the outside. Might be a wild ride.

Maybe an in dash control is a better answer... it would get a workout on the type of trails we were on.

The way the two inch spacers are made, each of the one inch spacer sections needs to be snaped together in order to mount them. I don't think you will be able to mount one on each side.

I don't know how much axle travel I have right now so I can't help you there.

In dash controls would be great. I just went with simplicity (easy installation) on my truck.
 

nmatcek

Adventurer
Great job on your truck. I just joined this forum but have been on coloradofans and 355nation for some time. I also have a Colorado and I was wondering if the company that made your rock sliders is still in business? Would LOVE to find a set like that!
 

opie

Explorer
Great job on your truck. I just joined this forum but have been on coloradofans and 355nation for some time. I also have a Colorado and I was wondering if the company that made your rock sliders is still in business? Would LOVE to find a set like that!

I dont believe they are.
 
New tires....again.

I replaced my BFG AT 265/75 16's with a set of BFG KM2's this summer. The KM2's have worked great and I would highly recommend them. Now that winter is just around the corner I wanted to put my AT's back on. They have been wearing well and still have a lot of life left in them.

I decided to go a slightly different direction. Instead of paying to have my tires remounted every spring and then again every fall I decided to just get a brand new set of BFG AT's and have them mounted on my original Chevy Colorado rims. I decided to go with 33x9.5 on my Chevy 15x6.5 rims. They are slightly taller and this setup weights 12 pounds less per tire. I'm hoping this will help with gas milage.

The old AT's will be saved for my wife's Xterra.

BFGAT33x95onrim004.jpg


Looking a bit naked without the camper or topper.
BFGAT33x95onrim008.jpg


BFGAT33x95onrim011.jpg
 
Last edited:

Forum statistics

Threads
189,683
Messages
2,919,733
Members
232,700
Latest member
bradbarbz
Top