R_Lefebvre
Expedition Leader
Ok, another update... Man, the hours that's into this thing are incredible. 2-3 hours every week night, and most weekends since this thing started. Almost finished my 3rd bottle of Argon, and about 10 lbs of filler rod. :Wow1: I'm starting to see the light at the end of the tunnel.
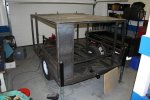
I've got the roof fully welded on, including the load bars that will hold the Maggiolina. I welded a slight slope into the roof so that it doesn't pool anywhere. But, since I was welding mostly along the top surface of the load bars, they warped down badly. I had to use a hydraulic jack inside to stretch them back upwards. The roof is 18Ga, and working with it, I'm glad I didn't use 18Ga anywhere else. It's kinda thin. The 14Ga body will be impervious to any impacts with trees, 18Ga, not so much.

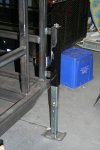
I also welded on my rear levelling jacks. When retracted, the shoe plate ends up just under the bumper. Or, I can completely remove the bottom leg if required.

I've got the roof fully welded on, including the load bars that will hold the Maggiolina. I welded a slight slope into the roof so that it doesn't pool anywhere. But, since I was welding mostly along the top surface of the load bars, they warped down badly. I had to use a hydraulic jack inside to stretch them back upwards. The roof is 18Ga, and working with it, I'm glad I didn't use 18Ga anywhere else. It's kinda thin. The 14Ga body will be impervious to any impacts with trees, 18Ga, not so much.
I also welded on my rear levelling jacks. When retracted, the shoe plate ends up just under the bumper. Or, I can completely remove the bottom leg if required.


")