1993 HiAce Firetruck Build Thread

Fenderfour

Active member
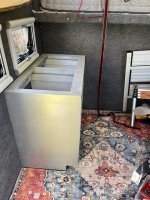
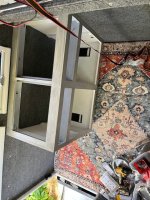
I've been trying to get some work done during the relatively dry Seattle winter we are having. I managed to finish insulating the lower camper with 1.5" XPS foam. I found the best way to cut it is with a sharp snap-blade knife and make a few passes. The insulation saws and even the serrated knife make too much 'chaff'. I wanted to set up a large frame hotwire, but never got around to it.

I found some great garage tiles to use as flooring at Lowes. They are ~.2" thick x 20" square vinyl and are fairly easy to cut. They were at the local Lowes but I can't find them online. I know lots of folks go with Lonseal coins, and I get it, and it's really expensive. These tiles were less per square foot, thicker, and easy to install. The new flooring also filled in the exposed height of the seat tracks I installed to allow for a variable interior. It's nice having a 'real' floor instead of tromping on the painted Coosa or the towels I had down to catch mud.

I also found a solid product for wall covering. Cheap indoor/outdoor rugs. These are particularly well suited to my build since the cabin is 6'x6'. I looked at automotive carpet, speaker box carpet, and few other things like that. Most of them didn't have a bonded back so they could form a bit better. I've used rugs similar to the link above for camping and they are pretty good. Lightweight, durable, and I don't have to buy a huge roll. I got the lower bed area covered in carpet and will get the other walls covered when we have another good weather day. I want to get the carpet behind the window flanges, so they need to come out one more time. The carpet is installed with carpet tape, and the bonded back made that easy. I also have a series of snaps installed on the upper edge to eventualy create insulated curtains for the pop-up, but for now, they will help hold the wall covering up.

I've followed the discussions here and elsewhere on interior covering. Seems counter-productive to put 1/2" or 3/4" T&G wood on the inside of a camper. It takes up volume, is heavy, needs additional finishing, etc... I was interested in some of the coroplast ideas, but i wanted something to cut down on the harsh soundscape a semi-rigid material would create. I could have covered the coroplast with this carpet, but why? Sometimes our ideas of how to build something stem from familiar systems, like our homes. Wood paneling makes sense in a home. Does it make sense in a camper? Putting a rigid sheet of 'something' over the structure is also a holdover from our homes, but is it necessary?

I've been aware of moisture management for a fair bit of my build. There are paths for water to exit all walls, the floor, etc... Nothing but the exterior roof is fully sealed. All walls and the floor have paths facing aft to drain. The interior wall covering is permeable to allow dray air to get into the insulated area when the heater is running.

I'll keep building small, light, and simple. Looking for a reliable easy to maintain toy to enjoy the world and nature. Not a tech-laden hideaway to watch the game while I park under the trees.
 

Fenderfour

Active member
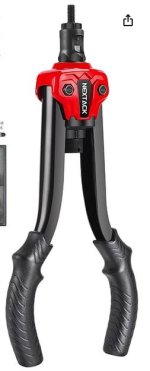
more work this weekend. I added a bunch of nutserts on the interior to mount /waves hands/ stuff. I don't really know what the interior will be, so I wanted to add nutserts in locations where I might want to add something. I had been using a 13" nutsert/rivnut tool and it works well, providing a lot of pulling force, but it was also tricky to operate, required two hands, would strip the insert if it wasn't adjusted correctly, didn't provide an 'feel' when using, etc... So I switched to a smaller tool and it's much better. I'm guessing there is a size of nutsert that requires the larger tool, but I'm getting up to 6mm and the small tool is working great.

Bignutsert.JPG
Here's the large tool I see a lot of youtubers and other DIY folks recommending. There are lots of manufacturers, they all seem about the same.

smallnutsert.JPG
Here's the tool I switched to. Easier to use for small inserts, more clearance for tight areas, etc... I'm also installing aluminum nutserts into aluminum and I can feel when it's compressed. The larger tool had to be carefully adjusted or I would pull the threads out of the insert, then have to drill i tout, etc...

Also added some carpet padding on the floor in the form of the cheap 1/2" Harbor Freight fatigue mats. At about $0.60/sq ft. It's hard to beat.
 

Fenderfour

Active member
Dry weather in Seattle meant time to work on the truck.

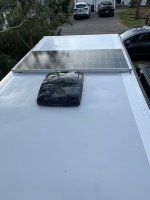
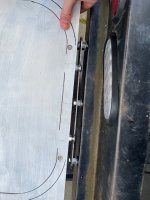
There is a lap joint between the ACM and the diamond plate corners on the roof of my camper. It's got a reasonable amount of 5200 marine adhesive and sealant up there, but I wanted another layer. On friday I scrubbed the roof and saturday I applied a line of RV roof repair tape along the seam. You can see it in the photos below. It's a belt-and-suspenders thing, but I feel better about it.

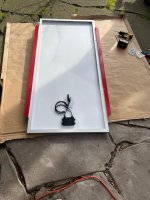
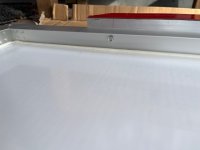
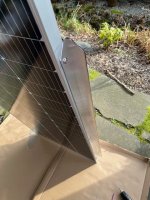
I also installed the rigid 200W solar panel that came as part of the ACOPower system i purchased on indiegogo. The panel is pretty standard fare. I thought I was going to need to build racks and screw it to the roof, but FarOutRide shows VHB on the Z-clips for mounting, and it's been plenty strong for them. I wanted a little more area, so I created 48" brackets from 1.5" angle aluminum. Those are VHB'd and sealed to the roof (like FarOutRide does for theirs). I drilled into the side of the solar panel and added 5mm Nutserts in 3 places on both sides of the panel. There are screws that go from the brackets into the solar panels to hold it on. Super easy to mount/dismount, only added maybe a pound of weight for mounts.

image3(14).jpeg
Bottom of the panel, brackets attached, red is release film for the VHB

image2(15).jpeg
Backside look at the aluminum nutsert in the solar panel

image1(22).jpeg
front side of the panel showing the bracket

image0(33).jpeg
lots of roof, a little bit of solar. You can also see the RV roof tape along the edges.

I put the solar on the front side of the roof because it was more difficult to close the front side of the pop-up. This extra weight makes it easier now. The panel isn't hooked up to anything. I do have an all-in-one mppt, inverter, and ac/dc charge unit, and a 230Ah LifePo battery, but I'm not sure where I'm going to mount it in the camper, so that's on hold for now.

Last week I took my truck out for camping and it was a bit bouncy. I hypothesized it was due to increased spring rate in the front (i installed heavy duty torsion bars from Sway-Away) pushing the load into the stock leaf springs in the rear. I think the HD torsion bars have 60% heavier springs?

I usually look at possible causes of an issue and then look at possible fixes and start with the cheapest/easiest to start. RRuf suggested some new shocks might help, but that's a trial and error to find the right fit, and expensive. I thought maybe balancing the spring rate forward and aft would work. I looked in to custom spring packs, and like the shocks, there is a lot of trial and error and a lot of $$$. I did some measuring on my leaf stack and realized it was very similar to the old Toyota Pickup (pre-tacoma, pre-T100). Lots of companies have add-a-leaf kits for these trucks, and I found one that was on sale for $60.

I spent four hours, a can of PBlaster, a new set of 1/2 drive impact sockets, and one broken flex head ratchet to get the new leafs installed on sunday. I took the truck for a spin, and it was great. The truck isn't plush by any means, but the bounce was gone. It felt more like the original truck.
 

allochris

Adventurer
How's the turbo project going? My oil pan is unbolted for installation of the turbo drain tube adapter, but currently stuck above the lower crossmember. Looks like I need to unbolt & lower the whole lower half of the front suspension cradle about 4" to allow the oil pan free. Do you have a similar setup as my 02' Dyna?
 

Fenderfour

Active member
How's the turbo project going? My oil pan is unbolted for installation of the turbo drain tube adapter, but currently stuck above the lower crossmember. Looks like I need to unbolt & lower the whole lower half of the front suspension cradle about 4" to allow the oil pan free. Do you have a similar setup as my 02' Dyna?
There's an installation video from HD Automotive. It's not all the same stuff as our trucks, but it's a good stating point. They do show needing to drop the diff to get the oil pan out.

I've been doing a lot of thinking about the installation, looking at the build thread at iH8Mud, and a few other sources.

I didn't like how the guy on IH8Mud crammed a cone filter on the end of the turbo. I want a better solution. I've been trying to find a way to make a reasonable air intake work on the right side, and I'm coming up with nothing. I also don't understand why he's using such large tubing. 3" is overkill and makes the packaging more difficult than it needs to be.

My current plan:
Route intake air from the existing airbox, sending tubing forward to the frame member and up through a gap between the radiator and frame then in to the turbo inlet.

Route pressurized air to the engine by going in front of the engine, between the radiator fan and the belt covers. This will probably be oval tubing. The pressurized air can then drop on to the existing intake manifold.

The IH8Mud thread mentions modification of the shift linkage to get the 3" dump pipe on the turbo. I'd rather not mess with it, so I got a 2.5" pipe and flange to make my own dump pipe. It's considerably smaller than the 3".

I also need to modify my current exhaust manifold (I think...) The IH8Mud thread shows the turbo in the middle position, between cylinders 2 & 3. Mine has the turbo between 1&2.

My first-draft doesn't have an inter-cooler. If I add one, it will be a side-mount with fan installed near my battery.


In theory there will be a bit of lag with all the piping. I don't think it's a big issue since I'm not racing anyone in the truck, and the whole system just get pressurized and the engine breathes from the supply. There's no blow off valve to reset the pressurization process on these old diesels.

Where I'm at:

I've lined up someone who can help with the tig welding. I've never learned and don't want my first welds to be oil return or exhaust parts under my butt.

I'm waiting for dryer weather in Seattle to get started on the installation since I'm working in my driveway.
 

allochris

Adventurer
There's an installation video from HD Automotive. It's not all the same stuff as our trucks, but it's a good stating point. They do show needing to drop the diff to get the oil pan out.

I've been doing a lot of thinking about the installation, looking at the build thread at iH8Mud, and a few other sources.

I didn't like how the guy on IH8Mud crammed a cone filter on the end of the turbo. I want a better solution. I've been trying to find a way to make a reasonable air intake work on the right side, and I'm coming up with nothing. I also don't understand why he's using such large tubing. 3" is overkill and makes the packaging more difficult than it needs to be.

My current plan:
Route intake air from the existing airbox, sending tubing forward to the frame member and up through a gap between the radiator and frame then in to the turbo inlet.

Route pressurized air to the engine by going in front of the engine, between the radiator fan and the belt covers. This will probably be oval tubing. The pressurized air can then drop on to the existing intake manifold.

The IH8Mud thread mentions modification of the shift linkage to get the 3" dump pipe on the turbo. I'd rather not mess with it, so I got a 2.5" pipe and flange to make my own dump pipe. It's considerably smaller than the 3".

I also need to modify my current exhaust manifold (I think...) The IH8Mud thread shows the turbo in the middle position, between cylinders 2 & 3. Mine has the turbo between 1&2.

My first-draft doesn't have an inter-cooler. If I add one, it will be a side-mount with fan installed near my battery.


In theory there will be a bit of lag with all the piping. I don't think it's a big issue since I'm not racing anyone in the truck, and the whole system just get pressurized and the engine breathes from the supply. There's no blow off valve to reset the pressurization process on these old diesels.

Where I'm at:

I've lined up someone who can help with the tig welding. I've never learned and don't want my first welds to be oil return or exhaust parts under my butt.

I'm waiting for dryer weather in Seattle to get started on the installation since I'm working in my driveway.
That's good stuff. I have to look up how different layout the engine components of our Dynas are. I also have a draft plan of where everything goes, but I dont want to hijack your post. Once I get some photos of it all I'll post it onto my existing Allochris camper thread, that way we can compared our approaches as we build it all out. I think we are both about on the same pace on the turbo build, which is very slowly as I'm slowly collecting all the bits & pieces parts, and also crawling over wet thawing dirt ground...a very weather & time dependent project!
 

Forum statistics

Threads
188,760
Messages
2,909,981
Members
231,075
Latest member
Mikenm
Top