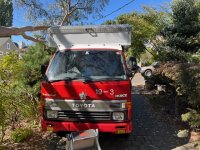
1993 HiAce Firetruck Build Thread

Fenderfour

Active member
Whats your top speed now? Can you maintain speed up hill better now that you re-geared the axles?
Top speed is 70 ish. Going up hill requires a down shift to 4th with the weight of the camper back there. Before I added all that weight, she did ok uphill in 5th. Still not fast, though. I'm slowly working on adding a modest turbo kit (7psi) to recapture the un-burned fuel and get a little more power.
 

workingman1

New member
Top speed is 70 ish. Going up hill requires a down shift to 4th with the weight of the camper back there. Before I added all that weight, she did ok uphill in 5th. Still not fast, though. I'm slowly working on adding a modest turbo kit (7psi) to recapture the un-burned fuel and get a little more power.
I've got a 95 with a 3L Hiace , drove it back from Denver to Austin and man everytime i hit an incline it slowed to 30 miles per hour. Trying to figure out if the gear swap or a turbo should be the first step. I just want to maintain a minimum of 60 mph on the highway
 

Attachments

  • 20250519_180712.jpg
    20250519_180712.jpg
    3.7 MB · Views: 11
  • 20250519_180652.jpg
    20250519_180652.jpg
    2.5 MB · Views: 11

Fenderfour

Active member
spent a bunch of time getting electrical installed last week. It feels like this shouldn't take very long, but then you get started...

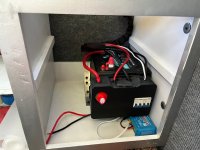
My battery is on the floor of the galley cabinet, all the way forward in the camper to help with weight distribution. Its a 230aH 12v battery from ACOpower. They aren't well known but have a number of other consumer products that are doing fairly well, so i took a chance on their battery kickstarter. They hosted a free battery giveaway during the kickstarter, and I won it, so this battery cost me nothing. Every now and then you get lucky.

image1(26).jpeg
The battery has attachment points for bolted brackets, so I used them to attach it to the cabinet. The kill switch is in a Tanos MiniSystainer that is velcroed to the battery. I cut out the front panel and cut a new one from 1/8 ABS. Clearly, the new panel has openings for the main battery cutoff and a couple of breakers to isolate my PV array. One breaker is for the 200w panel on the roof. The other is connected to an Anderson Connector out the side of the camper so I can plug in a portable PV panel. I figure I'll be parking in the shade when I can, but will still need some solar.


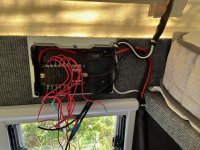
This is my 12VDC mains box. Here i've just gotten the feed from the battery hooked up. Same as the other box, a Tanos Systainer with the front cut out and a custom ABS panel glued on to house switches. This box houses a 100A main fuse for the 12VDC panel, and a 12 gang fuse box with negative bus from Blue Sea.

image2(19).jpeg

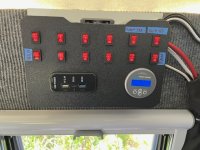
The front of the panel looks like this, a Vicron battery monitor, a USB charger and switches. I'll make better labels later.

image0(39).jpeg
 

Fenderfour

Active member
I've got a 95 with a 3L Hiace , drove it back from Denver to Austin and man everytime i hit an incline it slowed to 30 miles per hour. Trying to figure out if the gear swap or a turbo should be the first step. I just want to maintain a minimum of 60 mph on the highway
I'm beginning to think the 3L is lower power than the 2L in spite of more displacement. I have friend who has a 3L in a van and it's super slow, especially up hill.

I don't know what your experience is with driving these old NA diesels, but you can't put it in 5th and push harder on the pedal. If the engine bogs, the fuel doesn't produce power, its just turning into soot out the tailpipe. Try to keep the engine around 3k rpm and shift to keep the engine breathing well. That probably means down-shifting up hills and doing 45 mph.

Re-gearing will make your uphill speed worse, it only helps in the flats where you are running out of RPMs. It does mean that you run out of HP sooner, so more downshifting.

More power can come from a turbo kit. Folks in Australia have been adding them to these NA diesels for years. HD Automotive has one. Their kit is for a hilux and it won't fit on our engines out of the box. There is a fair amount of work getting it all packaged correctly. There is a thread on IH8Mud on fitting a turbo to a toyota firetruck.
 

Fenderfour

Active member
More (modest) progress!

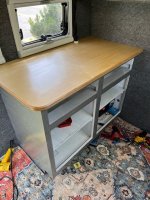
image0(40).jpeg

Got the counter top attached. I hoped to get a slab of bamboo plywood for a counter, but no one near me has any. this is 25mm baltic birch plywood with 5 light coats of polyurethane finish.

The wire run for the 12VDC loads box is just to the right on the right of the window. It passes through a hole in the counter that's got a PVC coupler (little white bit) to protect it at the transition and create a barrier to spills on the counter. I'm choosing to keep the wiring out of the wall to simplify the build. Individual runs will be attached to the carpeted walls using velcro. I'm not 100% confident on the final wiring layout, so this allows some flexibility.

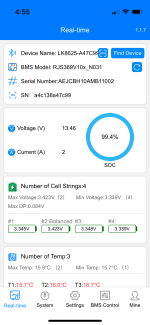
I also turned on the system. This is the readout from the app provided by ACOPower. Bluetooth monitoring is built in to the battery. The 12VDC mains box didn't work, and I think I know why. The solar input worked great. I was getting 2amps from my dirty partially shaded panel late in the day. 2A doesn't seem like much, but the panel maxes at 8 amps.

image1(1).png
 

Fenderfour

Active member
I sorted out the issue with the 12VDC mains panel. Each switch has a three pins: source, load, ground. The ground pin is to operate a built in LED. I have all the grounds chained together back to the negative bus on the blue sea fuse box. When I first powered up, the ground chain wasn't on the ground pin, so I made a direct short. The 3amp fuses on the three circuits saved my equipment. I moved the ground chain, replaced fuses and now it all works. Feelin pretty good.
 

Fenderfour

Active member
I took the truck to a music festival last weekend. Man, people love this silly thing. Lots of thumbs up on the highway, etc... Folks would come into my camp to talk about it. More and more people have heard about HiAces and are curious. Adding the TRD stripes tells all the car people that it's a vintage Toyota and they always have questions.

it rained 1/2" on Friday night. I had 15 people crammed in the 270 degree awning (with walls), hanging out as the rain came down. we kept everyone warm and dry with a Mr. Heater and had a good time in spite of the downpour. The pop-up canvas was water tight, and no leaks from the roof. All in all, I'm counting it as a win.

The power system worked great. The whole weekend was cloudy and we camped in the trees, so solar generation was negligible. Running the fridge and the lights for 3 days only took up 10% of the battery. Paying extra $ for the efficient fridge will pay off in the long run.
 

Fenderfour

Active member
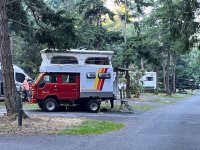
Took the weekend before the 4th to have some unstructured time with friends at Larrabee State Park in Bellingham, WA.

image2(20).jpeg

Its a state park, so the camping is a bit cramped, but they have hot showers which is pretty cool, and unlike almost all the dispersed camping sites in WA, there is ample access to a beach.
image0(43).jpeg

My 14' long truck looked pretty silly sitting in a row with monster RVs, trailers, and sprinter vans.

image1(28).jpeg

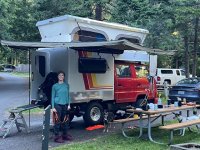
The 270 awning is pretty great. So easy to put up and extends the usable space.

image0(42).jpeg

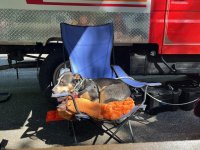
even the dogs like it.

Keeping the dogs tied to the truck made deploying the folding table nearly impossible. I'm working on a fold-down table that will hang off the side of the truck. I'll probably make a aluminum frame and use more Coosa board for the table top. This time with a formica cap.

Taylor Shellfish Farms is just down the road from the park, and it's a pretty great stop if you like oysters. They are located in an old shucking shack right off the oyster beds. It's an amazing view, and just a great time. High-end food in a rustic and gorgeous spot.

image1(29).jpeg
 

Fenderfour

Active member
Some house projects have slowed down my progress on the truck this summer. I was really hoping to have the ceiling insulated and the turbo installed. Unfortunately, I found some water damage on my house as I was prepping for paint, and that turned into a pretty epic side quest.

The delay has given me time to consider other options for the turbo. I was planning a traditional installation, not too unlike this installation documented at 1H8Mud. The more I think about it, the more I think I'm going to shift to a remote turbo installed just behind the engine.

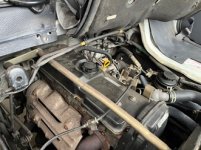
Engine Bay.jpg
View under the driver's seat, the gold pipe is a shift linkage that runs fore-aft, you can see the exhaust manifold shielding on the lower left of the picture. Throttle cable runs right-left under the shift linkage

There's just not much space under the driver's seat. Shift linkages crisscross the area a turbo would normally sit on the manifold. This also packs a bunch of heat into an already poorly cooled space. If you look really closely at the lower left corner of the picture, below the exhaust manifold shielding, you can see some light. There's lots of space just aft where the exhaust downpipe connects the main exhaust run.

so... I'm thinking about keeping the current exhaust manifold, adding an EGT gauge in the sweet spot and putting the turbo just behind the engine, more in line with the exhaust routing. I would use the same oil port coming off the engine to lubricate the turbo. The issue is getting oil back into the pan. This is where remote turbos have to compromise. I'll need to add a small sump and a scavenging pump to push the oil uphill to the pan. There's a small possibility that I can keep the turbo above the pan and allow gravity to return it, but I'm not optimistic.

This set up will increase turbo lag just a bit, as there is more tubing between the hot exhaust and the impeller, but I'm not making a racecar. I just want a little more power for uphill.

Still a lot of design to do. Not really sure where/how this will shake out.
 

Fenderfour

Active member
Spent some time holding the pop-can turbo up in different places under the truck yesterday. I had hoped to put the turbo just behind the engine, but that space contains shift linkages going back to the side shifting transmission. Maybe I should swap to an automatic...

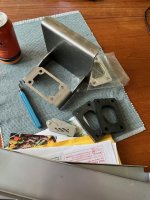
Anyway, The best spot seems to be on the right side just aft of the cab a few feet from the engine and just before the current muffler. I can tuck the turbo up high enough that it won't get hit by anything and allow some modest depth for water crossings. There are five reasonably well placed lateral holes through the frame that I can use for a bracket. I mocked up a simple bracket in cardboard. I'll probably refine it in plywood to see how well the turbo fits before ordering parts from Send-Cut-Send.

There is an opportunity to build a large airbox near the turbo. This would significantly simplify the piping. I could also add a snorkel, because I like snorkels. Not sure if that's my plan, or if I will use the stock airbox that is just forward of the air intake on the left side. The stock intake has a cool snorkel-like feature. There is a lever that will redirect air intake from outside near the engine to inside the passenger cabin. This is to help in dusty environments and water crossings. It is kinda noisy.
 

Fenderfour

Active member
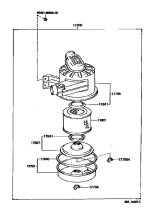
The stock airbox on my truck is actually really good. It incorporates some cyclonic dust separation and big filter element. Not sure I'll be in a hurry to get rid of it. Looking at the parts online, it seems like I could just... relocate it. It's a (mostly) self-contained metal drum.
Airbox.jpg

It looks like something off a tractor...

I can also leave the airbox where it is (forward left of the engine) and run pipes aft to the turbo. In theory, all of the standing air in the tubes becomes mass the engine/turbo has to move. So it's not a great thing, I'm just not sure how much it really affects anything. I'll do some tubing estimates and some math to calculate the mass of air being moved, and the energy required. If i move the airbox I could put a snorkel on the back. It's not rational or useful, but I'm a big fan of snorkels. And yeah, the snorkel adds tubing that adds air mass that has to be moved, etc... probably a similar amount to leaving the airbox in the stock location.

I was considering the nature of engineering over the weekend (again), focusing on amateur engineering, like building a DIY camper. People who are low on money tend to underbuild their structure/system, etc... I think the reasons are obvious. Stuff costs money and the right-er the stuff, the more it tends to cost. People with money tend to overbuild. This is a little trickier, I think. I think some of this os for the Farkle; to have functional sparkle that might not really serve a purpose in a given use case. My snorkel is a good example. I just want a snorkle. I don't need it, but it's cool. The other reason is more related to why people without money underbuild. Those folks don't know that their build is under specked, and the folks with money don't know their build is over-specked.

I talked with an acquaintance about building a custom flatbed for a new project. His plan was to use 2x4x 5/16 steel for 8 lateral supports along an 8 foot span. I did a quick beam analysis on one member using the entire proposed camper weight and found .04" deflection, now divide that across 16 supports, and it's clearly overbuilt. Not by a little, but by quite a lot. This doesn't pose a large problem, but it does effect the overall build and if a design philosophy trend to overbuilding, you will end up with a heavy truck.

This all gets back to what engineering is. It's making a series of compromises based on a set of constraints to meet a set of product or system goals. No decision is clearly good or bad, but almost all decisions have effects on other aspects of the system or product. Clearly establishing the system/product goals up front and using data and analytics to understand the compromises are what makes 'good' engineering.

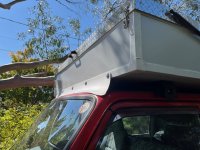
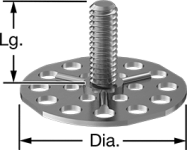
In other build news, I added a rubber flap over the back of the pop-up where the top meets the camper body. I could see where water would run in if I parked on a grade and didn't want the hassle. I also added some bond-on studs to the front of the camper to install a wind dam between the truck cab and the camber overhang.

Bonded studs are an interesting option if you understand your loading and bond strength of your chosen adhesive.
Stud.png
 

Forum statistics

Threads
190,281
Messages
2,925,917
Members
233,643
Latest member
4xCoffee
Top