1x1_Speed_Craig's utility/camping trailer build_v2.0

Andy G

Adventurer
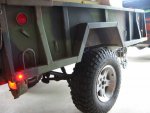
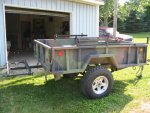
My LJ does OK with it. It weighs ~600 lbs. more than my old M416, but the added utility more than outweighs the trade-off with the extra weight. I like it 100% better than the M416 (for my purposes).

I will also say that you can notice a lot of wind drag when the sides/canopy are on it. With an open trailer, it pulls much nicer, as you'd expect (since the covered trailer has the aerodynamic efficiency of a brick).

Craig

Thanks for the reply!

Andy
 

1x1_Speed_Craig

Active member
Well, I repurposed some Jeep parts I had laying around, and installed a spare tire mount & tire on the M101A3 this morning.

The mounting holes for an OEM TJ spare tire mount are perfectly spaced to bolt to two of the hat channel/crossmember pieces on the underside of the tub (actually, it's VERY thick crossmember material). I just had to drill & tap a total of 4 holes in the crossmembers, and bolt it up. I used some 5/16" bolts recycled from a Jeep CJ, and used some blue Loc-Tite. I then mounted an OEM Grand Cherokee donut spare (27" diameter). The spare only hangs below the tongue rails about 1/4", so it's tucked up nicely. Obviously, a smaller-diameter XJ donut spare would work, as well.

NOTE: A full-size spare may run into clearance issues, depending on the size. There's 28" between the front & 2nd crossmember, BTW.

I originally wasn't going to mount a spare, and rather just use the spare from my Jeep, if needed. However, the parts were free, and I thought it would be a good idea to have a spare if I loaned the trailer out to a friend.

Craig

attachment.php
 

Attachments

  • m101a3_spare_tire.jpg
    m101a3_spare_tire.jpg
    100.9 KB · Views: 1,196

m101a3

Observer
Axle Questions

Looks good, and I've started the process of making an M101A3 suit my needs as well.
Sorry for the rapid fire questions:
1. What are the dimensions of your new axle (between spring centers, and hub face to hub face), did you have to get it custom made?
2. Do you think there is enough clearance to mount the axle *above* the springs?

Thanks, and keep us posted with your progress!

trailer-rear.jpg
 

1x1_Speed_Craig

Active member
Looks good, and I've started the process of making an M101A3 suit my needs as well.
Sorry for the rapid fire questions:
1. What are the dimensions of your new axle (between spring centers, and hub face to hub face), did you have to get it custom made?
2. Do you think there is enough clearance to mount the axle *above* the springs?

Thanks, and keep us posted with your progress!

trailer-rear.jpg

  1. 62" WMS-to-WMS, plus 2" spacers on each side. I'm not sure about the spring perch measurement - they're at the stock width.
  2. I'm not sure about that. My first inclination is to say no, but I didn't try either.

Craig
 

MIhunter

New member
I just did an axle swap on my M101A1. I ended up with a #5200lbs axle from abc trailer that had 43.25in spring perch centers with 66in hub face. It fit perfectly. Hub distance was spot on
 

1x1_Speed_Craig

Active member
I took the day off today to take care of some errands, and work outside a bit. It was nice to work out in the sunshine. :victory:

I started working on the tongue box, and a more permanent wiring solution for the trailer. I picked up a Pollak 7- and 4-Pole Trailer Connector Socket to mount in the face of the box, and will have one each 7-round and 4-flat removable "jumper" cables to run between the trailer, and the tow vehicle(s). Also inside the tongue box is a wiring junction box (terminal mounts) where everything will converge. The trailer wiring enters the rear of the tongue box from underneath.

The Pollak plug is a actually a vehicle-side plug, so it uses trailer-side plugs on both ends of the jumpers. Install was simple, as the plug came with its own mounting bracket, which I used as a template to scribe the (odd-shaped) mounting hole. I just used a mix of 4 1/2" grinder, and Dremel tool to slowly cut out & shape the hole for a perfect fit. The plug just snaps in.

Once I get all holes drilled and everything test-mounted up inside, I'll remove it all to prep & paint the storage box.

Craig

attachment.php


attachment.php


attachment.php
 

Attachments

  • IMG_6061.JPG
    IMG_6061.JPG
    74.2 KB · Views: 1,132
  • IMG_6062.JPG
    IMG_6062.JPG
    55.1 KB · Views: 1,133
  • IMG_6063.JPG
    IMG_6063.JPG
    59.1 KB · Views: 1,125

Calilove1

Jeep & Camping Enthusiast
M101a1

Keep the updates coming.... I love it.

I've got lots of planning to do on my new M101A1. So far I'm thinking an axle swap to run stock wheels is awesome as I can't seem to find spare rim/tires anywhere for it as is.

I can't do the tongue box because the rear door of my JK wouldn't be able to be opened so I can't go that route.

I'd love the AT coupler too but not sure I'll venture to do that part quite yet.

Anyway... keep up the good work. :drool:
 

1x1_Speed_Craig

Active member
I finally wrapped up the install of my tongue storage box. I initially ran into some issues with the Eastwood primer, as I started the work while it was still too cold (70-90 degrees is recommended). I wanted to test the Eastwood paint on a small project before using it on my daughter's XJ. Overall, I like the stuff. I used Eastwood Chassis Black Primer, and then Extreme Chassis Coat Black.

attachment.php


The inside was fully painted with Eastwood paint, then finished with 3M Rubberized Undercoat. I had some rework here, too. If you use the 3M undercoat, be sure to spray into the air for a couple seconds to clear all of the trapped solvent out of the tube. I remembered running into the same thing with my old Scrambler tub (I used 3M Rubberized Undercoat on teh bottom of the tub), but only after spraying it into the corner of the box. I ended up with a puddle of brown solvent that didn't fully cure, so I reworked it after it was mostly dry. It's expensive stuff...you DON'T want to do rework with this stuff.

The wiring junction box ended up making for a very clean install. I had welded a couple threaded rods on the inside of the box for mounting wiring loom clips.

attachment.php


Beauty shot :cool:

attachment.php


And here it is hooked up (with the 4-flat jumper cable) behind my girlfriend's 2011 JK. I wired up both 7-round and 4-flat "jumper" cables, depending on what set-up the tow vehicle has.

attachment.php
 

Attachments

  • wiring_junction_box.jpg
    wiring_junction_box.jpg
    74.7 KB · Views: 976
  • trailer_with_box.jpg
    trailer_with_box.jpg
    171.7 KB · Views: 981
  • tongue_box_inside.jpg
    tongue_box_inside.jpg
    91.2 KB · Views: 975
  • jk_with_trailer.jpg
    jk_with_trailer.jpg
    178.6 KB · Views: 982

1x1_Speed_Craig

Active member
With the help of my daughter, Mira, I just wrapped up installing my LED side marker lights. :)

Craig

attachment.php
 

Attachments

  • led_marker_lights.jpg
    led_marker_lights.jpg
    90.6 KB · Views: 915

1x1_Speed_Craig

Active member
Now with 2" rear receiver hitch. I may gusset it a little, but there really won't be any substantial weight on the rear.

Craig


attachment.php


attachment.php
 

Attachments

  • receiver_hitch_2.jpg
    receiver_hitch_2.jpg
    106.9 KB · Views: 804
  • receiver_hitch_3.jpg
    receiver_hitch_3.jpg
    145.9 KB · Views: 798
Last edited:

yeler

Observer
1 big word followed by a bunch of others

AWESOME love the build nice work

but page 2 & 4 had no pictures so if you can keep that from happening again we all would be grateful LOL
 

1x1_Speed_Craig

Active member
1 big word followed by a bunch of others

AWESOME love the build nice work

but page 2 & 4 had no pictures so if you can keep that from happening again we all would be grateful LOL

Thanks yeler. Much appreciated.

My goal was to do a slow build with sensible upgrades. I feel like I have succeeded at both. :sombrero:

Craig
 

yeler

Observer
its great just remember pictures keep us interested LOL JK
the bike rack on the back is great now I see why people put a rear hitch on keep us posted


Dave
 

1x1_Speed_Craig

Active member
If it's photos you like, here are some of the other projects we have going on currently. My 11-year-old daughter Mira & I are building her a '93 Jeep XJ 2-door. She's paying for 1/2 of the build, and is doing much of the work. We have 95% of everything we need, and are into the whole project for only $262. :victory:

Specs are a 4.0L/AX-15/NP-231, Dana 30/Dana 44, 31" BFG KM2s, Ravine wheels, etc.

Craig
 

Attachments

  • floorpan_half_done.jpg
    floorpan_half_done.jpg
    129.7 KB · Views: 75
  • d44_diff_cover.jpg
    d44_diff_cover.jpg
    81 KB · Views: 66
  • mira_dremel_2.jpg
    mira_dremel_2.jpg
    72.4 KB · Views: 91
  • floorpan_cutout.jpg
    floorpan_cutout.jpg
    72.3 KB · Views: 68
  • test-fitting_31s.jpg
    test-fitting_31s.jpg
    95.5 KB · Views: 80

Forum statistics

Threads
186,702
Messages
2,889,113
Members
226,872
Latest member
Supreet.dhaliwal
Top